- Posts
- 14,902
- Location
- Doncaster
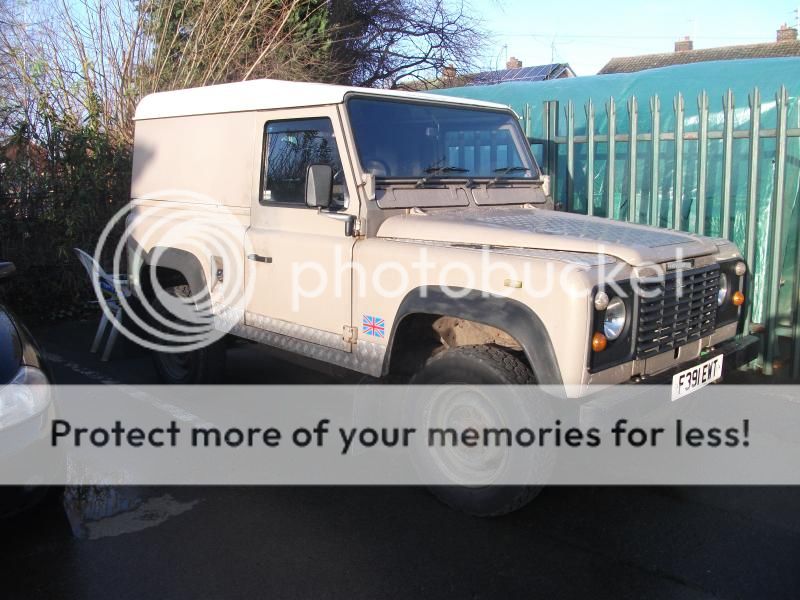
When I bought it ..
What it looks like now ..
Right now it still has a 19j (2.5TD) engine in, but I'm stripping out my old 300Tdi Disco engine and gonna use that. It already has Disco axles front and rear, Adrenaline trailing arms, +5" rear shocks with +2" springs and all new bushes etc. It has reverse mount (Spring bolted to Chassis) re-locators, +2" front shocks and springs, home made rocksliders, home made front bumper, rebuilt Warn M8000 winch. A Discovery light bar with 4 spots, properly angled for night laning, 235 x 85 R16 Malatesta Kobra tyres .. feckin' awesome for the cost .. HD steering bars, with a new Disco steering drop arm, Timken bearings all round, breathers all round. Home made dog guard and rear 'camping stuff' shelf, which also helps keep recovery gear, tools and fluids neat, tidy and in their places. I fitted my Disco Southdown snorkel, and found it works .. I also know the 90 doesn't float so no dramas crossing deep water now .. I hope ..")
Lots of other stuff to try and make it more reliable offroad, like decent winch wiring, battery isolators, new 1000CCA 90AH battery, fluids changed every two months,ish (with my money that's about every two laning trips!) New props front and rear. Just due to check all the wheel bearings, the last run out showed the brakes fading after running over very bumpy terrain, which points to a loose bearing.
Inside I run a Tesco Hudl with MMTracker app using Memory Map (Ordnance Survey) maps in both 1:50k and 1:25k, with an ipod connected to the radio 'cos the radio's crap. I have a camera mount bolted to the dash and use a cheap Fujitsu J37 (I think) for any videos or pics I take when laning.
The heater doesn't work, I recently replaced the matrix (one pipe had fallen off) but still no joy .. so will use a 12v (caravan) halogen heater when it's cold enough for now, but I'm hoping the engine transplant might fix this .. especially if I use the Disco heater setup .. dunno yet how I'm gonna do this though!
Future plans after getting the 300 engine fitted and running ..
Swap the +2" HD springs (2nd hand and all I could afford at the time) for much softer sprung +2" or +3"s, the ride is a tad harsh even when full. I want to move the remote winch receiver from inside the fusebox into the roof for better reception .. it only works when about 3' from the vehicle. Similarly the cb needs moving to the roof .. bought it brand new last time I went to Salisbury Plain and whilst it works well, it's been getting full of mud every time I leave a window open and won't last long!
I have a worklight to fit, an interior light, some sound dampening pads and it could do with the bits of bodywork I've fixed being painted the 'real' colour instead of red oxide or primer grey! I also want to remove the inner wings, the bottoms of which are rotten and likely to become a liability, the door bottoms need fixing, and I'd like at some point to remove the whole body to properly clean and check the chassis. Most of it is sound, but there are a couple of 'iffy' bits that would be easier to fettle with the body off ..
All in all it's effectively a toy, the only miles I do on the road are local scrap runs when I have a trailer full, round to TC's workshop and then wherever we're going laning to!
Mostly though it's mine, I keep making bits for it with the aim of improving reliabilty and off-roadability and I love it ..
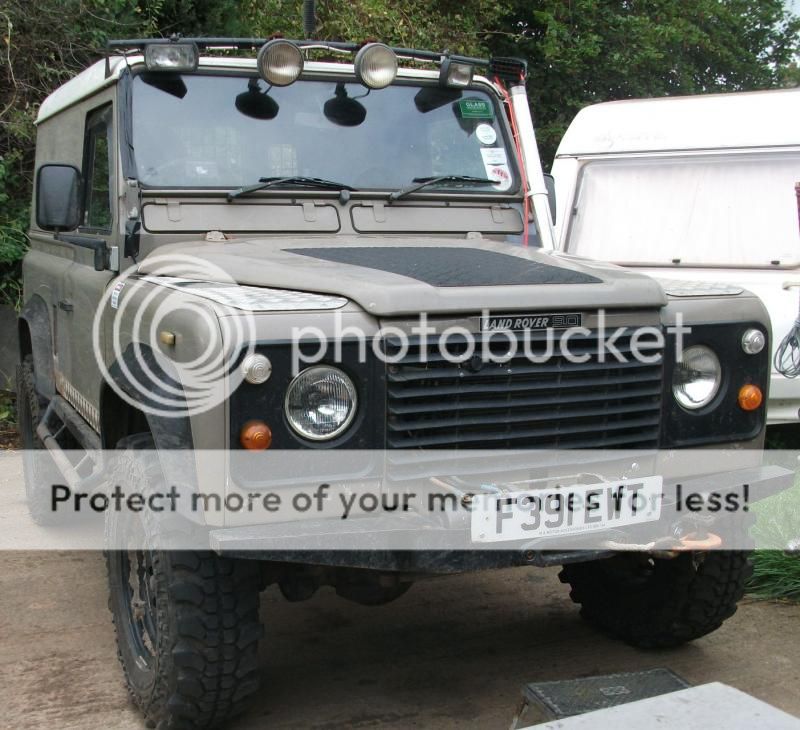
What it looks like now ..
Right now it still has a 19j (2.5TD) engine in, but I'm stripping out my old 300Tdi Disco engine and gonna use that. It already has Disco axles front and rear, Adrenaline trailing arms, +5" rear shocks with +2" springs and all new bushes etc. It has reverse mount (Spring bolted to Chassis) re-locators, +2" front shocks and springs, home made rocksliders, home made front bumper, rebuilt Warn M8000 winch. A Discovery light bar with 4 spots, properly angled for night laning, 235 x 85 R16 Malatesta Kobra tyres .. feckin' awesome for the cost .. HD steering bars, with a new Disco steering drop arm, Timken bearings all round, breathers all round. Home made dog guard and rear 'camping stuff' shelf, which also helps keep recovery gear, tools and fluids neat, tidy and in their places. I fitted my Disco Southdown snorkel, and found it works .. I also know the 90 doesn't float so no dramas crossing deep water now .. I hope ..
Lots of other stuff to try and make it more reliable offroad, like decent winch wiring, battery isolators, new 1000CCA 90AH battery, fluids changed every two months,ish (with my money that's about every two laning trips!) New props front and rear. Just due to check all the wheel bearings, the last run out showed the brakes fading after running over very bumpy terrain, which points to a loose bearing.
Inside I run a Tesco Hudl with MMTracker app using Memory Map (Ordnance Survey) maps in both 1:50k and 1:25k, with an ipod connected to the radio 'cos the radio's crap. I have a camera mount bolted to the dash and use a cheap Fujitsu J37 (I think) for any videos or pics I take when laning.
The heater doesn't work, I recently replaced the matrix (one pipe had fallen off) but still no joy .. so will use a 12v (caravan) halogen heater when it's cold enough for now, but I'm hoping the engine transplant might fix this .. especially if I use the Disco heater setup .. dunno yet how I'm gonna do this though!
Future plans after getting the 300 engine fitted and running ..
Swap the +2" HD springs (2nd hand and all I could afford at the time) for much softer sprung +2" or +3"s, the ride is a tad harsh even when full. I want to move the remote winch receiver from inside the fusebox into the roof for better reception .. it only works when about 3' from the vehicle. Similarly the cb needs moving to the roof .. bought it brand new last time I went to Salisbury Plain and whilst it works well, it's been getting full of mud every time I leave a window open and won't last long!
I have a worklight to fit, an interior light, some sound dampening pads and it could do with the bits of bodywork I've fixed being painted the 'real' colour instead of red oxide or primer grey! I also want to remove the inner wings, the bottoms of which are rotten and likely to become a liability, the door bottoms need fixing, and I'd like at some point to remove the whole body to properly clean and check the chassis. Most of it is sound, but there are a couple of 'iffy' bits that would be easier to fettle with the body off ..
All in all it's effectively a toy, the only miles I do on the road are local scrap runs when I have a trailer full, round to TC's workshop and then wherever we're going laning to!
Mostly though it's mine, I keep making bits for it with the aim of improving reliabilty and off-roadability and I love it ..