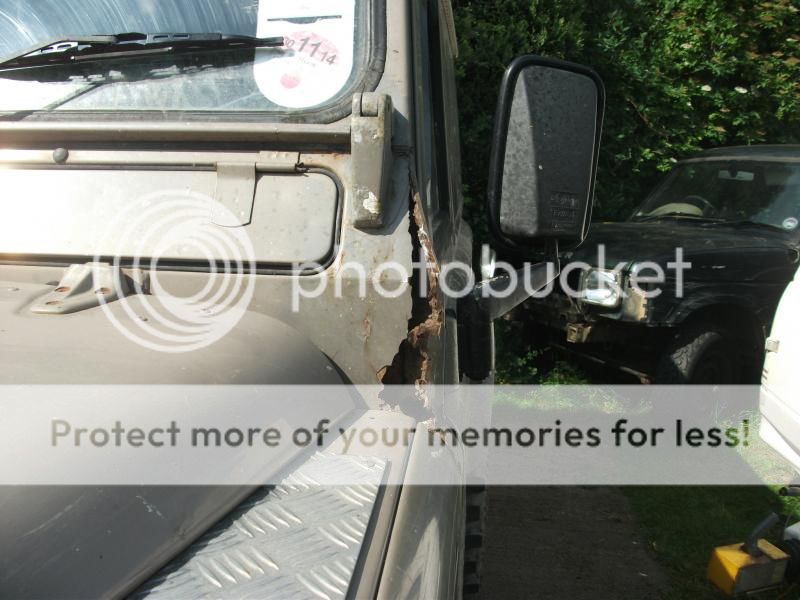
My new (old) Defender .. ;)

This site contains affiliate links for which LandyZone may be compensated if you make a purchase.
This morning went out and drove a couple of tracks I did last weekend, for a direct comparison, the difference is quite amazing! OK, it's rained a bit since so the ground is softer, but not on the farm tracks. The 90 now floats along compared to bouncing all over!

I filled the rear up with the stuff I usually carry for laning, all except camping gear and food, and it now all just works!

Happy .. ;)
 
This is something I need to look at. Mine's a 110 and the rear springs are far too hard - without any load at any rate, which is 99% of the time. I presume hard springs help for towing stability also, but it's not like I do much of that either.

How difficult is it to change the springs - I've never really done anything with the suspension.

That's the predicament i find myself in, do you still have the mitary XD springs?
 
Rears are easy, fronts a little less so, but all four only took two hours .. in between a sandwich break and a couple of beers in the sun .. ;)

The easy way for the rears is to jack one corner at a time and remove a wheel, then undo the spring retaining bolts. Use a small (Disco standard is what I use) bottle jack between the axle and rear of the bump stop plate to jack the chassis away from the axle enough so that the spring has room to drop out!! Then manhandle another one in it's place, along with the top rubber shock ring, but loosely tighten the spring retainers on the axle (If you have them, I've modified mine so the springs are captive at the top and dislocate on the axle, see somewhere earlier in the thread). Lower the axle jack steadily whilst guiding the top of the spring and the shock ring/retainer roughly into place, whilst arranging the spring (Mine were slightly bent!) so it fits correctly and when its all good, tighten the retainer bolts fully and release the jack, job done! Well, replace the wheel etc .. ;)

Fronts, similar procedure except we now have a shock inside the spring coils. So, jack one corner, remove wheel, undo bottom shock nut and remove the spring retaining bolts and retainer. Use the jack again between the axle and chassis bump stops to jack them apart until the spring becomes loose enough to move quite easily. With my longer shocks and springs I had to jack the chassis quite high before the shock reached full travel. If you have very long shocks you might be better compressing the shock and holding it compressed somehow. Any way, with the spring and shock loose at the bottom you can manhandle the spring to slide out forwards without removing the top shock mount or shock turret. The shock rubber spacers have enough give, even when fully tightened, to allow the bottom of the shock to move out of it's usual plane of movement forwards just enough to give space for the spring to slide out, with a bit of a heave or twist! With standard shocks and springs it's ridiculously easy, the longer the springs and shocks, the harder it becomes to do this. Replace the spring the same way, but make sure when you're putting the shock back in you get the spacers and washers correctly positioned and have them ready to slip on the shock pin under the mount when you lower the jack steadily. Stop it enough that you can get the bottom washer and spacers on, and the nut, loosely, then keep lowering and tightening the lower shock nut, it can be a bugger 'cos it's very awkward to get to. When the shock is low enough, hopefully the spring is still a little loose to rotate, because you need to re-fit the retainer and it's two bolts. If the springs are long, you obviously need to jack out more, but it is worth doing the retaining bolts up as soon as you can such that the spring is retained properly. Have a good look that the top of the spring is seated properly, otherwise you'll get a loud bang or twang the first bump you drive over when it re-seats itself! Lower the jack, wheel on, job's a good 'un .. ;)

I also took the time to copper grease the retaining plates and bolts, and the rubber spring seats and ends of the actual springs so they move easily when (IF?) I ever want to change them again. It does also stop a lot of banging and twanging for the first few hundred yards when the springs sometimes bed in a little, especially if they're older and have already developed a 'set' from another vehicle.

I should have thought to take pics, sorry!

Have fun ... ;)
 
...lots...

Wow Paul, that's a really comprehenisve write up - thanks for that. The rears sound quite easy (I'm sure it's harder than it sounds). I was imagining that you would have to compress the springs to get them in - I never thought of jacking up the suspension in the way you described.

The front sounds quite complicated, although I'm sure it would make more sense if I looked at the bits for a while. I would not be fitting longer springs, so mine might be easier than it was for you.

That's the predicament i find myself in, do you still have the mitary XD springs?

Yeah, they really are not suitable for everyday driving. The rear end is terrible. The front end probably nearly as bad, but it feels as smooth as silk compared to the rear - at least it has some give in it. I go over a particular speed bump at work and it just feels like there is no suspension at the back end, it's so jarring.
 
Wow Paul, that's a really comprehenisve write up - thanks for that. The rears sound quite easy (I'm sure it's harder than it sounds). I was imagining that you would have to compress the springs to get them in - I never thought of jacking up the suspension in the way you described.

Cheers, no problem .. ;)

The front sounds quite complicated, although I'm sure it would make more sense if I looked at the bits for a while. I would not be fitting longer springs, so mine might be easier than it was for you.

Way easier to do than to describe. Basically when you start jacking the chassis away from the axle you'll see the spring and shock extending, and at some point the bottom 'pin' of the shock will come through the top of the axle shock mount. By this time the spring should also be free, if it isn't just jack a bit more .. ;) When the spring is free it's easy (ish) to manhandle the bottom of it forwards and out, sliding or 'unscrewing' it down the shock and out the front of the axle .. the shock should move just enough to allow this.
 
Wow Paul, that's a really comprehenisve write up - thanks for that. The rears sound quite easy (I'm sure it's harder than it sounds). I was imagining that you would have to compress the springs to get them in - I never thought of jacking up the suspension in the way you described.

The front sounds quite complicated, although I'm sure it would make more sense if I looked at the bits for a while. I would not be fitting longer springs, so mine might be easier than it was for you.


Yeah, they really are not suitable for everyday driving. The rear end is terrible. The front end probably nearly as bad, but it feels as smooth as silk compared to the rear - at least it has some give in it. I go over a particular speed bump at work and it just feels like there is no suspension at the back end, it's so jarring.

Exactly what mine are like.

Think I will find some springs over the summer and follow pauls write up.
Standard springs all round I think
 
don't forget to watch yer brake flexi's when jacking axles away from chassis's !:eek:
think paul may have extended flexi's;)

Very good point, yes, I have +4" flexi brake pipes on !! Sorry ...
 
Move along, nothing to see here!

I'm under orders not to remove the bandage for a few days. Nothing to see anyway, it went in at an angle through the corner of the nail bed through to the bone. All that's visible is a nice neat 4mm hole in the corner.

You'll have to make do with a thumbs up for my new bitch :)

bitch.jpg
 
I know it isn't funny for you but that is for the rest of us mate!

I was quickly cutting some metal up yesterday and nearly cut into my foot with the grinder.. whoops
 
Had a days laning, 120 miles, started 9am finished 3pm ish .. and love it with the smaller, softer springs on!

So much quieter, grippier and just all round better.

Trouble is .. I can now hear the nearside axle end of the trailing arm banging 'cos it needs re-bushing, so that'll be done tomorrow now, small vice, big hammer!

I'm sure the change back to straighter props and UJ's has made it much easier 'cos today it just zoomed up to 65-70 and quiet! I could still hear the radio .. though quiet is a relative term, the extreme tyres do drone a tad .. ;) WHAT!!!!

Driving along at 40 - 50 is lovely, laning at 5 - 20 is smooth and quiet, and I swear there is more grip generated from the softer more compliant suspension, and certainly the steering feels better, a tad less wavery, more precise, exactly as it should be .. ;)

Love it ..

DSC_0014_zpsd3518542.jpg
 
After a weekend Green Laning in Wales with a great bunch of blokes, sons, wives etc, I opened the passenger door yesterday to clear the detritus and it almost fell off ..

NORTWalesJune2014030_zps7d11e5ea.jpg


So I decided maybe something needed doing. I’ve known it was an issue when I bought it, as I knocked off well over £1000 for the ‘issues’ from the asking price, so it wasn’t unexpected .. I'm just glad it didn’t fail on me son Tom ‘cos he was gate bitch all weekend in Wales!!

So out with the tools and made a start ..

Bulkhead001_zps26724947.jpg

Bulkhead002_zps726d5163.jpg


.. and (I also knew about this too) decided that as the wing and inner wing were off then I’d also remove the old rusty floor that they simply plated, riveted, over, but left the old rust behind! .. The outrigger will get more specific attention, it's only (after a quick clean up) a small hole but I'll probably replace as a half top section, the sides being fine.

Bulkhead003_zps37335f06.jpg


... but thought I best start on the door hinge panel.

Bulkhead004_zps9361bc1e.jpg


And came across some reading material …

Bulkhead006_zps55a79caf.jpg

Bulkhead008_zps831f4863.jpg

Bulkhead009_zpsc3c9d0b6.jpg


They did try to use some kind of sealer .. I have little clue what sort it is, but it was set solid enough .. just set solid to rust, not to solid metal.

Bulkhead010_zps75e402ab.jpg


Though this next blob is a mixture of rust, sealer, paper and .. er .. well yeah …

Bulkhead011_zps4115157f.jpg


So set to and cut a shed-load of it out, I already have the repair panels, using a mixture of finesse (angle grinder), percussive maintenance (hammer and chisel) and extreme violence (Much swearing, booting and general frustrated anger) .. ;)

Then rain stopped play … too suddenly for the grinder as it let some, but hopefully not all, the magic smoke out. I'll take it indoors and see if it won't dry out! Bloody hope so 'cos I can't afford another. Duct taped a quick plastic sheet over the open door and beat a hasty retreat for now.

rain001_zpsf6f8cf97.jpg


I’ll continue with the clean-up pictures and fixings tomorrow or when they happen … This isn't going to be a restoration, though I will mend things properly and solidly, I ain't got money to restore it fully, it'll use fixings I already have, 'cos I want it running rather than being fussed over .. :)

One day a chassis and bulkhead will my way come ...
 
Ahhh Paul.. this makes me feel oh so much better about mine, mine is exactly the same but expanding foam instead of paper.... what date is on the paper? :)

Heres a part of mine to hopefully make you feel better about yours and smile

chassis3.jpg
 
Back
Top