My 110

This site contains affiliate links for which LandyZone may be compensated if you make a purchase.

florncakes

Member
Posts
35
Location
Bicester
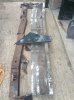
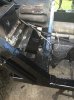
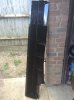
having been sorn'd for a month, I've taxed it, driven it to my workshop, as it's easier than transporting W bottles of argoshield. I've replaced the box section at the bottom of the second row doors, welded in a new section of U on either side of the body to replace the Swiss cheese that came out. A new mid cross member has gone in, much easier with no floor fitted, and the aluminium 2nd row up stand to rear floor piece slotted in a treat. Two side panels and a piece of under door section painted and lacquered too. It's all back out now though, having a good coat of paint before reassembly tomorrow. Next stop, engine service. Happy days :)
 
What came out
 

Attachments

  • image.jpeg
    image.jpeg
    995.4 KB · Views: 169
What's gone back in. A bit more fettling will even see the seats returned to their rightful place!
 

Attachments

  • image.jpeg
    image.jpeg
    829.4 KB · Views: 135
  • image.jpeg
    image.jpeg
    698.5 KB · Views: 150
Last edited:
Seats are in, carpet is back down and Looking habitable again! I'm considering the rear or back door next. How have you done your door? Have you removed the skin, repaired the frame and re skinned, bought a new door, or another option I don't know about? Any advise please would be most welcome. The spare wheel is mounted on the door, if that helps.
 
Cheers Joss. After taking a look inside the rear door, and considering the amount of surface bubbling on the outside, I've bought a new door. Not my usual style, but it saves several hours of work, cutting, welding and reskinning. Order the door last night from SP, it arrived at 3pm today! Not opened the box yet, so can't tell any more about the product other than a speedy delivery! Looking forward to getting that flatted back, painted up and bolted in.

Today the engine oil and filter has been changed, the diffs, the gearbox. Just got the transfer box oil to change, then the swivels and that's the main fluids done for the time being. I'm considering replacing the brake fluid too, just for laughs! I'm pleased with how it's going so far, even if my interior minister disapproves. On the horizon is a timing belt change as I don't know when that was last done either. The kit is in the back of the car.
 
I've got 4 alloy rims that came with the the vehicle if any one wants them. I've not got 50 posts so can't post in the for sale section yet. What's the going rate?
 
Good progress mate. Just about to do all the fluids in mine plus fix the transfer box motor!
 
Update on the door from SP. it was speedily delivered, almost as if they have ESP! It was well packaged and undamaged. The measurements were good, importantly the Hinge holes were accurate. Drillings for the wiper and wheel carrier were good, but I think QC should have picked up on the lack of deburring on the inside of the door for the wheels carrier holes though. It cleaned up well and flatted back beautifully. So far it's got 3-4layers of paint over and I'm letting it harden off over the weekend before flattening back and applying a clear lacquer. Just the carrier metal work, wiper module, glass and stay to transfer then it's ready to swap in.
 
Just when I thought the big jobs were complete my landy decided otherwise! Battery light on, no PAS, returned carefully home (not too far fortunately) with coolant over windscreen - eek. I suspected a broken fan belt. On summary inspection found the crank pulley was in a different plane to the rest of the apparatus! Have visitors today, so maybe take the fan belt off later to investigate further and hopefully no damage done. On reading around this is a common problem when the last person to touch the timing belt didn't do the pulley bolt up properly.
 
The crank bolt is still in place fortunately. I suspect the woodruff key is foobarred, maybe need a new pulley. Hopefully not a new crank!!! I took the fan belt off and the crank pulley spins freely! At least I can do the timing gear without resorting to hiring godzilla to undo the crank bolt - it was on my list of jobs to do, just not at this immediate time, until now. Taking a closer look tomorrow now family have left.
 
ooops, that does not sound right.

Hopefully it will be a simple fix with no real damage. I always find it easier to remove the rad etc to get at everything when doing the timing belt , rather than trying to work in the gap between the rad and the timing chest.

If I hear a load of shouting as I drive thru Bicester tomorrow I am going to guess it was not a good result you found.

Good luck.

Cheers
 
Rad removed, left the fan attached to the housing as I couldn't get enough friction to undo the LH thread. Turns out the pulley is pretty much worn away on the inside, the barest element of a keyway evident! Woodruff key is equally tired. The main news is the crank nose only has a groove around it, nothing more, which I'm pleased and surprised with. I think I've got away with it! I've stopped part way through the timing belt replacement, need to think the replacement through carefully before I charge in and wreck it all.
 
I meant to add if anyone local has a crank pulley locking tool I could borrow for a day please, in exchange for some beer tokens, I'd be very grateful. Thanks
 
Short update - home made special crank tool works brilliantly, crank bolt is now as tight as a tight thing in a very tight spot! 80Nm is easy, 85 degrees was a bit tough, the last 5 degrees was extreme effort, I may have done 4.5 degrees instead, but it won't shifting any more with my weight behind it. It's also loctited in position. That's the good news.
In other news my rad's in need of a recore/replacing, which in a way is fair enough as the fins furiously shed themselves out of the rad just looking at them!
Any recommendations for a replacement? I was going to head over to Mark Smith in the week for a recore - I don't fancy plastic tanks that many have reported on similar ones on ebay.
 
Back
Top