Me Disco's a wee bit rusty...

This site contains affiliate links for which LandyZone may be compensated if you make a purchase.
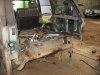
Welder arrived today... Wolf Weld 140, with a full kit of bits, £150 from amazon - not bad for a bottom-end mig that'll do 135 amps I suppose...

Anyway, nice to see I've not lost my touch and my welding is up to it's usual standard....

View attachment 33457

ie...sh*te!!!! This is going to get interesting....

How far should I be holding the torch from the job? Seem to be having alot of trouble maintaining an arc... If I get the torch REALLY close, the arc seems alot steadier... But then the shroud obscures the arc & weld pool and I can't see where to go properly. It runs from 30-135 amps and have it on the middle setting... Wire speed middling-to-high, and when I do get the arc steady I get great penetration...

I'm pulling, rather than pushing - the shroud catches on the bead if I push. Working one-handed at the moment (auto-dark mask on order) - have to hold torch at 45 deg angle to see weld pool and rest shroud on job - any further away and the arc won't maintain...

this is an awesome site with all the info you will evr need and a forum that is almost as full of banter as this one. Good luck M8 , i have been doing mine for months-well i have had the gear and the steel for months, it is just the motivation im lacking:eek:
 
this is an awesome site with all the info you will evr need and a forum that is almost as full of banter as this one. Good luck M8 , i have been doing mine for months-well i have had the gear and the steel for months, it is just the motivation im lacking:eek:

I know that feeling :)

Hoping to crack on and get mine done as quick as I can...
 
i have been doing mine for months-well i have had the gear and the steel for months, it is just the motivation im lacking:eek:

Just get stuck in! I know I kept putting bits off but once you start you'll wonder why you thought it was so difficult. I was dreading doing the boot floor and rear cross member on my RRC but now I'm nearly done it really wasn't that bad.
 
A couple of pics to show boot floor and rear cross member repairs. hope to put floor back in this weekend!
 

Attachments

  • Rust repairs go on and on! 025.jpg
    Rust repairs go on and on! 025.jpg
    57.7 KB · Views: 577
  • Rust repairs go on and on! 028.jpg
    Rust repairs go on and on! 028.jpg
    56.4 KB · Views: 304
  • Rust repairs go on and on! 032.jpg
    Rust repairs go on and on! 032.jpg
    54.9 KB · Views: 306
Is the silver paint a weld through primer?

What's the best order of play here? Weld in new floor sides, apply weld-through zinc primer, weld in new floor, more zinc primer on welds, seam sealer, underseal outside, hammerite inside?

Just looking at the mig welding forum now for some top tips...
 
Looks a bit like amperage is low and your gas shield isn't working. Try increasing both ie amperage up, put wire feed speed down and increase shield gas flow rate. It is surprising how much amperage you actualy need with MIG compared to stick given the wire sizes involved.
 
Currently using the CO2 mini-bottle that came with the welder - however, the regulator is fecked - the pin that presses the valve in the bottle was jammed all the way out and bent slightly, so I'm gonna get a new reg.

Also, just reading through the turorials on MIG Welding - The DIY Guide, it suggests Argon / CO2 mix is a much better gas for mild steel welding. Basically it says that with CO2 you can get a somewhat unstable arc that won't be cured fiddling with wire speed or current... does that sound about right?

I was getting good penetration (can see the bead on the other sdie of the job) with my practice job, so reckon I've got the current about right for the metal thickness...
 
What's the best order of play here? Weld in new floor sides, apply weld-through zinc primer, weld in new floor, more zinc primer on welds, seam sealer, underseal outside, hammerite inside?

Just looking at the mig welding forum now for some top tips...
seam seal and prime ,paint over the top once set,puddle welding (making your own spot welds by drilling top piece is a good way ,butt welding thin panels is hard work ,very short runs is also often best with
 
What's the best order of play here? Weld in new floor sides, apply weld-through zinc primer, weld in new floor, more zinc primer on welds, seam sealer, underseal outside, hammerite inside?

Just looking at the mig welding forum now for some top tips...

Well I suppose it is a case of personal choice. I cleaned up the floor sides with a flap disc after cutting out the floor panel then applied weldable primer. The new repair sides were zinc coated but I gave them a couple of coats of weldable primer on top. The floor supports (again zinc coated from YRM) were given stone chip and underseal on bottom, weldable primer on top.

Once bits welded in place, grind back welds as smooth as possible or acceptable (mine aren't perfect) then seam sealer long joins, then etch prime and paint or prime and underseal as appropriate. Not sure if that is the right way but it's what I did - looks O.K. so far for what I have done.

Over the last few months I have replaced front body mount and headlamp box, patched the front inner wings, repaired some areas of front and rear floor (footwells), replaced both outer rear arches, repaired 1 inner rear wheel arch, replaced rear cross member and repaired the boot floor panel. Nearly there now! with all the new metal I think the Rangie is a bit heavier than it was and should be a bit stronger too.
 
Getting better...

ImageUploadedByTapatalk1342013068.451728.jpg

The spatter came from the paint I didnt clean off that workpiece, but managed 4 good beads in a row...

I might just be able to do this yet!
 
Ok... FAIL #1...

Having blunted one cobalt spot-weld bit, I started with a fresh one... Only this time decided to lube the tip with a bit of machine oil to aid cutting and longevity...

Whereas each previous spot weld I'd drilled out took a good 10 - 15 secs to get through, the first one I attempted with said new lubed bit flew through it in less than half a second...

...and straight through the top of my petrol tank :doh: :doh: :doh: :doh:

Yes, I know I should have removed the tank first, but my 'trial run' on an area of the floor well away from anything else suggested that I could easily control the depth to which the drill went and not put it all the way through... So I cracked on...

Folks... The next time I ever mention the desire to pick up a power tool of any sort... Can somebody please stop me??? I was lucky not to be posting up a thread entitled 'Burn baby burn... Disco Inferno!'

Incidentally... Whats the best way to repair holes in petrol tanks?
 
If its on the top of the tank a piece of rubber with a bead of waterproof sealant around the edge should do. Lie this on top of the hole, don't put it inside.

If you don't want to use sealant you could use a bicycle puncture repair kit :)

The more people I meet, the more I love my German Shepherd.
 
Finally got the boot floor out today... What an utter b****rd it was!!! Tried drilling out all the spot welds - half of them still wouldn't let go, and found I'd missed quite a few in areas that looked like they'd rusted through, but had clean metal underneath still holding on tight...

Top tips - I found that a titanium HSS bit was ALOT better on the spot welds than a cobalt spot weld bit.... And lasted longer. Just dip the tip in some light machine oil every 2 or 3 spots to stop it blunting too quickly. Also... A min of 8mm - but you will STILL not get the whole spot to release on about half of them. This is where a cold chisel, hammer, and a bloody big demo bar come in handy...

Anyhoo, the rust:

ImageUploadedByTapatalk1343079705.036638.jpg

Not the worst I've ever seen... Some of it is still good metal with just surface rust on the lip... Gonna replace the lips all round anyway.

Looks like my rear cross member hadn't survived as well as I thought it had:

ImageUploadedByTapatalk1343079812.420046.jpg

ImageUploadedByTapatalk1343079870.219973.jpg

ImageUploadedByTapatalk1343079902.373101.jpg

Again, not the worst, and it looks salvageable, but will need a few patches. The drivers side body mount is ok, but it's gone right along the joint / lip where the rear door seal goes, and the join between the crossmember and the rearmost floor support lip.

I've been searching around for that strip as a separate panel... Even though it clearly IS a separate panel to the cross member (its spot welded to it) I can't seem to find a bespoke replacement... Looks like I'll have to take one of the floor lip repair sections I have and fabricate a narrow strip with an extra bend in it to make a U-shape (if you see what I mean).

Tomorrow, I shall be making a cardboard template for the floor sides, as I bought the 'blank' repair sections from YRM - cheaper than the fully-shaped floor side panels, and the cut-outs will give me the rest of the metal I need to patch the arches and crossmember.

Also... My fuel pipes are quite badly corroded, so probably worth replacing those too whilst I have the floor up... Anyone know the right part number(s) for them (Disco 1 V8)? Searched all the usual online places, but nobody has photos so not sure if the description matches what I actually need...
 
Also... My fuel pipes are quite badly corroded, so probably worth replacing those too whilst I have the floor up... Anyone know the right part number(s) for them (Disco 1 V8)? Searched all the usual online places, but nobody has photos so not sure if the description matches what I actually need...

If it's the pipes from the top of the pump to the filter and the other is the return you could use rubber fuel injection hose but make sure it is the proper reinforced stuff so it can handle the pressure. Secure to the metal pipes with jubilee clips - mine has been like that for the last 4 years and no issues.

Did you search Rimmer Bros? Don't know about Disco parts but I know one of the pipes (return) has a part number ESR2188 for a RRC, probably same for D1. Couldn't find an equivalent for ESR500. Other part numbers I came across for fuel pipe were NTC6143 and ESR502. HTH.
 
Last edited:
Thanks Kev. Yeah, I did look at Rimmer Bros, but without pics I'm not sure what exactly is what.

I might just go with rubber, since it's the sections that sit on top of the chassis - not too much concern about potential damage off-road.
 
Back
Top