Lots Of Welding Required

This site contains affiliate links for which LandyZone may be compensated if you make a purchase.

shandonman

New Member
Posts
55
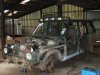
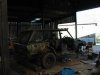
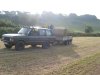
I knew that my 92 Classic was going to need some attention before another winter so took the plunge and booked her in with the local LR workshop. The idea was for a wee bit of welding and a waxoil.

RR21.jpg


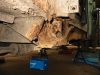
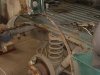
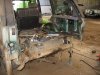
Trouble is, once the wings were removed, the o/s headlight box, inner wings and A pillars were all iffy and needing replaced or major work.

RRRust1.jpg


RRrust2.jpg


The other side was almost as bad. Looks like we are going to have a busy few days.
 
We were going to buy new inner wings but decided it would be more cost effective cutting out the rot and welding in new metal. About the same in labour but less parts.

RRrust3.jpg


Now I know why the drivers footwell was always damp. Big hole in the floor even bigger now.

RRrust7.jpg


Apologies for the poor quality phone pics.
 
Mine is going through some surgery just now as well. Just got some great stuff through from YRM. Passenger side sill is rotten (inner and outer). I needed the extended sill from yrm :eek:

Pillers ****ed too. Welder man said nay probs.
 
Hahaha, been there and then some. I've replaced front body mount and headlamp box, both sills, patch repairs to both inner wings and front footwells, rebuilt rear inner wheel arch, replaced both rear outer arches, replaced rear cross member and repaired the boot floor. Now all good, MOT and tax - happy days!
 

Attachments

  • NS A Post 001.jpg
    NS A Post 001.jpg
    52 KB · Views: 293
  • Rust repairs go on and on! 012.jpg
    Rust repairs go on and on! 012.jpg
    54 KB · Views: 321
  • Range Rover Rebuild 007.jpg
    Range Rover Rebuild 007.jpg
    44.9 KB · Views: 828
Nice big workshop you got there. Was the Classic worse than you expected once taken apart ? Today we got more repairs finished on the o/s inner wing. The n/s is pretty much identical.

RRrust4.jpg


Next are the sills then the rear arches to be patched.
 
Nice big workshop you got there. Was the Classic worse than you expected once taken apart ? Today we got more repairs finished on the o/s inner wing. The n/s is pretty much identical.

Next are the sills then the rear arches to be patched.

Yeah, thanks - it is useful having a barn I can work in. The rust wasn't really as bad as it might have been but over the years I have made various patch repairs so knew the rot was trying to take hold. On the front inner wings, have a careful check in and around the footwell area and make sure you give everything near the body mounts a good thump with a small hammer and do check the inside of the A pillars where they meet the floor.

Rear arches (inner) need careful checking as well, best to strip out carpet and look from inside, again give everything a good bash with a hammer. Outer arches are easy as replacements are available and simple enough to stick on. Do take up the boot carpet and the sound insulation and closely inspect the boot floor.

I did find it was a lot better to remove the outer body panels and doors to be able to properly see the structure of the Rangie, I know that might put a lot of people off but really it isn't that bad, you can have it stripped down in a morning and it makes life a lot easier.

HTH
 
I just cut out all the crap for a full sill today. Absolutely rotten.

Got extended outer all shaped up...tacked tomorrow by Mr Welder.

Rot Rot Rot. Hmmmf.
 
Yeah, thanks - it is useful having a barn I can work in. The rust wasn't really as bad as it might have been but over the years I have made various patch repairs so knew the rot was trying to take hold. On the front inner wings, have a careful check in and around the footwell area and make sure you give everything near the body mounts a good thump with a small hammer and do check the inside of the A pillars where they meet the floor.

Rear arches (inner) need careful checking as well, best to strip out carpet and look from inside, again give everything a good bash with a hammer. Outer arches are easy as replacements are available and simple enough to stick on. Do take up the boot carpet and the sound insulation and closely inspect the boot floor.

I did find it was a lot better to remove the outer body panels and doors to be able to properly see the structure of the Rangie, I know that might put a lot of people off but really it isn't that bad, you can have it stripped down in a morning and it makes life a lot easier.

HTH

Looking good Kev, I have nearly got a barn ready for mine, got any more pics? :)
 
Aye, when I were a lad we were so poor we had to work on the Jag and Range Rover down a uranium mine whilst fighting off goblins...and that was before breakfast!
 
Looking good Kev, I have nearly got a barn ready for mine, got any more pics? :)

I got loads - here's a couple for ya. The one in the field is the finished article, it failed MOT initially on a corroded headlamp but no advisories on rust - very satisfying even though it did take me 8 months to do it! It now has a ticket on it and rent in the window, hope to get out laning soon.
 

Attachments

  • Range Rover Rebuild 017.jpg
    Range Rover Rebuild 017.jpg
    44.8 KB · Views: 1,063
  • Gathering the Hay 003.jpg
    Gathering the Hay 003.jpg
    214 KB · Views: 296
  • Rust repairs go on and on! 037.jpg
    Rust repairs go on and on! 037.jpg
    44.5 KB · Views: 315
  • Rust repairs go on and on! 028.jpg
    Rust repairs go on and on! 028.jpg
    56.4 KB · Views: 302
Great pics Kev, The two inner wings and A pillars are all finished now. A bit of patching on the sills and next its the rear arches. Its nothing like as extensive as yours though, well I hope not.

RRrust5.jpg
 
Great pics Kev, The two inner wings and A pillars are all finished now. A bit of patching on the sills and next its the rear arches. Its nothing like as extensive as yours though, well I hope not.

That's looking quite tidy. When you get to the rear arches you might be in for a shock, make sure you have a very thorough poke around, seat belt mount, bottom of the door pillar and the join between the inner arch and floor and also between arch and side panel. Corrosion near the bottom of where the fuel filler is also a common area for rot.

Then have a good look at rear cross member and the back of the boot floor, as you probably saw I cut out and repaired the boot floor, not the tidiest I must admit but for a first attempt I thought it came out quite well.

I'm just starting the strip down on my project LSE and the rust is extensive, will get some pics up when it's stripped out.
 
On the home run now, lots of rot around the filler and where the arch meets the side panel so some patching here.

RRrust6.jpg


RRrust8.jpg


The n/s also had a 6 inch hole in the side panel where it meets the floor and I reckon water had been getting in through the perished boot side window seal which is no longer available and running down between the outer and inner rear wing.
 
Keep reading this thread and you are all scaring me, thought mine was solid but keep checking all the bits you are mentioning and sure enough, there is rot :frusty:

Luckily the rear cross member is ok :banana:

Will put photo's up when I attack my Rangy with an angle grinder:mil56:

Kev, looks like you had a lot to do but good work :clap2:
 
Back
Top