Killajoules Series 80" upgrade project

This site contains affiliate links for which LandyZone may be compensated if you make a purchase.
I acually used large headed pop rivets and large 5mm penny washers.

My non standard windscreen washer bottle sits on the n/s wing where the S2/3 expansion tank traditionally sits.

Also as the S1 vent tube is situated on the O/S i felt it was rather convenient. There is plenty of room above the steering relay and good clearance for the indicator/sidlight wiring through the wing.

I will be RTVing on Sunday at the Devils Pit so I will know how well it works then.

The only real issue with such a long pipe is freezing, but my 80 lives a cosseted life in a garage when not in use.
 
finally did mine, had to put it on the other side of the rad and run the pipe round with cable ties, mounted the bottle to the passenger wing using nuts and bolts with spring clip washers.

hopefully the bonnet support won't foul on it.
 

Attachments

  • 20140716_131950.jpg
    20140716_131950.jpg
    149.6 KB · Views: 152
Good job there.

Cant see why you would have a bonnet stay problem with a s1.

Well mine certainly filled up, not sure if the cap is letting it suck back into the Radiator though. The actual top seal in the cap does bubble a bit so it may just be may old cap does not seal well enouch to create enough vacuum to draw the water back.

Once I get my engine running again I will be able to monitor it a bit more.
 
the stay is on that side of my s1, I think I have the bottle low enough and there is enough space between the bottle lid and the wing for the stay to nestle in when the bonnet is down, the joint of the stay where the two bits bend has put some small dents in the top of the breather you can see at the right edge of the pic, so if it is resting on the breather it should keep it away from the bottle
 
Well, mixed weekend. Still cannot get the engine to start after the dizzy swallowed a screw which saw it's ignominious return from the Devils Pit on an AA truck

Have replaced the back box the AA man blew up

uploadfromtaptalk1405900214041.jpg

Have setup dizzy as per s1 workshop manual

uploadfromtaptalk1405900291608.jpg

Thats 10degs then adjusted dizzy so points just opening

But nothing.!

After many attempts I noticed that the ignition was not coming on and found the feed to the regulator was dodgy after the alternator substitution.

So first finally removed reg totally and connected the wires.

Then I decided the time was ripe to replace the horrible fuse box with a new blade fusebox

uploadfromtaptalk1405900626082.jpg

uploadfromtaptalk1405900637521.jpg

Just need to fix to bulkhead.

Then I decided to wind in my steering stops, o/s went easy

uploadfromtaptalk1405900722095.jpg

But the n/s sheared, may need to drill it out if it affects the swivel seal retainer.

uploadfromtaptalk1405900804281.jpg

also replaced the drivers wiper motor. Found in my recently inherrited tool trove a nice BSF top and die set which I used to clean up the rusty threads.

uploadfromtaptalk1405900954830.jpg

I also have a Whitworth set too 😀
 
Last edited:
Back in July at the Deviils Pit a rather nasty crack began to appear in the passenger door pilar which has gradually been growing worse.

i1F21p.jpg


Anyway, I have managed to hook up with a friend of a friend this morning to have a look and arrange a time to start a repair.

When I came home I got the jet wash out and cleaned it up so I can take the wing off and get it ready to take for surgery.

kxwTSw.jpg


Then out with the tool kit. As those of you that have removed wings already know there are four bolts into the bulkhead that need removing which tend to be little buggers. Well I was pleasantly surprised when the top two came out no problem, the next was missing then of course the bottom one just turned and turned, and turned !!

Popping the inspection camera up the bottom of the pillar I could see that there was no thread left and it appeared the nut was missing. However it seems the pillar has virually rotted away around the captive nut.

It took some gentle prying as wall as a bit of angle grinding but I managed to pop the nut THROUGH the rusted steel without destroying the already tired wing

KjIw83.jpg


That allowed me then to remove the grill panel bolts, agin two worked fine and the third sheared. I also needed to remove the washer bottle then add a connector into the sidelight/indicator circuit earth so I could remove the wing and have a good look

w7yhIr.jpg


f6DGAK.jpg


zxDJxI.jpg


Whilst washing down the chassis earlier I also noted that the rear exhaust bracket had sheared too so I will need to fabricate another if those too.

JzrAdE.jpg
 
I also installed a hydraulic damper / rear door stay on the 110, superb. AND I installed a relay into the supply for my new usb charging ports in the 110 gear tunnel tray I installed on Monday night.

]
E2zBVj.jpg
 
Last weekend I got the 80 Sorted by the welder, A nice job, he spends his days restoring Porches for racing !!

pPwCYb.jpg


rmkznu.jpg


While it was being repaired Stutab popped round and helped me take the back off the garage of the new house

muYfKT.jpg


n7Fd1l.jpg


4aHXZi.jpg


jrTYui.jpg


Now I can drive through into the garden with mm's to spare :D

DtTsgO.jpg


Now I should be able to go pick up the next project and store it out of sight

REz504.jpg
 
The Starter Appears to have died on the 80" !

My starter motor appears to have died. Back in December I last used SFF to trial. it had been -8 overnight and the starter struggled to turn the engine. Finally it managed to get the crank turning and finally fire up. It also kept working throughout the day withought any further issue other than I had noticed that when I pressed the starter button it would take half a second before the starter motor responded.

Since then the 80 was stored away in its garage. On Monday I tried to start it, the motor whirred feebly, it sounded like it was struggling to engage the flywheel. I thought it was low amps, so jumped a spare battery into the circuit and tried again. The starter motor turned even slower.

So I left the main battery on charge through the week. Today I tried to start the car with the freshly charged battery. The petrol pump vigorously came to life, but nothing from the starter. When I pressed the button all the lights in the dash dimmed out as though a huge power was being drawn, but the motor would not turn.

It started with having to use my newly aquired Tirfor from Jai_LR's brother to get the 80 back into the garage from the garden (It ha been stuck in the narrow part of the recently removed rear wall of the garage)

Thanks Andy, the Tirfor has paid for itself in less than a week :bounce:

CO91lm.jpg


Then I removed the front wing, fortunatly I had done all the ground work last autumn when I removed it to get the bulkhead door pillar repaire. I know some of you may flinch here, but the chap who did the excellent rebuild replaced all the captive nuts with M8 captive nuts plus speed nuts and speed screws on the radiator panel. I had bulleted the wiring to the sideligt/indicator so that easilly came appart too, then off with the wing.

1qZibI.jpg


The next step was to take a good look, those retaining nuts looked real swines. I could not even get a socket let alone a spanner on them.

yKgm71.jpg


R1Zojg.jpg


Last night I had done a search on the LRSOC forum and someone had mentioned a big nut which allowed the starter to slide out of the collar. This appeared a swine to get to with a spanner, so a quick re-read of the workshop manual pointed out the access hole in the bulkhad !

Sweet A socket in there and out cape the big setscrew.

The motor then started to move and pull out of the collar. I needed to undo my exhaust downpipe to give me the room to finally withdraw the unit.

l537Kt.jpg


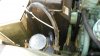
So here is the offending item. I will now take it into Aylesbury tomorrow at lunch to my auto electricians who sorted out my winch motor and supplied me with an alternator.

With luck it is probably worn/seized out bushes as the armature appears to spin freely.

JefTA9.jpg
 
Back
Top