K series Clutch replacement

This site contains affiliate links for which LandyZone may be compensated if you make a purchase.
This is the thrust bearing as promised. The mating surface has something very sticky on it. There is a fair amount of copper grease has been used else where and I'm wondering if this had been smeared on the mating surface would it go sticky like this. I'm concerned this might be the issue as my mate who was preping the thrust bearing (and is much more experienced than me) smeared grease in the same way on the new one
20160224_220437_zpsz6uajjtf.jpg

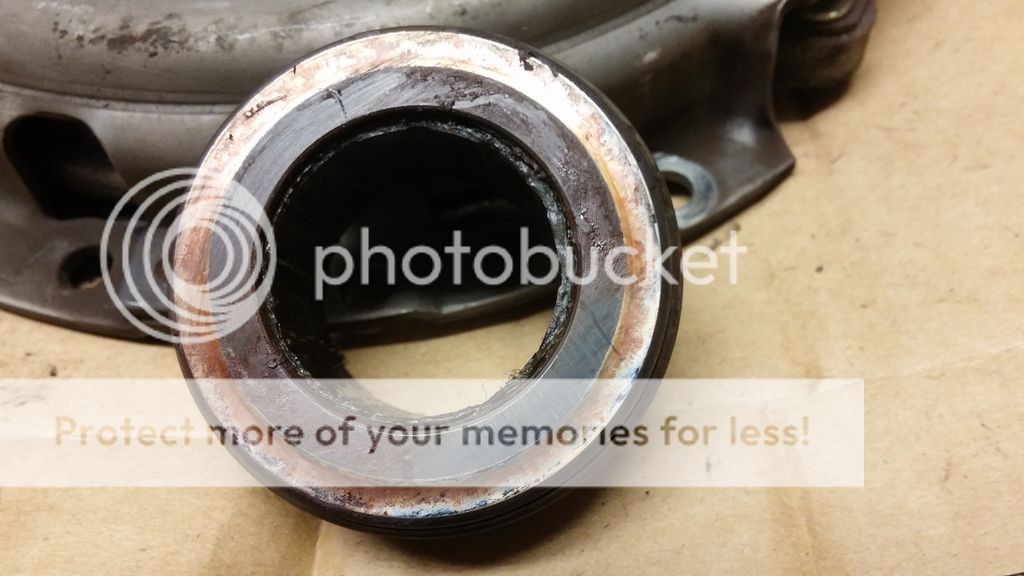
You can see bottom right I cleaned it off. Any thoughts as to whether this might have been the cause of the shudder and should I be worried?
 
Last edited:
Thanks James, Others have mentioned thrust bearing as a cause of clutch shudder but from what they said I took that to be a sticky movement in and out on the shaft. It was only when I saw the sticky residue on the mating face I was concerned it might be the cause.
 
theres thought that you should heavily grease thrust and clutch fingers to stop wear and other that they should be dry to stop dust collecting and making a sticky paste ,but neither makes a clutch shudder or judder ,hard clutch plate does though
 
I suspect the clutch was replaced in the past as the car has caravan power connector and the clutch plate is not that worn. Caravan and K series not a good combination.
 
In addition to the plate as a potential cause of judder. It's well documented that a sticking release bearing assembly will make the PG1 clutch judder on take up of drive. Everything needs careful lubrication, ideally with a high moly grease. The grease needs to be applied to the splines (sparingly). The box nose tube which the bearing slides on. The release fork tips and the cover fingers. At the same time, it's wise to strip out the release lever shaft for cleaning and greasing.
 
Release lever was moving smoothly by hand so happy it is OK, probably because it has been lubricated by oil leaks from the cam seals for quite a while.
Hopefully the rest of the mechanism is greased properly, I guess time will tell.
 
I spent a bit of time tonight pottering around refitting various bits and refilled the coolant. Everything was going great, fitted new drop links and got them torqued up no problem, bolted up the crossmember and was about to fit the new wishbones (lower suspension arms) but ran into problems getting the rear mounts off the old wishbones. Have tried bearing pullers and thumping with a heavy hammer but don't want to use too much force and damage the rubber mounts.
I left it soaking in Plusgas to see if it frees up but if anyone has any suggestions please share.
I started another thread about it here https://www.landyzone.co.uk/land-rover/wishbone-mount-stuck-on.297098/

This isn't mine but copied off t'internet but the bit that is stuck on is on the right hand side.
$_57.JPG
 
I'd buy new bushes and save to much messing. It'll make the handling sharper anyway. You can heat the alloy housing to get the bush out.
 
I might go with new bushes if tomorrows plan fails.
I'm going to fit arms + bushes I'm taking off #1 Freelander to #2 Freelander to see if that cures the rattle. Then cut the ends of the arms from #2 Freelander so I can get the beggars off. If I'm not 100% happy with the result I'll order new bushes as Nodge suggests. #1 is currently off the road anyway and there is no way in hell I'm taxing her before next month so no panic in getting it sorted.
 
I spent a bit of time tonight pottering around refitting various bits and refilled the coolant. Everything was going great, fitted new drop links and got them torqued up no problem, bolted up the crossmember and was about to fit the new wishbones (lower suspension arms) but ran into problems getting the rear mounts off the old wishbones. Have tried bearing pullers and thumping with a heavy hammer but don't want to use too much force and damage the rubber mounts.
I left it soaking in Plusgas to see if it frees up but if anyone has any suggestions please share.
I started another thread about it here https://www.landyzone.co.uk/land-rover/wishbone-mount-stuck-on.297098/

This isn't mine but copied off t'internet but the bit that is stuck on is on the right hand side.
$_57.JPG
I forgot to own up to being silly while refilling the coolant. Guess which hose I forgot to reconnect before refilling?
Yip, She pished all over the garage carpet from the IRD hoses. :oops: (I have some old bedroom carpet lying on the floor which makes lying under the car much more comfortable)

You gotta laugh :p
 
OK, so had a busy day today, got the wishbones bolted back on with original bushes, I can always replace them later if need be, but for now I want the car out of the garage as I have other stuff to do. Daughters Fiesta has stopped leaking coolant but now looks like the N/S spring is broken as it is lying down on that side. :eek: (probably something to do with her recent trip into a field). Also I need to replace the wishbones on #2 Freelander to stop the annoying rattle.
So I filled the gearbox and IRD with oil, bolted the battery back in, refitted the slave cylinder, my son and I checked and double checked everything was OK and tried to start the engine. No joy, the lights in the dash dimmed as if the starter was getting current but it didn't even try to start. After a bit of faffing with jump leads we realised the small connector to the starter wasn't refitted so plugged it in and the car started easily. tried putting it in gear and found the clutch was on the floor and it was hard to select gears. :(
I was disappointed but not surprised as it had been like this before, but at least the clutch was working so now to sort the hydraulics. I had a look at the clutch pedal and noticed a lot of play before it started pushing in the clutch. It turned out to be slack in the master cylinder so I am going to try shimming it out a bit and see how it goes. Hopefully back tomorrow with some photos and the result.
 
Last edited:
Latest update, the clutch pedal is now engaging at the right height, here is how I did it.
I spent a bit of time trying to figure out why the clutch was on the floor. It seems the master cylinder has too much slack in it compared to my other car so I pulled the master/slave out and tried to figure out a way to adjust it.
I started out trying to pull the head off the master so I could space it out but it wouldn't budge so I decided to file it out and shim it.
Filed a bit too much. Doh!

20160228_105621_zpspe4wfakx.jpg

First shim
20160228_111350_zpsxmnpca11.jpg

Second shim super glued in. This should give it approx 2.5mm which is near enough the amount of slack in the master cylinder.
20160228_112811_zpsigczzvmo.jpg

Making a container for a resin cap
20160228_113741_zpsvasjodc4.jpg

Using a drill bit smeared in grease to form the hole and the stuff I'm using to strengthen the resin. Carbon fibre.
20160228_115729_zpssp4z0fzw.jpg


The resin
20160228_120319_zpsrodr1a1a.jpg


Ready for pulling from the mould.
20160228_121513_zpsmypfjfku.jpg


Needs trimmed but not too bad. My resin has been lying around for a year or so and has thickened too much so didn't flow to a smooth finish.
20160228_153332_zpsbwdbebs6.jpg


Trimmed enough to fit through the bulkhead.
20160229_203610_zpsopk4zcbo.jpg


The hole made by the drill was the perfect size and with a couple of washers and a circlip it is more secure than factory.
20160229_213429_zpsy3qkxl0o.jpg


The fluid oozing out of the rubber gaiter is just silicone grease I poured in before reassembling and refitting. I know it is quite possible the master is on it's last legs and might need replaced soon but it's working fine for now, if it only lasts another 6 months I count that as a win.
As you can see from the last photo I didn't spend much time trying to make it pretty but it will never be seen so.....
 
Last edited:
I made up a much better master and slave cylinder arrangement for my first 1.8 Freelander. I was going to replicate it for my second 1.8 but never actually got round to making another set up. I basically used a system that is similar to the Rover 800 or Hondas of the period.
I used a Honda metal master cylinder which has an adjustable rod and a metal clevis. This adjustable rod allows for pedal hight adjustments. I found a slave bracket and slave cylinder from a Rover 800. These were linked together with a some standard brake piping. It worked much better than the plastic stuff LR used, although it was more expensive to install.
I guess a simple way to sort it would be to cut the plastic end off the master cylinder, thread the end and fit a rose joint. Not sure the master has much life left in it though so I just used the bits I had handy. One of the other guys here tried using a MGF slave as it can be bled, not sure what master he used.
 
Master from a Honda Civic of about 1995 vintage. Then an MGF slave and bracket with the pushrod from the Freelander slave. Link the two cylinders with some copper pipe, coiled near the box to allow for flex. The master needs a small remote reservoir from a motorcycle. That's about It really. I think when I made the system, it cost me something like £70 all in. It'll last longer than the car too!

Edit :
The bulkhead needs 2 holes drilled to fix the Honda master cylinder in place. Is helps to angle it slightly too.
 
Last edited:
Back
Top