Ever noticed the fine day never coincides with free time? Or equally the big expensive repair never coincides with a random tax rebate/bonus? Or the just when you thought you had sorted everything, something else breaks?I share your optimism. I've got a set of new wheel arch trims to go on when a nice warm and dry day coincides with free time.
You are using an out of date browser. It may not display this or other websites correctly.
You should upgrade or use an alternative browser.
You should upgrade or use an alternative browser.
Disco 2 Headlining - Anyone gone for black?
- Thread starter GJ1
- Start date
This site contains affiliate links for which LandyZone may be compensated if you make a purchase.
Feathers McGraw
Well-Known Member
- Posts
- 2,780
- Location
- Cumbria
I'm living about 30 miles away from the wettest bit of the UK 
I think you will find that the wettest part of the UK is the front passenger seat of my D2, just below the A-pillar.....I'm living about 30 miles away from the wettest bit of the UK
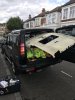
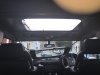
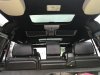
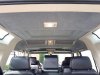
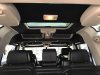
Started...... old lining out..... all clips and trim intact (glad I invested in some plastic pry bars for the clip extraction). Disappointed to find the GPS Antenna error was not a corroded or broken wire.... but happy to see all seems well everywhere else. The telltale water marks around each sunroof in the upper surface of the headlining... so each to be removed and sealed back to the bodywork. Plan to do the works over the next few free days. Now the lining is out, the black paint gives a good indication of what a black fabric on the lining will look like.... think I've decided to go to the Dark Side....
Attachments
Feathers McGraw
Well-Known Member
- Posts
- 2,780
- Location
- Cumbria
think I've decided to go to the Dark Side....
May the force be with you.
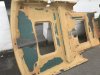
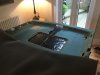
Work in progress.....
- Sunroof fix (how, on this fine earth, can anyone legitmately think that bit of draft excluder stuck to the frame was a watertight gasket??)
- Headlining strip of old cloth and foam,
- Then the scary bit with the lovely new material.....
Attachments

There was no kit available so i have purchased the spray addhesive and the headlining material separatelly. The addhesive is stated as suitable for headling and during the installation it seemed very sticky (once the cloth touches the glued surface it is very hard to remove and do any correction).
But you are right, original does not fail due to glue.
Yours looks also great! The black seems to be a good decision!
But you are right, original does not fail due to glue.
Yours looks also great! The black seems to be a good decision!
Mine was from Martrim http://www.martrim.co.uk/catalogue/landrover-headlining-kit.html. I went for the black seude, material came on a roll (just wide enough as the roof is big at it's widest part by the rear doors) along with 3 tins of spray adhesive. I'd get some samples sent, these arrived really quickly and give a much better indication than the photos on the website. My selection based on the samples was so much better than the picture would indicate, really close, dense fabric, feels almost like a moleskin type.
Tips, well if you look at mine on a close-up you can see some folds / creases where material puckered around the corners (e.g. front sun visor bracket wells). It's really difficult where you have change in direction / depth / curve as you don't really want to cut the material to suit, you have to work with the natural stretch / give.
I did mine in 3 sections, marked out the CL on the lining and also the reverse of the fabric so I could make sure I was aligning correctly as I went. Laid the fabric over the whole and then pulled back the "drivers" section. The instructions on the adhesive say spray on one surface across then the other surface along, guess this ensures an even coating. Worked slowly and pushed into all the corners. Then (being careful not to expose the "good" surface to any adhesive) pulled it over to do the middle row, then finally the boot. I've seen other people go for half and half along the length of the roof.
Don't do too big an area at any one time, make sure you have some reference points so you don't go off line (remember that the material is only just wide enough for the widest part of the roof), make sure that it doesn't accidentally fold onto itself once the glue is applied, the black polythene delivery packaging proved very useful for masking / protection / separation layer as I went. Mine was also surprisingly resistant to cutting (around the light fittings etc) and stupidly thought I could just fit the grab-handles etc through the material without cutting out - not the case. If I did again, I'd spend time trimming up all the openings / reveals to make the install quicker.
Once the two glued surfaces meet (even accidentally) they do tend to stay stuck........I'm happy enough with mine given how badly it could have gone...
Also, ultimate tip (for when you find yourself with more fabric stuck to you than the roof lining, and what is stuck on the roof looks like a ploughed field)
Ensure you have been to B&Q and got a 2.5lt tin of colour matched vinyl matt to the same colour as your fabric.....
Ensure you have been to B&Q and got a 2.5lt tin of colour matched vinyl matt to the same colour as your fabric.....
I have bought the car lining material form a shop deals not only car staff so I have selected the lenght and width as I have wanted. I had no issue with the width as mine was around 1,80m.
The glue was also selected separatelly from a car shop, type Berner, suitable for headlinings. All together it was about 80€.
regarding on tricks...
As GJ1 has explained, has to be done in separate steps (i did mine in about 5), the glued surfaces must not touch each other (before final arrangement) so you have to very carefully place the material to the fabric and start to slightly push from the middle to the sites. Very difficult to avoid folds (wrinkles).
I cut all the holes before installation. Not easy, you need something very sharp!
Also important to leave 2-3 cm extra material on the edges and stick to the other side in order to avoid problems on the edges.
You're welcome... good luck with it!Thanks guys. Good info and much appreciated.
Feathers McGraw
Well-Known Member
- Posts
- 2,780
- Location
- Cumbria
Any pics of the finished item? Sounds like a good job sorted.
blackstrat
Well-Known Member
- Posts
- 9,265
- Location
- East Anglia
strip the grp shell and paint with a textured emulsion as close a colour as u can get to the old cloth, car stays looking original and will never sag again u can't tell less u touch it that it's not cloth
@Feathers McGraw here you go

@blackstrat - agreed - see my ultimate tip above!!!
Similar threads
- Replies
- 29
- Views
- 7K
- Replies
- 15
- Views
- 5K
- Replies
- 11
- Views
- 3K