Disco 2 HEADLIGHTS FACELIFT TO PERIOD CORRECT STYLE

This site contains affiliate links for which LandyZone may be compensated if you make a purchase.

Jim_P

Active Member
Posts
51
Location
ATHENS GREECE
Hey there everybody,

I hope you are doing very well ! Also hope you all had a great Christmas and I am sending all my best wishes for a great 2024 full of joyful moments and great achievements with health and prosperity !

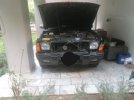
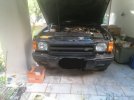
I am writing about something that has been, of course, discussed before but in reverse. I need to refit the original style headlights to a 2000 MY Land Rover Discovery 2. I realize most people do the opposite of what i am planning but the vehicles owner suggests and in this case i condone his decision to get the car back to original spec. The conversion was done very very poorly. Electrical connections, panel butchering etc.

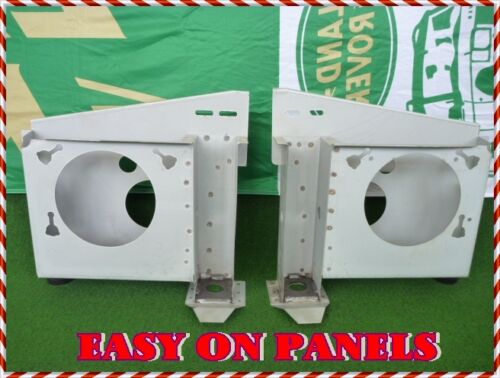
I have managed to fully restore the bodywork with two NOS valances that would accept the original style headlights, and indicators etc. I have also sourced the proper trim strips that attach below.

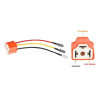
I am now working on the electrics and i was wondering whether anyone may have or could take some photos for me of the connections (both driver and passenger side) of the headlights, the indicators and the levelling motors. I understand that the Electrical Workshop Manual can be of assistance but having real life photo confirmation would definitely add to my confidence. Ii would greatly appreciate it if you could (in the photos) show the colour of the wires at their respective connections. I am currently following this thread (https://www.landyzone.co.uk/land-rover/discovery-headlight-conversion-to-2003-on-lights.71266/) and essentially reversing the process but some colours do not match, to my surprise. I am particularly interested in the indicators and headlight levelling motor connections.

Looking forward to any assistance.
 
Hi. I'll take some pics tomorrow, untill then tell me which colours dont match? ... also do you have all the necessary connectors?
Hey there,

Thanks so very much for your response and offering to take photos. Let me get to it again tomorrow to properly note the colours that do not match. Yes i do have the proper connectors. Sourced prior to embarking on all this actually.

Many thanks !
 
It sounds like (the genuinely talented) @sierrafery has got you covered on the electrical side of this retrofit removal / reinstatement / restoration, but that still leaves the butchered bodywork to contend with, which is something I might be able to help with...

I'm going to suggest you take a look at a UK supplier "froggats" they do good quality body repair panels for most things wearing a green oval, but most important for your project, they do replacement "headlight bowls":

1703712411974.png


...for just a hundred bucks a piece, those will save you a world of hurt trying to make good that which has been butchered on your customers car.

The "period correct" bulbs on this car were H4, and I've got to say that the twin optic facelights on my facelift TD5 are a world better than my 300tdi, so your customer will notice a drop in illumination when you complete this task for them. To minimise that disappointment, I'm going to suggest you use ceramic H4 headlight bulb connectors, and either higher wattage halogen H4 bulbs, like say some 100w+ H4s? OR, maybe some of the more modern LED bulbs? I recently asked about LED bulbs, and someone on here pointed me in the direction of auxbeam, and I haven't heard a bad word against them in all the reviews I've read...

Ceramic Bulb Holders:

Ceramic Bulb Holders & Relay Kit for improved power feed to bulbs:

Auxbeam LED bulbs which seemingly create good a beam pattern and don't need heatsinks:

Anyways, hope this is helpful, and good luck with your project 👍
 
It sounds like (the genuinely talented) @sierrafery has got you covered on the electrical side of this retrofit removal / reinstatement / restoration, but that still leaves the butchered bodywork to contend with, which is something I might be able to help with...

I'm going to suggest you take a look at a UK supplier "froggats" they do good quality body repair panels for most things wearing a green oval, but most important for your project, they do replacement "headlight bowls":

View attachment 305951


...for just a hundred bucks a piece, those will save you a world of hurt trying to make good that which has been butchered on your customers car.

The "period correct" bulbs on this car were H4, and I've got to say that the twin optic facelights on my facelift TD5 are a world better than my 300tdi, so your customer will notice a drop in illumination when you complete this task for them. To minimise that disappointment, I'm going to suggest you use ceramic H4 headlight bulb connectors, and either higher wattage halogen H4 bulbs, like say some 100w+ H4s? OR, maybe some of the more modern LED bulbs? I recently asked about LED bulbs, and someone on here pointed me in the direction of auxbeam, and I haven't heard a bad word against them in all the reviews I've read...

Ceramic Bulb Holders:

Ceramic Bulb Holders & Relay Kit for improved power feed to bulbs:

Auxbeam LED bulbs which seemingly create good a beam pattern and don't need heatsinks:

Anyways, hope this is helpful, and good luck with your project 👍
Hello and good morning !

Many thanks for coming through with great info on where to source bodywork parts for such instances. I actually did know this fabricator / manufacturer Froggatts but have never used them before. I have however always read excellent reviews on their stuff. Had i remembered about them earlier that would have saved me purchasing two (RH and LH) NOS headlight supports. I have actually completed fitting these. I managed to properly drill out the spot welded old ones which had been butchered with the likes of and angle grinder and installed the new pieces successfully. So thats the bodywork done. Thank you very much however once again for all the info and the great tip on froggats.


With regards to headlight lamp brightness lets say, i do realise there will be a loss and have informed the customer however the current state of the facelift headlights, i think made it even worse than original. I shall post photos when done, of the before and after in order to show you what i mean.

Sometimes i do really wonder how some garages manage to get away and even get paid hefty amounts with such poor quality of work.

Many thanks again !
 
I hope this helps, i removed the levelling motor to show you the pinout for the plug, the wiring comes in a single loom and splits between the motor and headlamp's wires, for the indicators it comes beneath the wheel arch... the other side is quite similar, the main wire colours are the same only the traces are different. For the headlamps check the electrical library - connector views for pinout of C0009 and C0011 and the traces of those blue wires cos otherwise they look very alike. The first letter is the main colour and the second the trace based on this chart
1703766067854.jpeg

Good luck

1703762643912.jpeg

1703762701251.jpeg

1703762718937.jpeg
 
Last edited:
I hope this helps, i removed the levelling motor to show you the pinout for the plug, the wiring comes in a single loom and splits between the motor and headlamp's wires, for the indicators it comes beneath the wheel arch... the other side is quite similar, the main wire colours are the same only the traces are different. For the headlamps check the electrical library - connector views for pinout of C0009 and C0011 and the traces of those blue wires cos otherwise they look very alike. The first letter is the main colour and the second the trace based on this chart
View attachment 305982
Good luck

View attachment 305979
View attachment 305980
View attachment 305981
Hey there,

I couldn't have asked for a better put together response and piece of advice than this ! Its exactly what i was looking for. Thank you so very much sir !

Will complete the installation and colour match the trim strips too. Will upload photos when its done of the before and after as promised. I think it will be great !

Massive thanks once again !
 
Last edited:
Hey hey,

I promised to update so here we go !

We have light ! On the right side (as viewed from the back) for now as the left still has some work left to complete ! The wiring the previous buffoons had carried out drove me bloody wild ! Twisted together wire and insulating tape everywhere. I don't even know how the lights even worked. Well even the way they did at least !

Sierra, my friend your photos were the most major part of the success ! A million thanks ! I did the side that had different tracer colours first so now it will be even easier !

Gonna upload photos of my work when done. Once again many many thanks !
 
So photos as promised (front bumper has seen much much better days by the way) Gonna take some of the internals too. Just didn't think about it when finishing up today.

Only the trim strips for under the headlights and indicators left to colour match and fit. Also gonna get someone to properly align the headlights using the correct equipment. Eyeballing works for now but it's not ideal.

One suspicion I have is whether I have flipped the wires on the headlights and now my main beam is my high beam. I am not sure though as I couldn't surely reach a conclusion due to the headlights alignment and the fact that it was still sunny outside.

Is that a possible scenario? Meaning if the wires are opposite of where they should be would this happen? The switching of the beams. Again not sure just asking to clarify.

Very pleased with the result overall.
 

Attachments

  • IMG_20240116_180310.jpg
    IMG_20240116_180310.jpg
    273.4 KB · Views: 56
  • IMG_20240116_180337.jpg
    IMG_20240116_180337.jpg
    235.2 KB · Views: 45
Yes, if you switch the positive wires the beams will be the other way around
Will update now that it has gone dark and I have somewhat aligned the headlights.

I think I may have done just that. Is there any chance you know the tracer of the low beams on each side?

It's quite simple to figure it out, just wanted to see whether you may already know it.
Right = black, left = pink
Thanks very much! I think the low beam is the top spade terminal on the bulb correct?
 
A tad late but updating the thread one last time.

The Disco left yesterday and everything is fine. I had indeed switched the main and low beams wires on the connector. Put them back together the right way (the top flat tab is the low beam on the bulb and Sierras tracer colour advice was spot on) and all is good.

Sierra, once again many many thanks !

Thank you Jayridium for contributing with valuable info and advice !!!
 
Back
Top