Disco 2 Fuel leak fix.

This site contains affiliate links for which LandyZone may be compensated if you make a purchase.

Ian Mackay

Active Member
Posts
316
Location
Scotland


After some guidance and pointers regarding a fuel leak from the fuel pressure regulator on my disco 2, I found this instructional how to, one of the best I have come across, it helped me, to get the job done and save a shed load of cash.
 
That's an excellent video which I will keep for (hopefully not soon) future reference.

Just a couple of points I noticed - would it not be easier to fit the 2 stubs (especially the bottom one) after bolting the unit on rather than before as that would make access to the bottom bolt easier? And I would leave nipping the union nut on the 3rd fuel line till the unit was in place to make alignment easier (is that only on 15P engines?)
Yes bit not real world, but to let you see what its all about really good, just about to start what's in my mind right now after cleaning is the possibility of feed and return hoses being mixed, hence leaving one on.
 
Hi James. IF they are quality replacement parts why do they fail? Is there something else that wears in the body that still causes a leak?
I have my old one I was thinking of overhauling.
Griff
 
Hi James. IF they are quality replacement parts why do they fail? Is there something else that wears in the body that still causes a leak?
I have my old one I was thinking of overhauling.
Griff
its either diaphragm,gasket or o rings the rest doesnt wear, hopefully yours will better quality the ones i used


After some guidance and pointers regarding a fuel leak from the fuel pressure regulator on my disco 2, I found this instructional how to, one of the best I have come across, it may help me, to get the job done and save a shed load of cash.
 
Last edited:
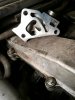
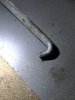
Well the video shows you what's to come off, unfortunately its misleading to say the least, first point, most of their bolts were pre loosened, the three bolts holding on the unit were incredibly tight, so tight in fact that I still have not got the bottom bolt off yet, (very easy all of it with the engine out), the very small m10 head risks getting chewed up I have had a socket on it and a ring spanner on the handle no joy, I will need a hand, one to force the body of the ratchet hard against the bolt, the other to try turning it, tomorrow's a new day. Another false part is the mention of taking the TWO BOLTS off the cooler bolted to the manifold, BULL, there are FOUR BOLTS, the bottom two also being bastards, oh well, it was designed to get sales, and it worked lol as mentioned by one chap would have been easier to take the manifold off, or the body lol.
 
Maybe this would have helped. Worth spending some time reading his stuff.

http://www.discovery2.co.uk/Fpr.html

Cheers
Aye read it, bottom bolt is still a tight bastard, and I've had to take my pipes off to get at it, I have only ordered a spares kit, so pipes off to replace small "0" rings at the end, did think of drilling a hole in the inner wing at one point, might not be as daft as it sounds.
 
That's the fuel pressure regulator off, bit of work, been busy but got an hour at it today, I would class that one bolt as very difficult, will get it built back up tomorrow. Got it from the top.
 

Attachments

  • IMG_20171109_162320.jpg
    IMG_20171109_162320.jpg
    321.1 KB · Views: 191
Last edited:
You're very lucky if you can get the repair kit to work. Seen a lot of posts where it doesn't, including mine. Bought a new one in the end.
I'm not big on luck, let's just see how this goes, keep you posted.
I am hoping the seals have degraded and the new ones, which are the correct grade, for resistance to biodiesel last a good few years.
I grudge paying a shed load for a casting, so I hope, as in all other aspects of rebuild, that the worn parts, if fitted correctly shall work.
 
Last edited:
Some small bits of crap inside the filter, equally they may have come from picking out the "0" ring, will be spotless on rebuild
 

Attachments

  • IMG_20171109_172034.jpg
    IMG_20171109_172034.jpg
    121.9 KB · Views: 177
I made this small pick for removing the "0" ring, simple tool, welding rod end bent and filed.
 

Attachments

  • IMG_20171109_172343.jpg
    IMG_20171109_172343.jpg
    260.8 KB · Views: 154
Back
Top