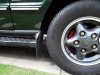
Hi, seen this today think it may help you,Discovery front mudflaps fitted
Since I removed the sidesteps Ive been flap-less due to the fact that the mudflaps are built into the sidesteps so when they went, the flaps went, not good!
As mentioned in a previous post Id ordered the mudflaps a few weeks ago and was waiting for the opportunity to fit them, trouble was either the weather or circumstance seemed to conspire against me.
I finally got the chance today with a day off and good weather as a bonus. I bought the complete front set and fitting kit (part number STC50067) from Duckworth Land Rover in Lincolnshire which contained all the brackets and fixings as well as the flaps themselves.
The kit
Fitting is pretty straightforward if you follow the instructions carefully, the first thing to do is locate the three threaded studs that protrude from the front floor pan on each side, if you had sidesteps fitted from new theyll most likely have plastic sleeves over them to protect the threads. The sleeves should easily be removed with a pair of pliers, just a twist and a sharp tug and they should come away cleanly.
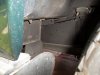
3 threaded studs just behind front wheel
The plastic protection sleeves are easily removed
I noticed a bit of light rust while I was underneath so I also took the opportunity to wire-brush and waxoyl the area while I had the chance, I also run a spare M8 nut up and down the threaded studs to clean them up.
Cleaned and waxoyled
The rubber part of the mudflap is fixed to the body mounted bracket by simple clamp-type affair, the fitting kit comes with two large rivets for each side but I chose to use stainless steel fixings instead, this was mainly down to the fact that my rivet gun wasnt big enough!
The stainless steel fixings I used and the rivets supplied with the kit
Brackets and mudflaps made up ready to fit
At this point you need to offer up the mudflap to enable you to mark up the plastic sill finisher which needs two 8mm holes drilled in it to accept a sprung steel clip that is fixed with two self-tapping screws. Take your time a measure out the holes to be drilled accurately as this will make life a lot easier when you come to fit the screws.
The two 8mm holes drilled with metal clip fitted in place
Next offer up the mudflap and bracket once more and when youre happy everything is aligned use the three flanged nuts to fix the top bracket to the threaded studs, dont forget to use a bit of copper grease to aid any future removal.
3 flanged nuts per side
Now use the two self-tappers to screw through the mudflap into the plastic sill finisher.
Use 2 self-tappers each side
That is pretty much it, job done, hope it helps. Does anyone know where I can get the moulded type, the ones that go onto the end of the steps?
")