- Posts
- 83,230
- Location
- Embasinga stocæ
WATER INGRESS INTO LUGGAGE COMPARTMENT - TAILDOOR SEAL
Bulletin Number - 0022
Issue - 2
Date - 20.01.1999
Model - Freelander
Affected Range - All 5 door vehicles prior to VIN WA 601478
Re-Issue Information - ACTION text and illustrations amended to show revised sealant bead application. WARRANTY CLAIMS time allowance adjusted accordingly.
Problem -
WATER INGRESS INTO LUGGAGE COMPARTMENT - TAILDOOR SEAL
Wet carpet in luggage compartment or condensation in security box.
Cause
</B>Water leaking between taildoor seal and mating surfaces.
Action
Replace taildoor seal with new seal part number CKE100960 using the following procedure:
1. Remove taildoor upper and side finishers. Refer to Workshop Manual repair numbers 76.43.74 and 76.43.81.
2. Remove rear roof rail nuts to release loops at top corners of old taildoor seal. Refit nuts.
3. Remove rear tread plate and two bolts retaining taildoor check stay.
4. Remove old seal and sealant.
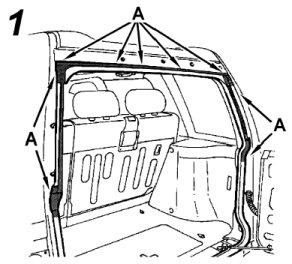
5. Clean seal mounting faces with panel cleaner in shaded areas A in illustration 1 .
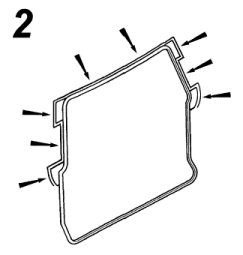
 6. Apply primer (e.g; Betawipe 4000) to the mounting face of the new seal in the areas arrowed in illustration 2.
 NOTE: Do not allow primer to contact any area of the seal which will be visible since primer may cause white discolouration of the seal.
7. Fit the new seal. As the seal shape is relatively complex, it is recommended that the following procedure is adopted:
a) Centre seal at top of aperture and push corners into place.
b) With the aid of a rubber mallet, seat the seal fully onto the top flange.
c) Work down one side of the seal from the top corner, hand pushing the seal to seat onto flange.
d) When the large flap at the waist line is reached, remove adhesive backing paper and press the flap into position to adhere to panel.
e) Continue pressing seal onto flange until bottom corner is seated.
f) Repeat for the other side.
g) Fit lower run of seal to bottom flange, ensuring that seal is evenly distributed along flange.
h) Remove backing from flaps at top corners and adhere flaps to panel.
8. Apply masking tape across the painted panel area shown (A-A in illustration 3).
 9. Apply a bead of polyurethane sealant (e.g. Betafill) across the top of the seal to fill the gap between seal and masking tape. Also apply a sealant bead around the seal corner flaps (B in illustration 3), continuing down to and around the waist line flaps, to C. Pay particular attention to the flaps.
10.Carefully remove masking tape, refit treadplate, check stay and finishers.
</B>Parts Information
CKE100960 - Seal - Taildoor aperture
DYC101470 - Clip - Latching - Upper finisher - 5 required
DCE100560 - Clip - Trim retention - Side finishers - 6 required
Polyurethane sealant such as Betafill - sourced locally
Compatible primer for sealant such as Betawipe 4000 - sourced locally
Use S.R.O.: 76.40.10
Time allowance: 1.00 Hr
Bulletin Number - 0022
Issue - 2
Date - 20.01.1999
Model - Freelander
Affected Range - All 5 door vehicles prior to VIN WA 601478
Re-Issue Information - ACTION text and illustrations amended to show revised sealant bead application. WARRANTY CLAIMS time allowance adjusted accordingly.
Problem -
WATER INGRESS INTO LUGGAGE COMPARTMENT - TAILDOOR SEAL
Wet carpet in luggage compartment or condensation in security box.
Cause
</B>Water leaking between taildoor seal and mating surfaces.
Action
Replace taildoor seal with new seal part number CKE100960 using the following procedure:
1. Remove taildoor upper and side finishers. Refer to Workshop Manual repair numbers 76.43.74 and 76.43.81.
2. Remove rear roof rail nuts to release loops at top corners of old taildoor seal. Refit nuts.
3. Remove rear tread plate and two bolts retaining taildoor check stay.
4. Remove old seal and sealant.
5. Clean seal mounting faces with panel cleaner in shaded areas A in illustration 1 .
7. Fit the new seal. As the seal shape is relatively complex, it is recommended that the following procedure is adopted:
a) Centre seal at top of aperture and push corners into place.
b) With the aid of a rubber mallet, seat the seal fully onto the top flange.
c) Work down one side of the seal from the top corner, hand pushing the seal to seat onto flange.
d) When the large flap at the waist line is reached, remove adhesive backing paper and press the flap into position to adhere to panel.
e) Continue pressing seal onto flange until bottom corner is seated.
f) Repeat for the other side.
g) Fit lower run of seal to bottom flange, ensuring that seal is evenly distributed along flange.
h) Remove backing from flaps at top corners and adhere flaps to panel.
8. Apply masking tape across the painted panel area shown (A-A in illustration 3).
10.Carefully remove masking tape, refit treadplate, check stay and finishers.
</B>Parts Information
CKE100960 - Seal - Taildoor aperture
DYC101470 - Clip - Latching - Upper finisher - 5 required
DCE100560 - Clip - Trim retention - Side finishers - 6 required
Polyurethane sealant such as Betafill - sourced locally
Compatible primer for sealant such as Betawipe 4000 - sourced locally
Warranty
Use Complaint Code: 9J4NUse S.R.O.: 76.40.10
Time allowance: 1.00 Hr