Freelander Project III (Audrey)

This site contains affiliate links for which LandyZone may be compensated if you make a purchase.
LOL, I know but what the hell, I have three angle grinders (115mm, 125mm and 230mm) a dremel, a jig saw and two drills, (batt and leccy). What could possibly go wrong?
Is this car a keeper?
A good friend of mine always says "do it right, use Hammerite" which makes me laugh. He also has all the cutting tools available and paints the damage with, you guessed it, Hammerite!! Lol
 
Is this car a keeper?
A good friend of mine always says "do it right, use Hammerite" which makes me laugh. He also has all the cutting tools available and paints the damage with, you guessed it, Hammerite!! Lol
Not a fan of Hammerite, I have been using Rustoleum last two cars so any dodgy bodging gets a good coat.
 
Last edited:
Not got much done the last few days, but managed to fit the new propshaft support bearings and bolted it back together.
20160609_210343_zpsx8juopxc.jpg

20160609_210349_zpscnl27pwa.jpg


No pics of it back together but hoping to get the car back to 4WD this weekend.
 
Not got much done the last few days, but managed to fit the new propshaft support bearings and bolted it back together.
20160609_210343_zpsx8juopxc.jpg

20160609_210349_zpscnl27pwa.jpg


No pics of it back together but hoping to get the car back to 4WD this weekend.
Looks good.
Have you found that the grease nipples hold the fluid in ok? I know they aren't really designed to take much internal pressure.
 
They're still going strong on the first one I did. I used extra fine thread nipples with the idea more threads means stronger and less likely to leak. Not sure if this is true or not as the threads are shallower but hasn't been a problem.
BTW I drilled the second hole after welding and tapping it was a right pain.
 
I was more thinking that the sealing ball in the end of the grease nipples might leak. The threads are easily sealed with a dab of threadlock compound. It's good to know yours isn't leaking.
 
I was looking under the first car I did last night to check the correct way round to fit the VCU (it has done several thousand miles since being done). While there I checked for signs of leaking and it all looks good. In the end it doesn't really matter as you can easily replace a leaking nipple with a bolt.
 
Prop shaft back on.
20160611_171808_zpsoprfclml.jpg


Now looking at the butchered sump guard.
20160611_170635_zpsualdzi8m.jpg


First I drilled out the rivets holding the remains. then cleaned it up and started adding bits of angle iron so I've something to bolt to.
20160611_200002_zps6ior0mmq.jpg


I'll drill the top face and weld on captive nuts so it can be removed from below without taking off the entire bracket. After fitting both bits of angle iron I refitted the whole thing so I could get an idea of what is needed. Turns out the sump is well out of the way so a straight bit of alloy should do the job, I don't have any heavy alloy so it will only be for weather protection but if I decide to use it for any kind of off roading I'll get something heavier.
 
interesting read, i like what youve done with the vcu!

i plan on doing something similar to the sump guard on mine, could you tell me the size of the bolts that hold it in place by any chance? mine came with the guard in the boot and no bolts.

atb
 
Last edited:
thanks mate, at least ive got somewhere to start. going to pull the plastic off first strengthen it up. was lucky last night, drove down a field to help a friend, grass was waist high and ended up hitting a rock that luckily just hit the sub frame, theres a knocking on the front now and it smashed my back box which is now blowing, im thinking the knocking noise is drop links as i can feel it directly under my feet.
 
Nice speakers for the money those. I think you're in for a game to fit the mid bass unit though. I decided to leave mine factory because I couldn't be bothered to mess about. Let us know how you get on fitting them.
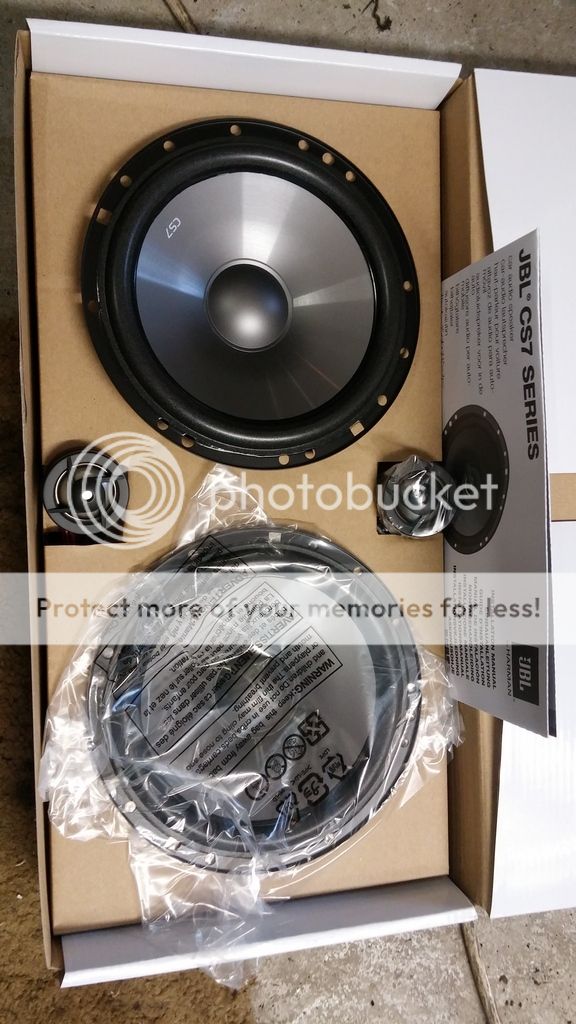
Got a bit distracted from the sump guard cause the new speakers arrived yesterday, so here is the 'HowTo'
20160613_195411_zpsnxnr6ngc.jpg


First out with the old, as these speakers came with a separate tweeter and crossover box I had to cut the wires where the old ones joined. The old woofers and tweeters were wired in parallel so once cut the main feed wires were connected to the feed side of the crossover.
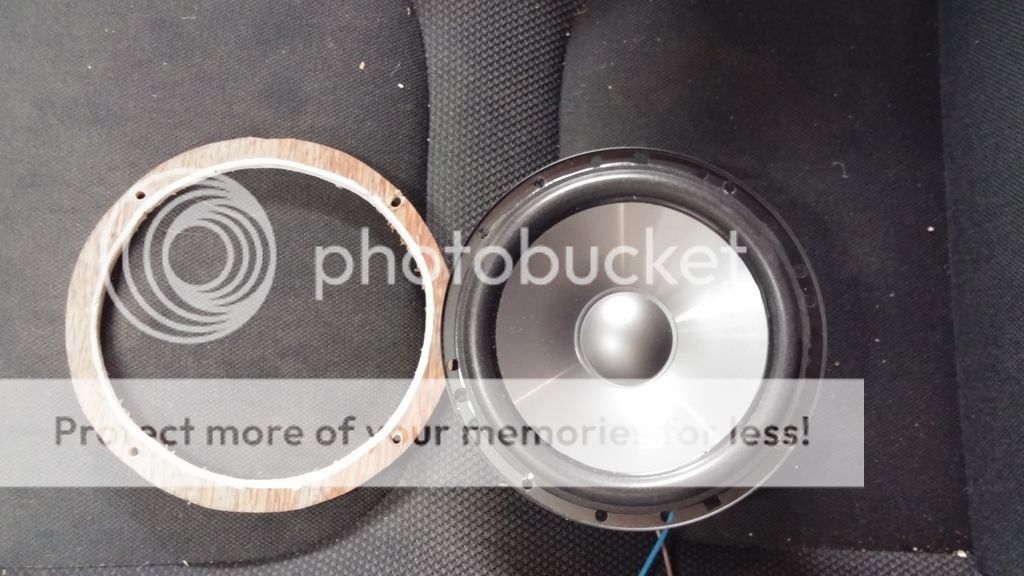
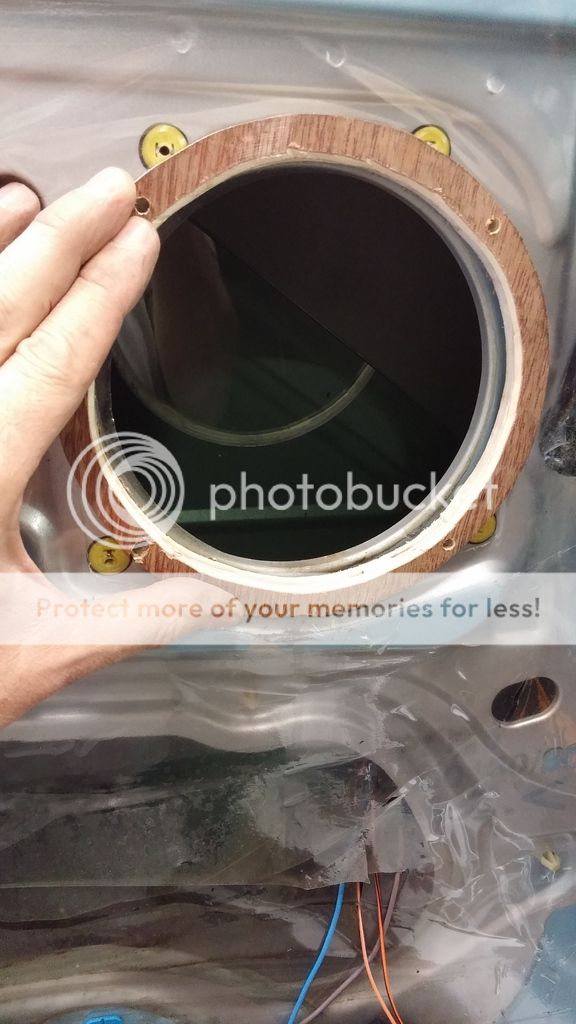
Then I looked at how to fit the new speakers and was pleasantly surprised they fit OK. That was until I lowered the window and found they fouled the glass coming down. :mad:
So after a bit of checking I came up with this.
20160614_215227_zpsljepqtbo.jpg

20160614_215343_zps7wn3ue3e.jpg

A bit of plywood approx 10mm thick cut to size and drilled to suit. I had to drill the door skin too but that was easy then a few 25mm M4 stainless bolts and lock nuts.
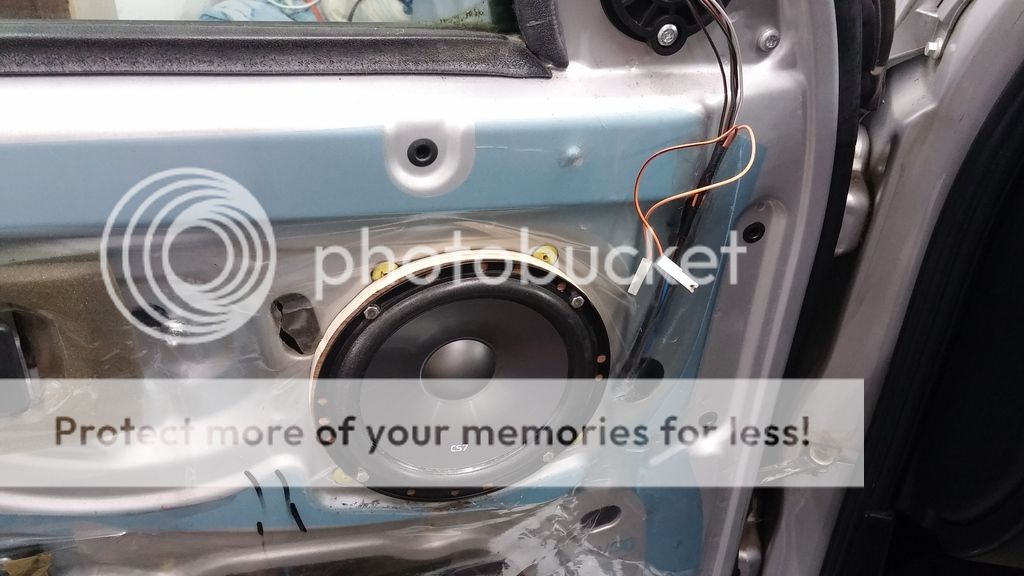
I had to solder wires onto the woofer as I had no connectors the right size but I don't expect to ever use them anywhere else so not bothered. The wires then got connected to the output side of the crossover.
20160614_220602_zpsvzu5vueh.jpg


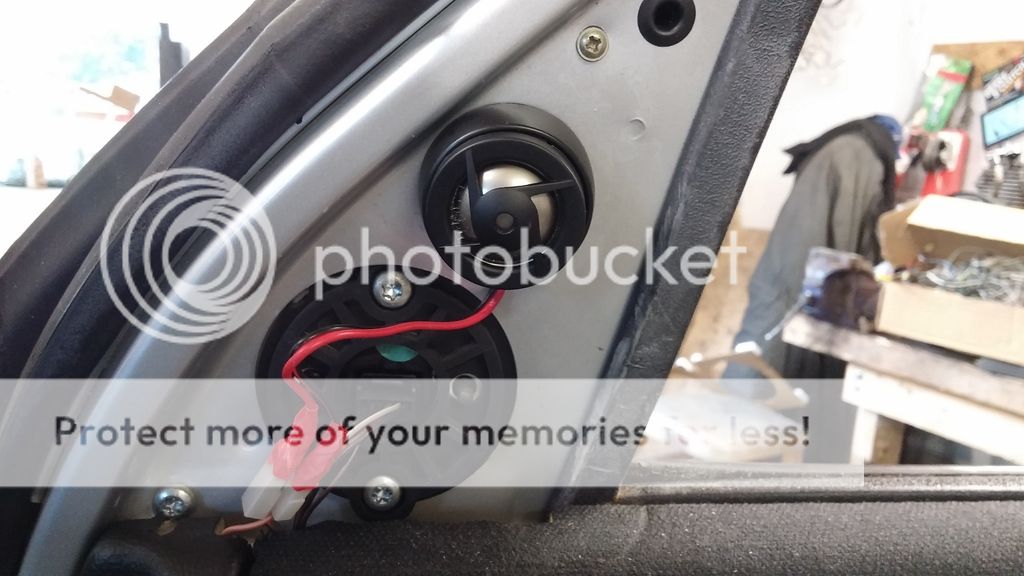
So with the woofer installed and connected it was time to look at the tweeter, the new tweeters came with nice cone shaped enclosures to surface mount them but I wanted the OEM look so I drilled a hole in the door at the correct height for the hole in the door trim and just jammed the new tweeter into it's holder. It should have fitted nicely but I didn't have the right size of drill to be able to use the correct screw.
20160614_203352_zpskuadwtm5.jpg

It is taped on now too so should be fine.
As you can see the new tweeters came with connectors which just happened to fit the old speaker wires so I just reused them. I had to solder a bit more length onto the wires to get them down to the crossover.
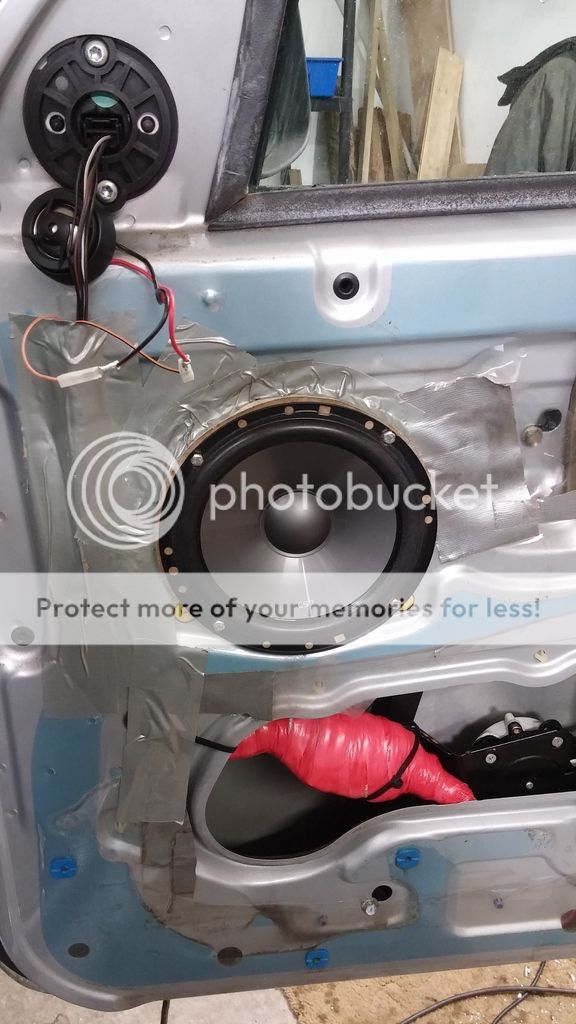
This is it all connected up with the crossover wrapped up in cellophane and cable tied out of the way.
20160613_225227_zpszih6ysz8.jpg

Once all connected I fitted a new membrane to the door
20160614_194143_zpsxjczriau.jpg

20160614_200826_zpsqrk5emsh.jpg


Had a wee listen and very pleased with the sound quality. The head unit is only a year or so old and reasonably good quality so getting half decent speakers makes it sound quite nice. Probably a lot better than OEM.
 
I had the day of work today and got a wee bit more done today but as usual it's two steps forward and one back. I've another thread on here about the crunch in third gear and a few days ago I refilled the gearbox with ATF. To explain I took the car for a test drive before buying it and didn't notice any issues with the gearbox, the next day I went to pay for it and drive it home and on the way home it started making a nasty crunching noise while changing into 3rd gear, funny the previous owner never mentioned anything about it. :mad: Strange thing is I have spent so much time sorting other bits and pieces before getting it taxed and insured I'd forgotten all about it until the other day when I took it out for a wee spin. :confused:
Anyway I was gutted as you'd imagine thinking it will need the gearbox changed but my new best buddy #Joe_H advised I try refilling the box with automatic transmission fluid, apparently it has detergents which can clean up a dodgy gear change. I tried this and so far it seems to be working so I'm very hopeful it might be OK after all.
On other things I hope to take the car to an off road club meet on Sunday so I got back to the sump guard I started in post 109. The angle iron was already cut and bolted on so today I cut out a piece of alloy to fit. I had taken the sump guard of my other Freelander so I used it as a template, cut it out and this is the result.
20160701_123036_zps0ngxfx2w.jpg

20160701_122938_zps4zncrxls.jpg

20160701_123005_zpswup5xqiq.jpg

It isn't quite finished yet as it will need trimmed to fit around the subframe but so far so good. Also the alloy I used is very light so this is more of a weather shield than a real sump guard but as it is easily bolted on and off I could use it as a template for a heavier duty version.

That kept me busy for an hour or so this morning and this afternoon I took the car to have the wheels aligned, although it isn't pulling hard to the side the handling feels a bit odd. The guy in the tyre depot said it is a mile out and had a go at adjusting it but wasn't happy working on the TRE as it was kinda seized. Apparently the bolts can snap easily so he asked me to get the adjusters freed up first and bring it back. I reckoned it was daft to free up the TRE's and have the tracking done without replacing them so I ordered a pair off Eurocarparts and drove down to collect them. It was during the drive that I noticed two other things not quite right. First there was a noise from the front left caliper and when we stopped I noticed it was very hot and second there is a very nasty wobble in the drive train. I'm hoping the wobble is the same issue my first Freelander had after refurbing the VCU so I did as before and rotated the VCU damper one hole. Sounds daft you say but I noticed on the first Freeby the damper is not perfectly balanced so maybe it will work, I'll report back later.
The sticky brake issue really requires a refurb kit or replacement calipers to sort but as I had neither today I decided to strip it and clean the piston. I had already tried pushing out the piston a bit and shoving red rubber grease into the dust shield but that only helped a wee bit. I thought I would pop the piston out with the air compressor but it was so tight I had to put the caliper back on the brake line and use the brake hydraulics to push it out, even then it was very tight. No pics unfortunately but it had some rust so I cleaned it up with a nylon scrubber, cleaned up the inside of the caliper, lubricated with brake fluid and poped it back in quite easily. The dust shield is fine so hopefully it will be OK now.
 
Last edited:
I spent a few hours on Saturday tinkering with various bits to try and get Audrey ready for an off road event today in Mageramorne quarry. It is an disused quarry where some of the outdoor scenes for Game of Thrones are shot, but is also used for off roading.
The ally I used is pretty lightweight so I found an old deckchair and cut a chunk leg out of it, a bit of thumping and squishing in the vice and it now strengthens the leading edge of the sump guard.
20160702_170941_zps0d6v259o.jpg

I then found some 5mm ally plate I rescued from a tip and bashed it until it had a nice hump in the middle. Then I fixed it to the sump guard and using a mixture of rivets, small bolts and brute force and ignorance I made the thinner ally follow the contours of the 5mm plate.
20160702_185049_zpsjaabpetm.jpg


Bolts temporarily fitted to pull the ally into shape around the bulge in the 5mm plate.
20160702_181506_zpshxcekaqj.jpg

20160702_181456_zpsbufumqzi.jpg

20160702_185111_zpsoknptthv.jpg

Then bolted it in place
20160702_191150_zpsop4x3jou.jpg


I have to admit with the low ground clearance there was a lot of scraping and crashing over some of the more rutted routes but happily no damage to report so the sump guard earned it's keep.
 
Last edited:
Fitted a Renault thermostat in the top radiator hose!

20160806_125431_zpswzi1afwu.jpg

20160806_125443_zpsonqms5wo.jpg

20160806_125811_zps900gs84z.jpg

I used a 115mm grinder to cut off the metal band that secured the hose, the old coat was to stop anythiing getting into the inlets while grinding.
I found the connector was too tight to pull off so left it there as I had to take the hose off the connector anyway. Had I been able to pull it off I wouldn't have had to take the inlet manifold off but it isn't that big a job anyway. I used a smear of Silicone grease to get the thermostat into the hose and it slipped in fairly easily.
I think it took longer bleeding the system than it did replacing the thermostat but now the temperature gauge rises nicely and sits at half way so very pleased.
 
Last edited:
How to repair a TD4 Starter motor.

Audrey has been running really well since the thermostat mod until the last week or so. SWMBO happened to mention that in the cold spell we had for a few days she was hard to start, "just clicking" she said. So I had a look on the interweb for similar faults and the common thing seems to be the starter motor contactors. New parts ordered off ebay for £13 and fitted so now it seems to be sorted.
The kit includes a solenoid pin and two copper contactors, and is easy enough to fit once you have the starter out.

It you ever have to do it here is a quick step by step.
Tools required
1/4" socket set with long sockets for the manifold 11mm nuts
Small torque wrench suitable for 10Nm
13mm spanner
15mm spanner.

1. Remove the top engine cover.
2. Remove the air intake plastic pipework.
3. Remove the manifold
4. There is a bolt running through an earth strap, and the gearbox bell housing as well as the front mount hole of the starter motor. Remove the nut and pull the bolt back a bit. This is the easy one.
5. The second bolt doesn't have a nut as it goes through the bell housing and screws into the starter. It is a bit awkward to see and get at because of the pipework in the way but with a bit of patience and a 13mm spanner it can be undone. I used a 1/4" ratchet and 13mm socket to speed things up as you can only turn it 1/5 or so of a turn each time.
6. Remove the nut holding the heavy electrical connections and the small spade connector
7. With a bit of fiddling the starter should drop down between the pipework without too much fuss.
8. Follow the instructions to replace the parts in the starter. Take care to keep the parts in the correct order as they come out cause it would be very easy to get confused when putting them back in.
9. Refit the starter, tighten up the bolts and nut and refit the inlet manifold etc. 10mm bolts should be 10Nm and 11mm nuts and bolt should be 15Nm

I did a pictorial on this a while back on the R40 club I keep meaning to add it to here, as soon as I have time I will, but for now here is the link below.
http://www.the75andztclub.co.uk/forum/showthread.php?t=227316
 
I did a pictorial on this a while back on the R40 club I keep meaning to add it to here, as soon as I have time I will, but for now here is the link below.
http://www.the75andztclub.co.uk/forum/showthread.php?t=227316
That is a brilliant pictorial Mr Artic2. Hats off to you sir for putting in so much effort. I think it would be a great help to anyone else doing the same job and the differences with the Freelander are minimal so a simple copy and paste job should do.
 
I've been hearing nasty noises from the front N/S wheel for quite a while but each time I checked the bushes everything seemed fine, until last week that is. This is SWMBO's car so I'm not in it much but last week I was passenger in it and couldn't believe how much it was cracking and rattling.
"How long has it been like that"
"Oh just a wee while"
Yeah right! The wheel would need to be falling off before I'd hear about it.
Anyway it only took a few minutes to spot the issue was the inner CV joint and a new one was ordered. Being a tight fisted miserable git I searched quite a while to find an OEM one cheap but gave in and ordered an ebay cheapy.
I thought some of you might be interested in seeing the CV joint that arrived last week, so this is it.
http://www.ebay.co.uk/itm/130922594437?_trksid=p2060353.m2749.l2649&ssPageName=STRK:MEBIDX:IT
and these are a few photo's of what came in the box.
20170106_161001_zpsygfrgjva.jpg

20170106_161029_zpshojzksg6.jpg

20170106_170320_zps5viy4ly7.jpg

20170106_170329_zps5eqgopsx.jpg


Fitting was very simple and so far so good. The part claims to have a 2 year warranty and seems pretty strong but as I plan to sell the car soon I'll never know.
As the boot is generic it could cause problems for anyone replacing it in the future but like I said that won't be my problem. Anyway the whole thing came to only £25 so you could replace the whole thing for the price of an OEM boot.

Here is what happened to the old one BTW
20170108_143659_zpsnox5w24s.jpg
 
Last edited:
Back
Top