Fitting rear crankshaft oil seal

This site contains affiliate links for which LandyZone may be compensated if you make a purchase.

Resurgam

Well-Known Member
Posts
184
Location
Ynys Môn
I'm trying to fit a new oil seal to the flywheel housing of my 200Tdi but because I'm lacking special tool 18G.134-11 or anything large and solid enough to drift the seal in properly I've managed to deform it and now need to order another one. As they're not exactly cheap I'm keen to avoid this happening again.

It strikes me that the special tool isn't all that special and could quite easily be turned up on a lathe rather than buying one for £210 :eek:. Does anyone know the dimensions of the genuine tool, particularly the depth that it pushes the oil seal down to as I can estimate the diameters. I know it says that you can push it to the bottom if you don't have the tool, but if I'm making one it might as well be correct.

Cheers
you can fashion a disc suitable out of ply and a jigsaw depth isnt vital the idea is you can alter position of seal to avoid previous seal wear grooves in crank boss
 
Doing this seal change too, and also damaged the first one we tried to fit. New part obtained, along with new FW mounting bolts, with thread sealant already applied. (thanks Turners.) FW housing cleaned etc.

Just somewhat confused now (nothing new) re how far to press the new seal into the housing. Some info says all the way, others say 1 or 1.5mm from the top (G'box side.)

The comment from jamesmartin (above) makes sense, as then a new seal can be fitted to avoid running on the old crank surface if it is damaged. Mine is marked (dark stain) but feels smooth, so ???

The housing and seal is currently at a friends workshop where he has a press. (Got to be better than my attempts at tapping it in, see first para' above!...

As is usual for a LR, what started as a clutch job, has escalated somewhat, but at present it's just fitting this new seal to the FW housing that is being a right pain...

Comments & advice welcome.

Regards to All.

DDave.
 
Last time I did mine it would not go in, but after an hour in the freezer I was able to tap into place with ease.
Also remember if using a proper Dowty seal surfaces have to be clean and dry, no lube, they are Teflon coated.
leaving slightly proud as suggested is good.
 
When I did mine the seal came with the cone fitting guide and just tapped in with no problems. I am Fairly sure I went for flush but can’t remember why now. I know I did a lot of research as part of my rebuild.
 
Morning All.
All understood etc. The only reason I'm in this minor pickle, is that the clutch started slipping under "Power". 50MPH and full throttle, the rev's would go up, but not the road speed. :-( Plus that smell if you let it do that for too long... Not even towing a trailer either. Mind you, in the last 20+ years since the big build, it's had some (ab)use to say the least (Abingdon event MudRun Recovery duty etc..) so not done bad.

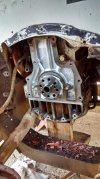
When we (finally) seperated the g'box and engine, and especially after removing the clutch assy, we could see engine oil around the flywheel bolt heads, and a small pool resting in the middle of the flywheel. Though the clutch plate was worn, it was not too bad, however it had that oily/greasy feal and was obviously contaminated. Hence the stripdown, as the flyweel bolts at least needed investigating. (Evidence that most if not all of the oil had seeped past the threads and bolt heads!)

Of course, with them out, and flywheel off, we could then see the seal, that also "Appeared" to be leaking. (But on investigation I don't think was, but without the install tool, it's just as easy to replace it etc, or that was the thought at the time!) It was also evident from looking under the engine, that oil was getting out between the FW housing and block etc. When we got the FW housing off, the gasket had failed, as the bottom half fell on the ground, so oil was getting out that way.

So, what started as a "simple" clutch job. (Are they ever?) Escalated quickly to say the least, and here we are! :)

Hopefully in a few hours, now I've found someone with a large press of sorts, and also a bit of a LR nut, the seal (second attempt) will be in and not damaged during fitting, and re-assembly can commence. New FW bolts, Housing/Block gasket, Blue Hylomar, HD clutch kit, release bearing, slave cylinder, coffee etc etc... (Not evident in the attached picture, but there is now a new spiggot bearing fitted too.)

And yes, the bulkhead footwell on the left also needs attention. It was "New Old Stock" 20 odd years ago, + I had it "Profesionally" prepared and painted after the needed minor mod to clear the Disco Lump exhaust, and also filled all it's cavities with WaxOil. It's now turning to dust in significant places (but not where the footwell mod was done) just like a 20 year old Solihull product of it's generation... That'll be another big job for next year, and another thread. Like this job, and the original rebuild, all done on the driveway in the open, dodging the British weather from time to time...

Regards to All.

DDave.
 

Attachments

  • IMG_20230611_140753064_HDR.jpg
    IMG_20230611_140753064_HDR.jpg
    1.3 MB · Views: 49
Even with a press I recommend cooling the seal first. One chap on here who is a wood turner made a wooden copy of the official Land Rover seal tool. :)
You should not need the Hylomar, the correct housing/block gasket comes with pre applied sealer in the correct places, just all has to be clean surfaces.
 
Hi again.

I have a friend who's a carpenter, but not a wood turner. I also have a friend in the vilage, who's metal fabricating workshop has lots of facilities, plus he's also a LR nut, very creative and experienced in "alternatve" uses for tools and machines.

The seal is now in. Recesed by 2mm, the thickness of the available metal plate, now trimmed to fit the seal apature in the FW housing. We used his hydraulic Press Break (metal folding/forming machine) that was very easy to control for just the minimum force needed to do the job.

Anyway, the housing was previously cleaned, all signs of the green sealant from the previous seal I damaged was removed (Petrol shifts that.) Eveything positioned so that there was plenty of support below the housing, and space for the plastic fitting cone. A large block of ally' was positioned on top of the seal, everything centered, and gentle presure applied.

At first, the seal only went in a mm on one side, so the top metal block was repositioned slightly, and it went in straight just fine.

Then the 2mm piece was positioned on top of the seal (by then "flush mounted") under the metal block, and seal pushed in a little more. We checked with a caliper/depth gauge, and it's in "straight" with no damage.

All I need to do now, is summon the enthusiasm to get out, get under and get mucky! Its gone mid-day, and it's uncomfortably hot out there in the sun allready, even under the waggon with no breeze... But needs must...

Re the housing/block gasket. Yes, I'm aware it comes with those beads of sealant, but the original had failed (that Turners fitted when they rebuilt the engine well over 20 years ago) showing signs of weepage after only some 5 or 6 years of intermittent use.

Yes, a decent gasket should do the job by itself, but as it's a pig of a job to get to and replace this particular gasket, this is getting the Hylomar treetment, after the engine surfaces are thouraghly de-greased & cleaned etc.

It is non-setting (so easy to clean off when next exposed) plus I've used it in other places where even with a gasket, troublesome leaks occured after a few years. (Water Pump, Rocker cover, Fuel lift pump etc.) Remove, Clean, New gasket, a light smeer on both metalic parts, position and fit using correct torque settings where specified, and no more leaks!

Time will tell.

Regards to All.

DDave.
 
Good luck, a 200 is easy to do compared to a 300. My local garage took three attempts to get one not to leak.
It was his own truck! Drove him:mad:. Half the problem these days can be getting quality parts.
 
I had a rear main seal come loose in the fw housing, next one went in with some loctite.
Leave the protective shield in place when you slide the fw housing into place, saves any damage from crank.

Blue hylomar is excellent stuff.
 
OK.. Latest..

Housing fitted OK the other day, two stage torquing of the bolts (with delay between) etc, (plastic fitting cone saved "just in case"!) Flywheel fitting surfaces cleaned and FW fitted back onto the crank with the new bolts (torqued to spec etc.) Negligable "run out" (wobble.)

Eventually (other non LR stuff happening, wifes 60th and a gathering etc) got to re-fitting the starter motor yesterday (pig of a job, especially as I'm not as flexible or as strong as I was 20 years ago!)

Checked everything, especially the wood block under the rear of the engine! Checked for electrical shorts, put the battery in temporaraly, and she started on the button just fine. Somewhat noiser than "normal" with just about everything that usually surrounds the back of the lump missing, I guess that is expected, and let it run at a fast idle for some 15 mins. Oil presure steady at 60PSI. (Would have attached a short video, but seems the site can't support that...)

At that time, no signs of any leaks, but that was yesterday. Later (have to do an airport run today) or tomorrow (it rained here this morning) I'll examine things again to make sure nothing has dribbled down behind the flywheel and become visible in the bottom of the housing, before contemplating fitting the clutch assembly etc (or swearing a lot!)

Then all I need is a fat wallet (for the "after graft beers") and find a local helper or two, to help manhandle the gearbox assembly back into position. (No room for a hoist!)

Oh the fun of working outside on the driveway, fence and a drop to one side, neighbors footway and sloping lawn on the other!...

Ah, "Management" downstairs now shouting at a cat about something. Best I go see who's honked up what this time!.

Cheers All.

DDave.
 
Good luck, a 200 is easy to do compared to a 300. My local garage took three attempts to get one not to leak.
It was his own truck! Drove him:mad:. Half the problem these days can be getting quality parts.

Indeed, I've seen a lot of Y'Tube vid's about that!

Too much unbranded "white box" or Sh*tPart stuff on the market, at any cost. Hence where possible, I try to buy from trusted people/companies who use the same stock of parts for their own work. So far... So good.

Regards.

DDave.
 
I had a rear main seal come loose in the fw housing, next one went in with some loctite.
Leave the protective shield in place when you slide the fw housing into place, saves any damage from crank.

Blue hylomar is excellent stuff.
Re:- "Watch the film Idiocracy, then take a good look around you!"

100% agree! That could almost be a documentary these days...
 
The mind just boggles with what some garages/shop's as they call them in the US have to deal with.
View "Just rolled in " on the tube.
 
Back
Top