Fitting Paddocks Rear Bench Seats

This site contains affiliate links for which LandyZone may be compensated if you make a purchase.

Roadkill77

New Member
Posts
75
Location
Blackpool
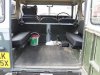
With photos as i couldnt find ANY anywhere.

Tool's needed/used
Mole grips (as you cant be in 2 places at once:D)
Drill (Dont be scared of drilling holes landys are full of em as standard lol)
spanners.
8 x Nuts and Bolts

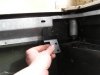
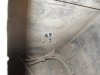
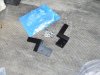
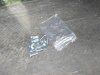
Basically all you get from Paddocks are 2 small bags of crap that makes no sense see pic
 

Attachments

  • Crap supplied.JPG
    Crap supplied.JPG
    25 KB · Views: 756
  • Crap supplied 2.JPG
    Crap supplied 2.JPG
    22.6 KB · Views: 645
Last edited:
In the blue bag there are 2 brackets for each seat that i did learn off here! are to go at the back of the back rest (bolted) and then slot up into the body capping use the ONLY nuts and bolts that came with the seats to fasten the folding hinges together then discard the rest and go and buy 8 nuts and bolts from a hardware store.
 

Attachments

  • Where the hooks go.JPG
    Where the hooks go.JPG
    40.4 KB · Views: 1,203
  • Hooks lined up.JPG
    Hooks lined up.JPG
    48.5 KB · Views: 1,218
  • Folding hinge assembly.JPG
    Folding hinge assembly.JPG
    24.2 KB · Views: 1,228
  • Folding hinge assembly 2.JPG
    Folding hinge assembly 2.JPG
    22.5 KB · Views: 1,726
First of all i assembled the seat base to the seat back then offered it up to the body capping to find out which of the many holes in the seat back frame were going to line up.
Once i did this i fastened the seat back hooks and slid them up into place till the bottom mounting points were flush with the inner wheel arch where the seat rests.
 
From there i drilled my holes to fix the seat back bottom to the truck while the seat back was in place with its hooks holding it!
And then ofcourse with the holes drilled (twice as a cross runner was in the way of the first washer for the underside/outside) i mounted the seat.
 

Attachments

  • assembled 2.JPG
    assembled 2.JPG
    21 KB · Views: 1,554
  • Assembled.JPG
    Assembled.JPG
    23.7 KB · Views: 834
Thats it job done apart from the 2 holes at the back of the base cushion that you tie to the seat back frame to hold your seat base in place but i didnt bother as if the cushion is removable then it gives you a lot more room when folding the base up!

This is my first ever how to, so forgive any errors i may haver made as im sure there are some nit pickers that would do the job differently but at the end of the day i bothered to take my camera out and do my best blind!:)
 

Attachments

  • One mans aid.JPG
    One mans aid.JPG
    20.5 KB · Views: 1,087
  • Underside mounted.JPG
    Underside mounted.JPG
    45 KB · Views: 1,029
  • Job Done.JPG
    Job Done.JPG
    44.8 KB · Views: 1,195
  • End game.JPG
    End game.JPG
    49.7 KB · Views: 1,371
  • Cushion tie holes.JPG
    Cushion tie holes.JPG
    45.5 KB · Views: 1,075
Hi Roadkill77

i am not sure but the seats you have are more for a 90/110 rather than a series truck so you may need to mode the seat frame to suit series cappings, think i just bolted the back rest frame to the cappings and didn't use the brackets that slot in the cappings hope this helps.
 
Well there in now with no play in them good and solid so im happy.:)

As far as i can tell NOBODY (Including Land Rover) knows what bits are for where and how to put them together lol
I have heard stories about how Land Rover used whatever bits they had lying around when it came to building them hence why my Carb is clearly stamped SOLEX 316V and when it came to the overhaul i learned it was a ZENITH 316v one had just sold to the other :rolleyes:
Which is why i will be getting the bumper sticker Built Not Bought :D
Cheers anyway though it would have been nice to get the right seats but hey ho:cool:
 
Land Rover did know which bits went where - a look in the parts catalogue would have shown you how the seats went together. And it's hardly Land Rover's fault that their carb supplier changed the name of the product!
 
Land Rover did know which bits went where - a look in the parts catalogue would have shown you how the seats went together. And it's hardly Land Rover's fault that their carb supplier changed the name of the product!


Really, Seriously, Honestly, Wow thats good to know! So glad you were here to set me straight on that one thanks.:rolleyes:
 
Just trying to help - I find the parts catalogues help to fill in the bits the manual misses out. Lots of exploded diagrams of the various options and age differences. And those bench seats do look right - they are awfully similar to the ones Land Rover put in my early S3.
 
Do away with mole grips and get youngest child to hold spanner.... a cash saving on a pair of mole grips... Land rover economy motoring ! lol
 
Hi fellas,

this post isnt too related to the above, but i did a search and this was the closest on the series section,

Im looking at getting a pair of bench seats (side facing) how much is a decent price to pay for them? They are in half decent nick and not ripped.

Thanks

J
 
i got a pair from ebay a couple of weeks ago for £40 including delivery they where a bit dirty, one small rip and needed some painting but have cleaned up well. Having said these I needed to chop them around a bit to fit around my lpg tank so I didn't want them in A1 condition and had a couple of hours to get them looking good. I would do a completed listing search on ebay to get an idea of price, ones in good condition have been going for well over a hundred for a set, prity near to new prices I would guess.
 
Cool, thanks for the help!

I was hoping to pay around that, the seats are in half decent condition, bit of surface rust on the frames but, nowt a bit of sandpaper and a lick of paint won't sort.

Cheers

J
 
I have used the holes provided on one side of the capping. I test fitted the other side and then remembered the toolbox! It cannot be attached on that side in the same position as it would have to bolt into the tool box lid. Any other ideas/ What have other people done? It is on a 109, 5 door.
 
Back
Top