- Posts
- 143
- Location
- Calne Wiltshire
Hi all,
Finally getting around to fitting an electric fan to my 200TDI Defender and appeared to have failed at the first hurdle….
The kit is from bolt on bits and includes:
-Fan
-4 small plastic brackets
-2 large metal plates
-Electrics cable with top hose T-piece, switch etc
-Lots of tie wraps
4 nuts, bolts and washers

The problem is, ‘fit brackets to fan and fit fan to radiator frame’
It’s not clear which slots on the fan to push the plastic brackets, but I’ve had a go, and bolted to the two brackets to the plates (not really mentioned in the instructions) see pic and there are a number of options on where to fit the clips

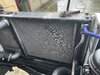
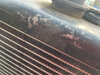
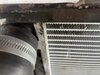
Then there is the question of ‘fit to radiator frame’. The instructions don’t mention drilling holes or draining and removing the rad.
I see no holes….rad pic is attached, wouldn’t display
So I’m hoping someone will have fitted one of these fans and can provide me with some clues as what I thought was a nice Sunday morning job has so far failed.
all advice really gratefully received
steve
Finally getting around to fitting an electric fan to my 200TDI Defender and appeared to have failed at the first hurdle….
The kit is from bolt on bits and includes:
-Fan
-4 small plastic brackets
-2 large metal plates
-Electrics cable with top hose T-piece, switch etc
-Lots of tie wraps
4 nuts, bolts and washers
The problem is, ‘fit brackets to fan and fit fan to radiator frame’
It’s not clear which slots on the fan to push the plastic brackets, but I’ve had a go, and bolted to the two brackets to the plates (not really mentioned in the instructions) see pic and there are a number of options on where to fit the clips
Then there is the question of ‘fit to radiator frame’. The instructions don’t mention drilling holes or draining and removing the rad.
I see no holes….rad pic is attached, wouldn’t display
So I’m hoping someone will have fitted one of these fans and can provide me with some clues as what I thought was a nice Sunday morning job has so far failed.
all advice really gratefully received
steve