Discovery Rust - Boot, Sills and Wings

This site contains affiliate links for which LandyZone may be compensated if you make a purchase.
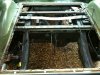
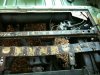
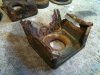
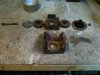
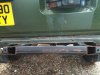
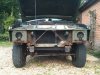
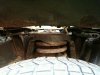
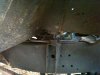
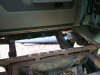
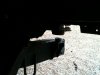
This evening I have removed the towbar and the fuel tank to gain proper access to the chassis and rear cross member.

WORD OF CAUTION.
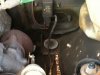
The fuel tank should have been removed first as even though I am careful withe tools etc, I still managed to almost drill through the tank three times whilst drilling out the spot welds.

Also the feed and return pipes were very weak and rusty so they ended up breaking off - Bugger!!

Anyhow now that it is all off I can get at it with a wire brush and a pressure washer tomorrow.

See you soon
 
xat44

I procrastinated for a long while too but ince started the interior was stripped in about 2 - 3 hours and last night it took me about two hours to remove the towbar and fuel tank.

It was made more difficult because the towbar bolts had rusted in and need to be cut which was interesting.

I dont know what it is about LR that prevents them from designing out water traps and build in good fixtures lol
 
Mr Noisy..is that boot floor just replaced with one sheet of check-plate? Got to do mine soon, and although not expensive for the fllor (£60) I reckon your solution would be far better..

Yo storm

Yeah it is a single sheet of aluminium chequerplate, I think it was 3mm. The treads make up more thickness though, so it is VERY rigid and strong (as you are probably aware)

It came about for a few reasons:

I bought a boot floor repair package. Had all support beams, side panels and boot floor itself. I don't know about OEM/britpart but whoever this was suppose by (came off eBay) the panel quality was terrible. The sides did not fit and the floor was so flimsy it wanted to twist all the time. The whole lot was 1mm, very poor. No suprise that the britpart panels were more expensive.

Also, because the sides were so thin, they warped bad when welding in, so my new floor did not fit, was about 4mm too wide.

I had decided already that it was useless and would bend as soon as I threw any stuff in, so decided to order a piece of chequerplate. Cost £50 from local metal merchant, cut nicely to size :)

I still used the 2 chassis support beams, but the floor support beams were sold with the floor for £60.

I simply finished the rest of the job, then ran a bead of sealant around the aperture, dropped the floor in and riveted it all around. About 30-40 rivets I guess.

It is an excellent upgrade, very pleased with it tbh and it's not going to dent or rust! :)
 
Well I have now removed the fuel tank as i mentioned before and cleaned the chassis and behind the wings with my pressure washer.

As you will see she is looking quite clean now but boy the rust just fell away from where it was weaker.

As you can see I have started modelling up some lift blocks for raising the body. I am learning 3D modelling as I am a CAD draughtsman and want to expand my skills (even at 40+). I plan on using these skills for many additions and even the next project which is a westfield or Locost etc.

At the weekend I will be getting to grips with the Missus (only joking she is grumpy because I have a stripped down Disco that Im still paying insurance for and as she says "whos going to nick the bloody thing with no seats or fuel tank?") Ah well she has a point but damned if Im going to admit it.

Anyway what I was going to say was i will get to grips with cutting some of the rot out and take photos as I go.

Heres wishing for better weather than last weekend!!!!
 

Attachments

  • IMG_0238 (640x480).jpg
    IMG_0238 (640x480).jpg
    80 KB · Views: 2,425
  • IMG_0239 (640x480).jpg
    IMG_0239 (640x480).jpg
    72.3 KB · Views: 1,923
  • IMG_0237 (640x480).jpg
    IMG_0237 (640x480).jpg
    83.1 KB · Views: 1,776
  • IMG_0248 (640x480).jpg
    IMG_0248 (640x480).jpg
    42.6 KB · Views: 1,760
The jetwash is your friend, it will remove rust and old paint and it's much easier than using a grinder - plus it washes as it works!

Sometimes a jetwash will get behind rust and pull big flakes off that the grinder would probably have just rubbed over. I swear by it for chassis diagnosis etc.

Lift blocks look cool too. If you design a decent product make some extras and get em on eBay!!!
 
Yeah I do like getting wet - oohhhh

The lift blocks are OK. I have plenty of steel lying around and couldn't see the point of spending loads of dosh on turned items. However I am wondering if they look a bit noddy. Then again if someone can easily see them it would usuall mean you're upside down and the look of a lift block will be the least of your priorities!!

I am looking at some spring lifters too that go under the spring - to - axle locations, what do you think?

Next post should include some grinding of the inner wings - ohh ahh the excitement!!!!!!!!!!
 
hi mate

spring lifters and damper droppers are a great way of performing a lift on the cheap

the theory is that you lift and fit bigger tyres, and by dropping the dampers too you retain your original droop travel. people complain that you lose that top 2" of compression travel but in reality if you have 4" larger diameter tyres on then that 2" is taken up anyway. if you kept the top 2" you might rub the tyres which is pointless.

if you make spring plates and body lift brackets you only need to buy damper droppers for the rear and shortened turrets for the front and you have a nicely sorted car that would accomodate 33s easily and 35s without much trouble.

now thats the makings of a good off roader.

be careful when making spring lifters btw. the bracket that is welded to the axle is not strong enough to support the car. standard fitment locates the spring base on the plate but if you look carefully you will see the sides of the spring plate and as such the actual spring itself is sat directly on the axle tube.

you need to make sure your design allows this or your brackets will bend.

good luck!

cheers :)
 
Mr Noisy,

thanks for your advice on the front springs. I looked tonight and understand where you're coming from. Keep an eye for the model on the new mounts!!

As for work today - I cut out the rust from the rear crossmember. Not much there to be honest and good metal was easily found without going too far.

However when unbolting the rear body mounts the metal risers simply fell off. Check the photos for the rust worms work!!!!

I have included photos of the 'rubber body mounts' themselves just in case someone wants to lift their body and doesn't know what they look like.

Finally I cleaned the rear boot floor area in readiness for making the floor.
 

Attachments

  • IMG_0252 (640x480).jpg
    IMG_0252 (640x480).jpg
    70 KB · Views: 1,146
  • IMG_0251 (640x480).jpg
    IMG_0251 (640x480).jpg
    70.9 KB · Views: 1,109
  • IMG_0250 (640x480).jpg
    IMG_0250 (640x480).jpg
    72.9 KB · Views: 1,174
  • IMG_0249 (640x480).jpg
    IMG_0249 (640x480).jpg
    68.9 KB · Views: 1,220
Just been reading and enjoying the thread, great attitude green hornet, its all about getting stuck in and laughing about the problems, as a wise man once said "never problems only soloutions" Good luck!

Mr Noisy great job on your car looked really good, what size tyres are those?

Cheers Jim
 
Thanks very much Jim. I have learnt that having a Discovery is just that - a discovery. A journey where you discover how many ways a car can fall to bits, be repaired and then breakdown. A journey where enjoyment is not a destination but the many various ways in which you tackle adversity in actually getting to your destination.

Seriously I really like the Disco. She is a toy for the family and always starts and runs despite undressing herself of various body panels and chassis parts atthe earliest opportunity.

I will endeavour to ensure that I weld with equal attention to detail as my father-in-law did when he worked for Land Rover, making sure that the very panel I am replacing today will grace the grass verge tomorrow lol!!!!

Ian
 
Well the evening has now turned into night and I have completed the 3D modelling of the body lift assembly.

As you will see I have modelled the actual body mount which consists of two rubbers that slide on a spigot and are then capped by a large washer/circular plate.

It may seem a fruitless and silly exercise to model these components however I am using this as a learning tool for AutoCad Inventor so if anyone has experience of the program I would appreciate some basic pointers.

Next I will add in the rear crossmember to body mount plates when I purchase them so we can get a good look at the whole mount from chassis to body. Once I have played with that I will model a simple lift kit using some of Mr Noisy's simple yet effective pointers.

BTW I am fully conversant with Autocad 2012 so if anyone needs design work doing I am available :D
 

Attachments

  • IMG_0253 (640x480).jpg
    IMG_0253 (640x480).jpg
    35 KB · Views: 588
  • IMG_0254 (480x640).jpg
    IMG_0254 (480x640).jpg
    47.9 KB · Views: 648
This weekend I mainly lifted my body - Oh ah misus.

Well I started mid morning Saturday with making the body lift blocks (I'm just a tight arse and wont buy um!). I used 50x50x3 RHS with 25x25x3 supports welded inside. The first photo shows the item finished. Cheap cheerfull but bloddy strong eh.

I took photos of the body mounts which to be fair are easy to get to and the bolts were very easy to undo.

I did get stumped when all the bolts on the drivers side were undone and the body still wouldnt move! Then I found the centre seat belt fixings - doh!!:doh:

Once these were undone the body lifted clear and the sapcers were fitted easily. The second photo shows one side done

Finally a before and after for your perusal.

Before anyone asks -
Yes - I need to make brackets for the radiator as it is lower now than the standard pin holder
No - the steering didn't need touching - although this may bite me at the first corner once its back on the road.
No - I haven't extended the gear knob BUT did have to undo the four screws securing the rubber membrane from the gear lever but managed to keep the transfer lever ones attached - if this makes sense - if not I'm sorry - - No truly I am sorry because theres nothing more anoying than looking at a thread and then the explanation is just crap and the guy waffles on about nothing for ages before getting back to what he originally was talking about which by then yo have lost your way and he still keeps going on and.................
Sorry!
No - I didn't have to move/extend any wiring fuel pipes brake pipes
Yes - I will need to extend the brake pipes when I lift the suspension
Yes - the floor underneath the front seats now moves slightly - This could be because there is no support underneath or that i'm just a fat blooter :)

Next on the list are the new rear cross member mounts and then the sills.

See you soon
 

Attachments

  • IMG_0267 (640x480).jpg
    IMG_0267 (640x480).jpg
    55.5 KB · Views: 1,615
  • IMG_0266 (640x480).jpg
    IMG_0266 (640x480).jpg
    71.1 KB · Views: 1,667
  • A1 (640x480).jpg
    A1 (640x480).jpg
    93.9 KB · Views: 2,048
  • A2 (640x480).jpg
    A2 (640x480).jpg
    86.1 KB · Views: 1,626
  • IMG_0259 (640x480).jpg
    IMG_0259 (640x480).jpg
    79.5 KB · Views: 1,672
  • IMG_0260 (640x480).jpg
    IMG_0260 (640x480).jpg
    51.1 KB · Views: 1,554
  • IMG_0263 (640x480).jpg
    IMG_0263 (640x480).jpg
    55.9 KB · Views: 1,614
  • IMG_0264 (640x480).jpg
    IMG_0264 (640x480).jpg
    63 KB · Views: 2,772
  • IMG_0262 (640x480).jpg
    IMG_0262 (640x480).jpg
    53.8 KB · Views: 1,741
  • IMG_0265 (640x480).jpg
    IMG_0265 (640x480).jpg
    47.3 KB · Views: 1,525
Last edited:
Well hello again from my office desk this lunchtime.

Well I am very excited I have almost wet myself as all my panels have arrived from YRM Metal yesterday.

First thing to say is that I am very impressed with the company's customer service. Whilst ordering these panels I placed a note on the order regarding the light panels and during the evening I got a phonecall personally asnwering my query and to assure me the panels would be despatched. Brilliant:)

Anyhow the panels are great quality Photos to come soon) and at first inspection - last night in the dark much to the annoyance of Mrs GreenHornet who couldn't for the life of her understand such excitment and giggles coming from me - the panels fit and finish are spot on.

All in all I have both inner wings, both light front panels, both front body mounts and rear body mounts PLUS a boot side floor panel to use as infill patches here and there.

I have also been looking at Suspension and wheels. Need to find a 3" lift kit and some good 33x12.5x15 wheels and tyres - Anyone help by suggesting a company?

I can't wait to weld tomorrow YEEEHAAAAA:D
 
mr noisy

this was like an action reply of my "Freddy" named after freddy flintstone due to the lack of floor.......:p:p just like this.
the good news is it can all be done with time and effort.
its took me over 12 months to get freddy sorted, welding,new parts, replacement panels and just about evry thing else in between.

good news is hes away this weekend having his new paint job,
will bw good to see him in one colour at last as over the last 18 months + hes been numerous shades of primer and various coloured replacement panels.

this just shows others that it can all be done, and not to be disheartened
plod through and you'll get there just be patient ;););)

cheers[/quote]
 
Back
Top