Daves D2 TD5 Project

This site contains affiliate links for which LandyZone may be compensated if you make a purchase.
I had a load of customers work in today, but managed to get my rotten piece of chassis cut out and rebuilt with a one piece cut from 2.5mm sheet :)

I guess I got my Landy Zone "Welders Badge" now :) ............. Well I'm pleased with it anyhow, and I kept the template in case I need to do the right side next year, but ATM that seems a lot more solid, couldn't bash any holes in it ;)

Pixels ....


Cheers for now :)
 
Would you agree welding thick stuff is a damn sight easier than welding car bodywork?
I've always found it so.
I use stick on the thick and struggle with MIG on the thin.
Yet peeps tell me MIG is easier than anything.
So why do I see so many vids of peeps welding with TIG?
TIG seems to me to be the best of both the above, the facility and practicality of MIG combined with the control of stick.
Thoughts?
 
Thanks guys :)

Sadly i did no Vehicle work at all today, I had forgotten, due to pylon maintenance our Electricity was scheduled to be cut for the day, it went off at 9am and only just came back on 16:50 pm ;)
What I did do was earn some brownie points and lay our new bathroom Carpet, so when Mel got in that was a nice surprise for her ............ Our 2 Cats made it interesting and amusing as well as being a PITA :D

Would you agree welding thick stuff is a damn sight easier than welding car bodywork?

Hell yes, much easier ;)

Very recently I reconstructed Chassis, Inner Wheel-arches and Floorpan edges plus welded in outer Arches on that Silver SLK R170 of mine ;)
The only panels I could buy for that were rear Outer Arches, everything else was fabbed from 18 gauge Zintec Sheet (Chassis / Inner Sill bits) and 20 gauge for the inner rear Arches and Floorpan edges ;)
Had to be very very careful welding that lot to avoid burning 'oles and distortion ;)

I can Arc Weld (Stick), but haven't had a Stick Machine for over 35 years, no need IMHO ;)

I used Mig on that Discovery Chassis, in fact yes I can TIG weld, but I have a preference for the MIG, I have both Argoshield and Pure Argon Gases, Argoshield for Steel and Pure Argon I use for Stainless and Ally Welding.

Obviously I have different Reels of Wire, 0.6 steel, 1.0 Aluminium and Stainless 0.8 Wires.

I do heaps of steel and stainless gets used for Exhaust fabrication work, I'm not that good with Ally, but can repair an 'ole in a sump or such like, but pretty it isn't ;) Don't really do enough of it ;)

I will likely be back at the Disco 2 all day tomorrow ;)
 
Last edited:
Re the welding, I am VERY inexperienced (but nonetheless please with my results so far).
I found an arc welder when we bought a tiny farm many years ago. It was buried under hay in a loft, rusted to f***, but turned it on and it worked. That was before I knew about rods getting damp (destroys em), but I welded away with it for a year or two, old rusty farm equipment and such like. Never bought any rods as it had a box of em with it, I really had no clue how hard I made it for myself!
When I had gearbox issues on my manual D2, it was near enough £500 for a selector yoke, and I was f***ed if I was paying THAT! So my friend recommended a welder to me so I could weld it up myself. I bought this one - Lincoln Bester 190C Multi Process MIG/TIG/MMA Welder Package 230v, 2yr Warranty

I AM BLOWN AWAY by that welder, so if anyone here is trying to weld with a crappy old machine and is thinking of investing in a new one, get that one! My friend welds every day of the week, does council lorries and waste trucks etc. Very good welder. He recently left and started his own business, losing access to the monster welder he had with his previous job. He recommended this Lincoln to me and so he bought one himself. Chatted to him yesterday, he was just as blown away as me. He said he can do what his old one could do and way more, he has it running off a 30A socket but even on 13A he said it can blow holes in heavy stuff so plenty of power, but lovely when down low.

I also bought this for it - https://www.ebay.co.uk/itm/351711731458 and some 0.8mm wire (https://www.ebay.co.uk/itm/321887766261). I got a bottle of HobbyWeld (think its 95% or 99% argon), and I am very pleased with the results after a bit of practice. I am really hoping to pluck up the confidence to do my own galv chassis on the disco.

Seriously, if anyone out there has no confidence in their welding and is using a crappy old machine, or just rusty/damp wire/sticks, improve your gear and see if that helps! I absolutely love this welder, fixing broken gate hinges, kids toys, shovels and spades, I love it when metal 5hit breaks around here now :D

P.S. My Lincoln Bester came with a Tig set and an Arc wand. I haven't used anything but Mig so far. Not brave enough to try Tig (and can't afford to buy any more gear), and the stick just seems superfluous with the ease of mig welding with it! Nice to have the other bits though, one day I really hope to get into Tig stuff as that would be great for the small stuff.
 
Lincoln are very good welders, I have ESAB 360 Amp Industrial Quality MIG it has Spot Weld Timers etc, but I never use them ;)
Butters are another good make ;)

Hobbyweld is same as Argoshield 5% CO2 / Argon
 
To be honest I was a bit suspicious as nearly EVERY "good brand" these days has SOLD OUT, just get generic Chinese factory junk and make a killing by slapping their logo on it. I am still not 100% convinced these machines are as good as the Lincoln's of 20 years ago, but I have to say the machine is forcing me to change that view. I was mainly suspicious by the user manual which I don't think is very good, it's better than some of the awful Chenglish manuals around these days, but not as good as I would expect from a company with the name/following Lincoln does. Still, it's a great machine and so bloody small I never believed it could do what it can! My friend's was an ESAB i think
 
OK, a small "Coffee Break" update and some DIY Tips :)

So remember I mentioned I am yet to fit the Track Bar to the Steering, so I did that this morning.
This procedure is only any good if your vehicle is not scrubbing Tyres, mine isn't ;)

See the red I I chalk marks on the Tyres Identifying a particular piece of tread, turn each Wheel so these marks are in the centre line of your CV Joints (then if you accidentally turn one of the wheels you can return to your Datum easily) ;)....

Firstly before undoing anything relating to the Track Bar, measure between the 2 edges of the marked Treads in my case 56" exactly, which I chalked on the left tyre in case I forgot ....


Now prepare your new Track Bar, I always very carefully remove the wee Spring Clip on the Rubber cr@p Covers on each Swivel Joint and add a little extra grease, then carefully refit the Spring Clip, also strip down the Adjusting mechanism and copiously Copperslip all threads, reassemble and make sure the reverse thread and the regular thread are screwed in exactly the same number of turns ;)


Now fit the Track Bar and tighten both Swivel Joint Taper Pin Nuts ....


Now, simply use the 24mm Hex Adjuster to adjust the Rod Length to give you exactly the same distance between the two marked Tyre Treads ....


Job's a good un :)

Yes I do have Laser Tracking gauges, and I will double check it after road test, but I'll bet a pound to a pinch of coo pat that it will be bang on ;)

I use this method on all Vehicles, provided they are not scrubbing Tyres ;)

HTH :)
 
Last edited:
Disco Update from close of play yesterday ...................

The (correct and matching) Left Headlamp arrived yesterday, so I fitted that ;) ....


Shame the last Clear Indicator Lamp for the left side hasn't arrived yet, (hopefully later today) ;)

I buffed the welding and painted the repaired area with Epoxy Primer (non porous) :)

Refitted the rear Anti-Rollbar as well ....


4 new Bump Stops fitted all round :) ....


Back to the Numpty Mechanics :( :( :(
Here's a "Dave's DIY" for anyone who may need it ;)

Some total Knob Jockey has removed the Chassis Cross-member under the Transfer Gearbox presumably when the Engine and Trans got replaced, and OK so 4 outta 8 M8 Bolts snapped off in the Chassis Brackets ............... What did the aforementioned KJ do, just left that Cross-member off
upload_2021-7-9_9-33-21.gif
:mad:

So I bought a good used one, gave it a coat of Satin Black ....


What really annoys me is that if these Bolts do snap off in their captive Nuts it takes well under a half hour to sort it out and is obviously chargeable to a customer as a part of the job .................

Get an 8mm diameter Punch and a 4 lb Club Hammer, hit the broken bit of bolt upwards, and the tiny spot welds on the captive nuts snap, fish them out through the Brackets gap with a magnet ....


Using the Cross-member as a template, cut 2 pieces of 18 gauge Steel and drill 2 M8 holes, tack weld a couple of M8 Nuts on and slide em into the Chassis Bracket, Copperslip eight off M8 Bolts with Washers and refit the bleedin' Cross-member ;) SIMPLES !! ....


How bloody easy was that ............. Rocket science it is not !!
Rant over ;)

Out on road test in a whiley, I got some errands to run, then get her back on the lift later today and start on the Left Front Axle side :) ............

Driveshaft / Axle Seal, I'm also going to hopefully get the right side CV Boot done this weekend and will fit both the new front Brake Calipers, (left one is still slightly sticky).

They gotta come off to do the jobs both sides :) I'll make a call on whether I fit the new Discs and Pads when the Discs are off, I will leave the old ones if they look like they'll see the next 8 months out, then fit new ones at just before MOT time ;)

I know many MOT Testers, even my buddy who does all my Testing likes to see that some work has been done prior to the Test, guess it is a psychologicalamabob :D :D :D

L8rs ..................
 
Nuvver update ..............

Whoever was working on the Discovery has now peed me right off :(
Absolute no nothing total moron bodge artist :(

So basically his inept idiocy cost me a few extra hours yesterday and has meant that although I have done that Driveshaft Seal I will likely have to do that job again next weekend ..............
If I didn't need my lift this week, and also likely need to use the Discovery, as I don't have another "Workshop Overalls" DD then I would have left that side in bits whilst awaiting a good used Half Shaft ...........

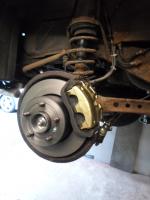
So I've done the job, also decided to change the Brakes too, back of Disc was scored (see later on) ...............
First off I stripped off the whole Brakes and Hub / Bearing assy in order to draw the CV Joint and Half Shaft assy out ....


It was at this point that I noticed the Hub Bearing assembly had been changed recently and also the CV Boot hmmmmmmm ok that's no bad thing ;)
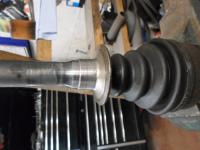
After cleaning it up, I pop out the Seal, and fit a well greased new one ....


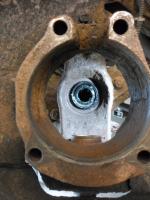
Now is where it got me totally confused and so I had to go Googling pictures to confirm my suspicion ....


You see that round ring near the CV Boot, it is designed to flick water, mud and other excrementopoop out of the way so it doesn't damage the Seal, but there it was loose and sliding up and down on the machined surface of the Shaft ?????????????????????
My confusion arises because I have never worked this far in on the Disco 2 / Range Rover P38 design of Axle before ;)

So is the Seal designed to run on the machined surface of the shaft ? (No) After much googling I come up with the definitive answers to this and the questions below ;)

Is the crud flipper on the wrong way around ? (No)

Is the crud flipper designed to be a tight press fit on that machined Shaft surface, and not like a sossidge up an alleyway ? (YES)

So, this disc thingy, if I refit it as is it will move around and screw up the Seal, also because it has a "loose fit gap" that I can see daylight through, (around 5 thou " all round it), between it and the Shaft Oil will leak out through said gap , so here's wot I tried which may at least stop it peeing oil out for a week .............. I carefully put a ring of Silicon Sealant around the surgically cleaned surface on the shaft at CV boot end, then put Loctite "Stud and Bearing Fit" gloooo" around the rest of the machined surface and inside the muck thrower Discamabob thingy, and slid it down onto the shaft surface, wiped off the excess Silicon and Loctite each end and then left it well alone vertically in the Vice for a couple of hours ;)

It appears to be set tight, so I've refitted it, but it is really too far out by about 3 - 5 mm, so don't know if there's enough tolerance where the Seal lip runs, also don't know if it will come loose again etc etc so I found and ordered a good used Half-shaft last evening. Hopefully I might get it this month (that's another story) !!

If it's not leaking by next weekend I will leave whilst I do the other jobs, or until it does, whichever occurs first ;)

I don't hold out much hope for it :(

Here it is all back together ....


All new Bolts :) ....


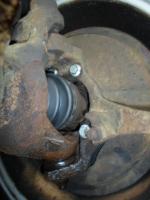
At least I'm now getting a dab hand at stripping these down and I know all the Bolts will come out with no hassle when I gotta do it again :)


Now, why did this hack me off, well simple ....................

Firstly it had been driven a while with the Wheel bearing so bad that the back face of the Disc had been rubbing on the Caliper Carrier,and the CV Boot was torn, that makes the Driver an ass hat ;)
Hence I changed the front Brakes, also although not dangerous, I have ordered a new Caliper Carrier

Second, the numpty "mechanic" who fitted the new Bearing must have bashed that ring off to do the CV Boot instead of just removing the CV from the Shaft, which is how y'all supposed to do the job DOH :(

But anyways, OK so surely he must have known it would leak Oil as it was now so bloody loose on the Shaft ......................

Nah, probably not
upload_2021-7-11_10-4-2.gif
:rolleyes:

Anyways, I'll get the CV Boot on the right side done today.

So I'll tell y'all what it is here, whenever I buy a new to me Car, I always find a bunch of jobs to do to get it up to my (high) standards, nor, (a lot of times), am I happy with the way it has been "worked" on, especially as this one was obviously repaired by our local Knob Jockey Mechanic, and I think I know which one as this one is so bad :(

However all that said, this will be a real nice workhorse example of a D2 once I've finished fettling it back to it's former glory and the best bit is, unlike a Mercedes the parts are nice and cheap and plenty available good used stuff too :)

TTFN :)
 
Well, so I ordered that Half Shaft last night, and this morning a spare Front Axle Seal, Caliper Carrier and a packet of those Spring Brake Hose U clips as there is one of those missing too, Brake Pipe cable tied into it's Chassis Bracket :mad:

Then I took it out for a 32 mile run up to Cluanie and back, and got it on the lift to do the right side CV Boot and Brakes ........................
Pleased to report that so far the Loctite has held that "disc muck flinger spreader doohickey centrifugal cleansing device" on the left Half-shaft and it must be far enough onto it's boss to enter the seal because there is not a drop of Diff Oil anywhere ;)

That'll do for now, so onto the other side ...................
Pretty uneventful but I've had enough for today, I will bleed the new Caliper and stuff the Wheel back on in the morning ................

The piccies can do the talking ....


If I get lucky the Clear left front Indicator might turn up tomorrow it's only about a week later than the others
upload_2021-7-11_17-50-25.gif
:rolleyes:

I need Beer'S and Hot Tub, l8rs :)
 

Attachments

  • upload_2021-7-11_17-50-25.gif
    upload_2021-7-11_17-50-25.gif
    42 bytes · Views: 79
Back on the Disco this morning, finished off by bleeding the Brakes and refitting the front Wheel, Brakes are now bedded in an superb after another extended road test :)

So in between other jobs, I managed to take care of some cosmetic work, went round and touched in a load of small scrapey scratches, looks much nicer now :)

On any 4X4 with the spare Wheel mounted on the back it is always a good idea to actually take it off and Copperslip the Studs threads every year, the Bracket was a bit scabby grotty but solid, as they usually are, so I took it off, wire wheeled it and gave it a couple of good coats of Zinc Etch Primer before a few heavy coats of Satin Black, then did a bit more cleaning inside it :)

I'm still waiting on a couple of parts, gonna get narky with these 2 sellers soon, they are taking the proverbial, both parts should have been here by 3rd July, I just wanna finish it and get back on my other projects ;)


Dinner calling :)
 
An R170 SLK 320 is coming in shortly for a Roof diagnosis and fix :cool:

First job this morning, the Fuel Tank "support cradle / bash plate" like most is well past it's "scrap by" date ....................
Not wishing to pay double for the same flimsy mild steel affair I bought a nicely made, well fitting and much thicker hot dip Galvanised item for less than half the price of the OE Landy effort .............


Well impressed by the guys at Braith-Speed, great service, very helpful and don't mind a good technical "Land Rover Blether" on the phone :)

Also (Shhhhhhhhhhhh), there is no sign of any Oil from my "Ahem cough cough" temporary repair on that left front Half-shaft Seal job :)

Hopefully my Clear left front Indicator will arrive today, it is winding me up having one orange lens when all the others are now clear ;)
I might take the front A Bar and Bumper off it later, get all that lot realigned and fabricate the offset front Tow Ball hitchamabob ;)

Is anyone else sick and tired of hearing about F**tb@ll every 10 minutes on the Radio / TV ??????????????

If this was an English pro Motorsport Driver who had come second in a world event I doubt he / she would even get a mention
upload_2021-7-13_9-10-3.gif
:mad:
Pah, it was blatantly obvious to me even at the start of the tournament that naff all would be coming home
upload_2021-7-13_9-10-3.gif
:rolleyes:

L8r's
 
I'd love to know where you got the fuel tank cradle from please, mine could do with being replaced.
Also on your pics above I saw your tow plate. Mine is a funny one, way too high and I keep grounding the tail of my trailer when i pull onto a slope. Pics...


Any idea what the cheapest way to get it lower would be?! Thanks
 
Fuel Tank Cradle / Guard is from Braith Speed, as I said above ............

https://www.ebay.co.uk/itm/124800247057?hash=item1d0eaca511:g:2s0AAOSwkjxeyEht

Is your D2 still on Airbags at the rear ? Looks hellish low to me already ? What most folks do is buy / make a "Dropper Plate", looking at the way yours is sitting I'd say if you go much lower then the Towbar will hit the deck ;)

Mine has a 50mm lift, which I will be removing very soon. I need to change all 4 Springs and Shocks as that lift kit has screwed up the Castor Angle which is making it wander about in a straight line :(
These Discos do not need a lift kit on 235 / 70 x 16 M+S Tyres, that is only needed when getting more extreme and need to fit big big Tyres to lift the Axle heights ;)

I see a lot of folks up here fit Lift Kits, just because they think they look cool, what they don't realise is it just screws up the self centring effect of the Steering ;)
So then they fit Castor Arms, which puts strain on the Propshaft etc etc etc etc :rolleyes:

As I don't do serious Off-Roading, just Forest Tracks and the like up here, the stock ride height will be just fine for me ;)
 
Thanks, sorry I missed the bit about Braith Speed. That looks reasonable.

Mine is still on airbags yep. It might just be the perspective/angle of the photos, never had any comments about it being particularly low, its same as any other disco I have owned or used.
here's another pic

 
It might just be the perspective/angle of the photos,

Yes, it obviously was, "Cameramabob Trickery" ;) That looks OK ride height wise to me :) Just buy or make a proprietory "Tow Ball Drop Plate" ;)

D 15 KOE Update :-

As all the urgent repairs like Brakes, Oil leaks, CV Boot, Welding etc are now done, I got started re aligning the front end ;)

To be fair I knew it was gonna be a bigger pain in the butt job than a simple re-alignment, the A Bar was offset to the left but almost level, the Spot Lamps Wiring was a rats nest of Scotchlocks, a minging looking Relay just hanging behind the left Headlamp and un-fused Wiring connected direct to the Battery
upload_2021-7-14_8-54-46.gif
Also the left side of the front Bumper was low and the right side might need adjusting down a tad, plus I wanted to remove the front Towing Eye and fabricate an offset left side Tow Ball Bracket :rolleyes: !!

Here is as far as I got last night :-

Front end stripped ....


Started fabrication of the Front Tow Ball Bracket, now got to bung the A Bar on temporarily and mark the correct Length / Angle to weld on the Tow-ball Mounting Plate, weld that on, paint the whole chebang then it can all get re-assembled and lined up ....


Some of the Rats Nest :eek:


I'm out some of today and also got a PITA customers job in to do, so might not get back to this today :(

Seller is sending another Clear left Indicator out, "lost in post" ........................

Over and out ...........................
 
Back
Top