Chassis repairs and rusty bits on Peggy the ex farmy pick-up

This site contains affiliate links for which LandyZone may be compensated if you make a purchase.

Wagon Loon

Well-Known Member
Posts
532
Location
Aberdeen
Recently bought 90 300 TDI Pick-Up.
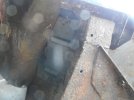
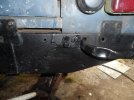
My needle descaler is very good at unhiding rust perforations and hidden holes. These can look solid under crusty layers of metal and paint.
PXL_20231107_153648767.MP.jpg

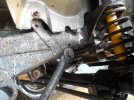
From under O/S/R spring top mount.
I removed the spring, which am replacing with new Flat Dog standard springs, galv seat and ss bottom clamp bracket.
The bump stop was missing and the bump stop mounting bracket heavily corroded in the middle where it contacts the underside of chassis leg.
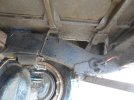
So bracket cut off and a longer section of bottom cut out with plasma cut into good metal.
Pic above is new part/original part.
PXL_20231107_153724597.jpg
PXL_20231107_181426811.jpg
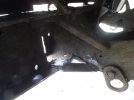
This got fully pushed together and mig welded in last night after rain stopped, and I'd sprayed rust treated inside accessible chassis. Got a powerful led on helmet which really helps.
 
Indeed lol
Rear crossmember is great outside, has been replaced
PXL_20231109_115818329.NIGHT.jpg

But been driven in salt, full of muck and never cleaned on the inside, so some rust jacking has occured and I need to work on the inside part to make it more happy
PXL_20231109_114734087.NIGHT.jpg

Rust treated and etch primed ready to weld the bump stop bracket on
16995313998317035934297905991361.jpg
I will mark and clean back to bare metal at the weld points. That log is perfect to hold bracket in place 🙂
 
Made pattern from recycled cereal box. Will leave putting holes in until new metal part fettled in place, I may have a piece of galv sheet that could do nicely, since this area is in a bit of a war zone; being immediately behind back wheel.
PXL_20231109_165915945.jpg
Pattern should do other side flipped, as it's likely similarly punished!
 
Last year did some repair on mine, mud flaps on the inside have kept the cereal box area good on mine. Rot was in the area of the tube jacking points that I never use so I removed them [real crud traps]
 

Attachments

  • LR17.JPG
    LR17.JPG
    211.5 KB · Views: 52
  • LR16.JPG
    LR16.JPG
    295.3 KB · Views: 63
Last year did some repair on mine, mud flaps on the inside have kept the cereal box area good on mine. Rot was in the area of the tube jacking points that I never use so I removed them [real crud traps]
I wondered why the mud flaps are not used to protect this area a bit more.
Is that a 13 pin towing socket by your fog light?
I've got a new rear loom and have a tow socket to fit, once the welding is done.
 
Here's hoping,
16996197485836670623827084629613.jpg

Got some nice galv 2mm sheet which should do. Been using 3mm on the chassis leg.
I'll keep the jack tube, since have original jacking kit and like factory.
However do use a farm jack on Gigi the 1975 S3.
 
Just some tidying up and folding
16996235462475693593810694813818.jpg

And cutting two, one fir other side
16996236390253378557417275727317.jpg

I always use respirator, especially with galv metal ⚠️🫁☠️, and the wee plasma cutter is a great bit of kit 👍
 
Original jack was something I chucked in the corner after using it once, saw its rusty remains a few years ago. [In my top ten of rubbish things I have owned]
Trailer socket is just a standard 7 pin fitted in an out of the crud position. Mine is a working truck so practicality comes before originality.
Lol, haven't actually used jack yet. Maybe it is useless!
Cutting a new holder for the 13 pin socket I use fir towing my caravan.
Mine needs to be in the original position for my cable to reach.
16996270360575954002772011050254.jpg

Got some 3mm scrap will do. The 13 pin socket is much more weather proof than the 12N 12S ones used to be. I'm only off-road in my small woods so hopefully it will hold out, or I may take your idea with a small extender cable.
 
PXL_20231112_163355368.jpg

Managed to get the galv part I fabricated welded in yesterday, just before the rain started again!
Small dogs on the hunt for mice 😄
I will tidy the welds up a bit, when weather permits, and found another small area needs sorting on the inside of chassis leg, which I'd missed. But now's the time to do it, while the springs out. It's above the bump stop mount, which isn't welded in that side yet.
Nicely done ... and so it begins
Indeed 😂🤣😂
 
Nicely done, couple of pics of my 1990 chassis [owned since 93] It has only needed small bits of welding in that time, odd bits of corrosion in those exposed area's. Sprayed every year inside and out with oil and diesel mix.
Before I had a series that had been in the sea, chasing rust was quite a pass time.
 

Attachments

  • LR8.JPG
    LR8.JPG
    452.3 KB · Views: 48
  • LR10.JPG
    LR10.JPG
    230.5 KB · Views: 52
  • LR13.JPG
    LR13.JPG
    299.3 KB · Views: 49
Made pattern from recycled cereal box. Will leave putting holes in until new metal part fettled in place, I may have a piece of galv sheet that could do nicely, since this area is in a bit of a war zone; being immediately behind back wheel.
View attachment 302216Pattern should do other side flipped, as it's likely similarly punished!
great to see you using LR original quality plate in this picture :p
 
I'm slowly restoring a1982 Series 3 Station wagon. Recreated most of the front. But I've noticed many of the parts replaced, like out riggers have gone to tin worm more quickly than the original metal.
1699868587860555446579445094295.jpg

She's a 12 seater, and I've restored the bulkhead already.
16998689688081691668796660231287.jpg

It's in Raptor primer and lives inside for now.
But I've come to the conclusion that the metal of many replacement parts may not be that great.
Plus I may enjoy making a rod for my own back !
But most of the 90's chassis is really good considering how much farm muck it had eaten 😂
She's now had an enema, courtesy of a drain cleaning attachment on the pressure washer. Much compacted stuff removed, and the rust is were muck had accumulated and sat damp, no doubt salted to taste, to aid the tin worms digestion!
 
The fabricated galvanised part
PXL_20231111_180443161.jpg

Is definitely better than the original part of a replaced rear crossmember.

I made the towing socket bracket from a scrap 3mm steel piece, which took a bit of fettling.
PXL_20231110_184602296.jpg

And I coded the 13 pin wires to the Landy colours and fitted Lucas brass connectors; which will connect to a new rear wiring loom made by Sparks in England.
 
Back
Top