Chassis repairs and rusty bits on Peggy the ex farmy pick-up

This site contains affiliate links for which LandyZone may be compensated if you make a purchase.
Made pattern from recycled cereal box. Will leave putting holes in until new metal part fettled in place, I may have a piece of galv sheet that could do nicely, since this area is in a bit of a war zone; being immediately behind back wheel.
View attachment 302216Pattern should do other side flipped, as it's likely similarly punished!
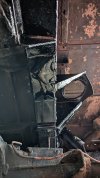
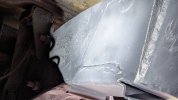
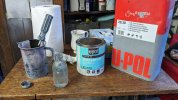
Bit of underseal on that an I wouldn't have bothered with the effort of new metal would still hvae been better than mine when I bought it with 12months ticket. :rolleyes:

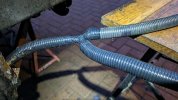
I wondered why the mud flaps are not used to protect this area a bit more.


I had the same question but you can make your own to protect this area. I have just done this to mine and used come old conveyor belt I acquired from work to replace the foam rubber flaps that hang down from the rear tub to protect the rear lights. I simply cut new ones of these that were long enough to cover that part of the crossmember and bolted them to the original brackets. I also did the same with the front ones that come off the bottom of the mud shield in the front wing so the outrigger is covered.

1699896275220.png


1699895915128.png
 
Longer inner wheel arch mud flaps, good idea. As you say the original plastic sheet hangs too high to stop crude filling the crossmember, and with the visible mud flaps mounted behind, they only benefit vehicles behind, as far as I can see.
I will spray Waxoyl in the cavity and make sure water can drain freely once done. For me the regular removal of any collected mud and salt from the entire chassis is more important than cleaning the outside of a landy
PXL_20221217_152651342.MP~2.jpg
 
Trying to cut the last bit of rot from O/S rear, which I found on Sunday. Couldn't do anything yesterday because of constant rain.
Using a thin cutting disc to get a good look pattern to work from. I couldn't see this from inside because it's double up metal, so was behind my internal view.
16999727045516014074044824065608.jpg

The part I want is still hanging on in a couple of places

16999727806667440899968928212554.jpg

But you can see some of the internal doubled up metal. I guess that's because it's where the spring supports the chassis.
Just waiting for the latest shower to stop shop I can get the rest of the piece out. So time fir a cuppa
 
PXL_20231114_174131216.jpg


Got it, and there's a doubled up parts top and bottom
PXL_20231114_174155458.jpg


Just trying to decide
1, Replace with one piece of 4mm metal
2, replace with two 3mm parts and cover with 2mm piece.

PXL_20231114_175345812.jpg

I'm kind of thinking to weld the two plates together inside
PXL_20231114_172027407.MP.jpg

You can see on left of cut out. So it would be one piece inside, then weld a 4mm piece in to complete the repair.
 
I'll weld them together first before fitting a 4mm plate flush. The original combined thickness of 5.2mm was at the top and bottom, and 2.2mm in the center. So I'm hoping the 4mm plate I have a sheet of will be more than strong enough.
It's raining most of the time, but I can get it done in-between the showers. I didn't get the opportunity to do this when the weather was a bit better!
I'm looking forward to fitting the new wiring loom to the rear also, but am going to run it along the top of the chassis and can weld some securing brackets on to prevent any possibility of entanglement. It's handy being able to access the top of chassis under drivers seat too 😃
 
but am going to run it along the top of the chassis
You are already planning on doing it but this is the best piece of advice I could give anyone running a new rear loom. Wrap it in conduit for protection and run along the top of the chassis. much easer to repair/replace in future and no less protected. I have done it with both my 110 and series.
 
I replaced the rear section of my wiring loom but used a heavy duty 13 core trailer cable instead as I was going to have to join it anyway. Being 30 years old the loom was showing its age.

I considered a rear loom but chose the trailer cable as it had its own protective sheath, was good size wires and uses colours that are universal - not for the land rover purist but rugged! To further protect it I actually put a piece of quality nylon reinforced garden hose around it - I was going to use some of the split plastic conduit but actually found the hose fitted perfectly.

I then used a piece of the same trailer cable to make the loom to the other side light cluster and also to the trailer socket. They carry an earth but I have fitted a dedicated earth to the rear anyway.
 
I did buy a new loom from Sparks
PXL_20231003_131824272.jpg

Being the Pick-Up, it's the cheapest one having less going on. I did add an ignition powered cable for the caravan fridge and battery charging, which was further taped over with proper loom vinyl tape, and covered it all in corrugated plastic conduit, which I further vinyl taped over to keep water out.
So yes externally fixed to top of chassis leg is the plan.
PXL_20231115_121140948.jpg

Pattern cut
PXL_20231115_121321373.jpg

Marker the internal brace
PXL_20231115_122949476.jpg

Cut the part and drilled out where the brace is which I made bigger hole to weld through
PXL_20231115_132002694.jpg
 
After welding the layers together, I should have modified the card former. But I hacked Boris off the piece to get it to fit, so there was more space than needed 🤬
PXL_20231115_161258310.jpg


But it's welded in and thanks to a break in the weather and having just enough gas
PXL_20231115_182357882.jpg

If I clean it up a bit, it's good to paint and fit the new spring from Flatdog.
 
PXL_20231116_143316356.jpg

After cleaning up with flappy disc, painted over
PXL_20231116_143333519.jpg


The exposed metal with etch primer, and mixed some 2K paint
PXL_20231116_145717673.jpg

Thanks to it being dry, albeit a bit cold, was able to get some paint sprayed over the repaired areas to protect them; and before fitting a new spring and seat.
PXL_20231116_155506183.NIGHT.jpg
PXL_20231116_155439743.NIGHT.jpg
image.jpg


I had to warm the paint in the microwave to get it working with the hardener, but it's all shiny and black now 😍
 

Attachments

  • PXL_20231116_155535844.NIGHT.jpg
    PXL_20231116_155535844.NIGHT.jpg
    271.1 KB · Views: 39
  • PXL_20231116_143353308.NIGHT.jpg
    PXL_20231116_143353308.NIGHT.jpg
    220 KB · Views: 48
  • PXL_20231116_145717673.jpg
    PXL_20231116_145717673.jpg
    313.1 KB · Views: 52
Got some new lights fir front. One was a fair bit milky on the chrome
PXL_20231117_120747697.jpg

Lots of cleaning up and cleaning contacts ect
PXL_20231117_120756678.jpg

Broken O rings had let a fair bit o muck into the repeaters
PXL_20231117_124334942.jpg

But they're looking lovely now
New O rings and bulbs too


PXL_20231117_121600856.jpg

PXL_20231117_124155532.jpg

Fitted a new bumper, same as factory, not even with the plastic corners. It took a little longer finding the earlier type.
Also got Night Breaker bulbs in now, but just plain white, not the ones with a blue tinge.
Been fitting the new loom also with many more zip ties than should be needed, but I don't fancy it getting round the prop.
PXL_20231118_160538341.MP.jpg

I did use corrugated plastic conduit and it was also covered with vinyl loom tape as had to it a split to fit and the non sticky tape holds it together and should keep stuff out hopefully.

PXL_20231118_160544900.jpg
PXL_20231118_160556206.jpg
PXL_20231118_160609889.jpg
PXL_20231118_160617887.jpg
 

Attachments

  • PXL_20231118_160524242.jpg
    PXL_20231118_160524242.jpg
    251.1 KB · Views: 29
Thank you,

All the lights work and look original even if the front lights have night breaker bulbs
17004797153174221403770928094417.jpg

It's the details, when thinking on what's to do, forget the details like for me bump stop to be mount, but it's on now
17004798508712800877228767836970.jpg

The black paints so shiny, can see my orange Overalls.

Tie off the loom where it goes up into the tub, and making sure no sharp edges to cut through cable ties .
17004814870343559487693810854649.jpg


17004817049498097176453964695225.jpg
 
That's still a possibility,
I will be revisiting the chassis quite a bit and need to get back to using her as well as continuing round lots of small and medium jobs.
Like replacing the fuel filler neck which has a small rust hole and the rubber and seal + lock barrell in cap
1700493758794497129525199960693.jpg


17004938215267870390185997269497.jpg

I think your idea is a good one, and I may use an old 20 L oil container as the sides are tall and flat.
 
Back
Top