Bulkhead replacement - where to start?

This site contains affiliate links for which LandyZone may be compensated if you make a purchase.

Webley1991

Well-Known Member
Posts
2,567
Location
London
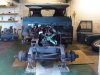
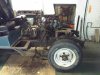
So I managed to find a small workshop made from three single garages knocked through into one. This seems to be an ideal place to do the bulkhead replacement I have been needing to do since I got the Series 3.

I may start tomorrow if I can find the motivation.

Where exactly should I start? I thought the first things would be doors off, windscreen off, wings off.

With rusted bolts etc. I can see this taking at least a day working on my own.

Removing (and refitting) the dasboard and wiring looks like an absolute nightmare. This is the part I am really dreading.

Thanks for any info.
 
Your "off" seems correct with the addition of the sills.
Never done it myself. What are you doing with the old bulkhead? If you're scrapping it, would it be possible to cut it up to ease removal and allow to take the wiring harness off in one piece?
 
With your wiring dont start until you have a drawing. Confirm each termination on your drawing as you disconect. Make notes as required. Get some tape and lable the wiring as you disconect and mark up your drawing with the same lable. Take photos as you go
 
on the wiring front i cut a chunk out of the old bulkhead and flipped all the wiring into the engine bay. to get it back in i took the instrument panel apart and fed the switches and wires back thru the wiring hole, the speedo and the other big round one i got thru the steering columen hole and removed one wire at a time and fed it thru the wiring hole in the new head once on and put it back on the instrument, that way i didn't have to label anything apart from the wire to the brake pedal and the wiper motor thing.

i left the drivers side wing resting against the car so i didn't ahve to break any wiring there either. my passenger wing wires i had to label but that was because i didn't think of leaving the wing resting against the car until after i took it off.
 
There's a good drawing of the back of the dashboard wiring in the land rover manual but buy yourself a cheap digital camera (so it doesn't matter if it gets oily or dropped) and photograph EVERYTHING as you take it apart.
 
looking at my own pics i actually took the doors off first, as there is a distinct lack of captive nuts, if you are on your own the only way you can reach both ends of some of the bolts is to remove the doors, with some of the ones in the middle of the bulkhead its easiest with the screen off too.
 
Thanks for the replies.

From when I have had the dasboard off before, the wiring appears to have been modified, which opens up a whole world of extra problems.

I didn't actually get anything done today. I thought "I'll gather everything and take the landy over there soon". I kept thinking this and before I knew it the whole day was gone. I often end up doing that.
 
DON'T PANIC!

Thank you Douglas Adams.... :)

Even with a modified wiring harness this is not as much of a nightmare as you might think.

As has been said before, pictures are your friend. As many sections are on multiplugs on the Series III (as opposed to individual wires as on II/IIA and earlier) it's a case of insert tab A into slot B and go from there. When undoing things that have been "customized" just mark wires with either tabs of masking tape and a marker (1A slots to 1A , 1B to 1B, 2A, and so forth)

Take your time, be methodical, and remove things in the biggest chunks you can manage.

Also, take time before you start to spray all those pesky nuts and bolts with penetrating oil before you get started. Hit them a couple of times if you can - the more the merrier. Also expect that you will break a lot of the small ones and just buy a box of 1/4-28 x 3/4" with washers, nuts and lockwashers. SOmetimes it's easier just to bust the damn things than to try and undo them.

SLow, steady, methodical and you will do just fine.

ajrr
 
So here's where I am after 4 days working over the bank holiday.

I don't think I have done too badly so far.
 

Attachments

  • rebuild6.jpg
    rebuild6.jpg
    229.7 KB · Views: 1,493
your "old" bulkhead looks in better condition than mine :eek:

Good progress so far though.

Series wiring is really very simple, if it's a complete and utter mess already i'd cut it all out and re-wire it from scratch when you're new bulkhead is in.
 
Thanks for the replies.

I know the axle stands don't look very substantial. I put the wheels back on and left them when I had finished working around that area.

The target I set for myself was to have the wings and radiator off by the end of the bank holiday weekend. I managed to get the cab floor out as well.

The wiring wasn't as bad as I thought. Most of it is colour coded anyway. I will re-join it with bullet connectors later. It may have been re-wired at sometime as it all looks newer than 1972.

The old bulkhead is actually quite a mess. The footwells are completely gone. The door pillars are full of holes. The rim along the top underneath the windscreen is all rust. The part behind the dash at the driver's side is all gone.

I remember reading on here that bulkheads are wanted in any condition for restoration. If anyone iis interested, send me a PM. The front panel (bottom completely rusted out) will also be available.

What is the quickest way of removing the steering coulmn? My plan is to undo that and then lift the bulkhead off with most of the other bits still attached.
 
remove it at the track rod end at the bottom of the drop arm.

the bracket that holds the box to the chassis should be undone, then you can take the column off still on the bulkhead or just unscrew the bolts that go thru the bulkhead and remove the column with the bracket attached.

i had to take mine off with the bulkhead as some twonk had welded and rivetted patches over the steering column - and other - bolt heads.
 
The wiring wasn't as bad as I thought. Most of it is colour coded anyway. I will re-join it with bullet connectors later. It may have been re-wired at sometime as it all looks newer than 1972.

Use one or two of these:

p3.jpg


(I'll get you a proper link to them later, really easy to work with and make life very easy. I have my dash on some, wiring through bulk head on another, etc. very easy to take things to bits and rebuild.

Always leave spare capacity for future expansion too :)Then if you need to disconnect it again it's a simple easy job, bullet connectors can get messy.
 
Last edited:
Good luck with the work mate, steady but surely you'll get there.

Bump do you know what those connectors are called as they look really useful. I've a Spitfire in parts that I took apart and almost all wiring has to be replaced as it's cooked through.

The series 3 I've just taken on is a chassis and separate body so I never had a bulkhead to take pics of. That's going to be fun!

Steve
 
I found out today that the lower fascia has rusted inside to the point of disintegrating. I'm not entirely surprised by this judging by the state of the bulkhead.

I need to separate the steering linkages to be able to get the column out so I can actually get the bulkhead off. I should have thought to buy a ball joint splitter.
 
I managed to get the bulkhead off today.

I borrowed a screw-type ball joint splitter from a work colleague. This popped the drop arm ball joint right off.

The steering box appears to have been leaking oil for a long time. However, this worked in my favour as the splines and nut were well soaked in oil. The nut didn't need any force to undo and the drop arm came off after two taps with a hammer.

Once I had got this undone I could remove the column and undo the remaining securing bolts. I decided to remove the bulkhead with the dashboard and instruments still attached so that I can straight swap them onto the new one.

I had to cut through the passeneger side door pillar as the small bolts holding the bulkhead on were completely rusted. However, as the pillar was mostly rust anyway this didn't really matter.
 

Attachments

  • bulkhead_off.jpg
    bulkhead_off.jpg
    170.3 KB · Views: 660
Back
Top