You are using an out of date browser. It may not display this or other websites correctly.
You should upgrade or use an alternative browser.
You should upgrade or use an alternative browser.
Bit more progress
- Thread starter Tuskenraider
- Start date
This site contains affiliate links for which LandyZone may be compensated if you make a purchase.
Tuskenraider
New Member
- Posts
- 1,248
- Location
- Basildon, Essex
Forgot all about this thread :doh:
So this is how she looks at the moment, yes i know its a Marmite Truck


I have cleaned it since
Next plan is a 2" lift and some bigger tyres as I was some more ground clearance. This is now 100% my offroad toy as I bought a 530d as my daily driver.
I also removed the rear ARB last weekend and it drives no differently. Might be because one of the drop links had broken !!!!!!!!
So this is how she looks at the moment, yes i know its a Marmite Truck
I have cleaned it since
Next plan is a 2" lift and some bigger tyres as I was some more ground clearance. This is now 100% my offroad toy as I bought a 530d as my daily driver.
I also removed the rear ARB last weekend and it drives no differently. Might be because one of the drop links had broken !!!!!!!!
Last edited:
Co-Pang-Yang
Well-Known Member
- Posts
- 2,930
- Location
- Colchester, Essex
I like it alot!
Off roading this sunday in Chelmsford if your about
Off roading this sunday in Chelmsford if your about
Tuskenraider
New Member
- Posts
- 1,248
- Location
- Basildon, Essex
Bah, got my mates wedding :doh:
Tuskenraider
New Member
- Posts
- 1,248
- Location
- Basildon, Essex
Got bored so did a 90min makeover


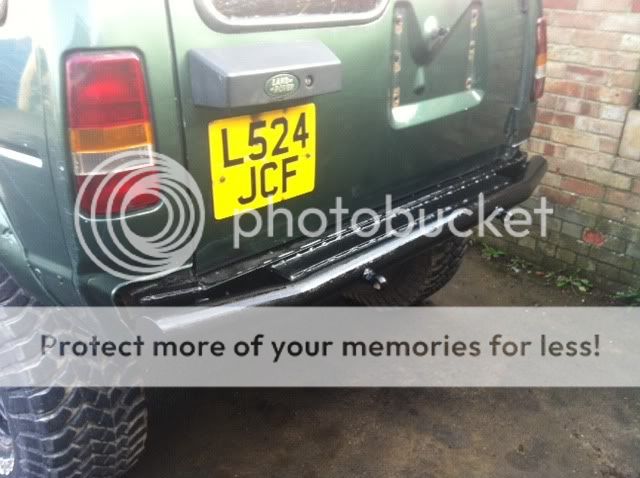
Removed the bullbar and bumper end caps, trimmed the bumper back at the ends and then hammerited it. Looks much better IMO.
Removed the bullbar and bumper end caps, trimmed the bumper back at the ends and then hammerited it. Looks much better IMO.
Last edited:
Mikey_b
New Member
- Posts
- 23
- Location
- North Norfolk
Don't wanna highjack this thread... but if there is a problem with fitting steel wheels on with alloy nuts, then why did Landrover decide to put a steel spare on my 2003 D2 ?
The ends of the alloy nuts are flat so can handle a steel perfectly well, its just the tapered bits don't disappear into the wheel so they do look like c@$P
The ends of the alloy nuts are flat so can handle a steel perfectly well, its just the tapered bits don't disappear into the wheel so they do look like c@$P
jamesmartin
Well-Known Member
- Posts
- 91,886
- Location
- louth lincs
you can hold spare on that way but not road wheel steel wheels rely on the taper,alloys with dowel fit and clamping
Big Stu 12
Well-Known Member
- Posts
- 1,940
- Location
- Suffolk & Essex
In my opoinon, for the cost of steel wheel nuts its not worth the bother of all the comments if you use alloy wheels nuts ...............
there are differnt schools of thought on this and there will always be it just they way things are......
They alloy nuts I have do have a taper that macthes the steel wheels.
PS I have got steel wheel nuts, did use alloy for a week or so while I got me new ones from ebay, think they were only about £12 a set anyway.
Tuskenraider
New Member
- Posts
- 1,248
- Location
- Basildon, Essex
Moving on from wheel nut chat
fitted my 2" lift kit


The old shocks were so fooked, it now actually handles better on the road and isnt as bangy and crashy off road
Well happy
fitted my 2" lift kit
The old shocks were so fooked, it now actually handles better on the road and isnt as bangy and crashy off road
Well happy
Last edited:
Tuskenraider
New Member
- Posts
- 1,248
- Location
- Basildon, Essex
So a bit more work done
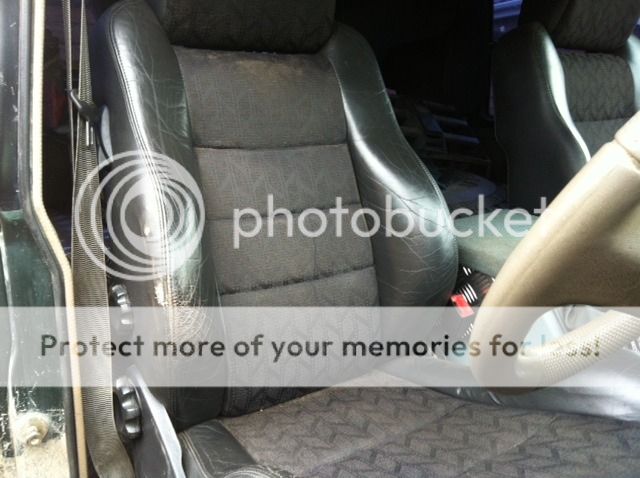
Fitted some seats out of a Rover GSi
Fitted 2" Arches
Fitted 30mm Spacers


Fitted some seats out of a Rover GSi
Fitted 2" Arches
Fitted 30mm Spacers
Last edited:
iwantone
Active Member
- Posts
- 911
- Location
- North Ayrshire
How difficult were the seats to fit? Looks good by the way
shocker
Well-Known Member
- Posts
- 2,038
- Location
- BODMIN MOOR,KERNOW
Rear spots , fitting and wiring ?
wiltshire landyman
I’m back
- Posts
- 15,062
- Location
- salisbury plain wiltshire
just the orrible rear bumper to sort then
Tuskenraider
New Member
- Posts
- 1,248
- Location
- Basildon, Essex
How difficult were the seats to fit? Looks good by the way
Not terrible, cut the runners off them and made some plates up and bolted them in.
Rear spots , fitting and wiring ?
Just got them wired off a switch on the dash via a relay
just the orrible rear bumper to sort then
Yer, ripped the original off whilst out playing. Will sort something eventually
Yesterday I took all the stickers off

Tuskenraider
New Member
- Posts
- 1,248
- Location
- Basildon, Essex
just the orrible rear bumper to sort then
As requested

As you can see the spare wheel mount was looking a bit worse for wear so i gave it a lick of Hammerite

and on went a decent usuable spare at last

The chrome spots were going rusty and looked crap so decided to fit the 2 off the old bullbar plus take the 2 off the back

Fitted 2 rectangle spots i had to the back (as seen here after a very dirty day)

I also binned the decals so this is pretty much how she looks at the moment

Last edited:
ra1nb1rd
Member
- Posts
- 46
- Location
- benfleet, essex
Looking good,
Wheres the rear bumper from?
Wheres the rear bumper from?
wiltshire landyman
I’m back
- Posts
- 15,062
- Location
- salisbury plain wiltshire
same seats as mineSo a bit more work done
Fitted some seats out of a Rover GSi
Fitted 2" Arches
Fitted 30mm Spacers


my rear bumper
DLowe
Member
- Posts
- 34
- Location
- Stoke on Trent
got a feeling I will be doing something similar with the rear bumper, when I find some 200 series lights
Tuskenraider
New Member
- Posts
- 1,248
- Location
- Basildon, Essex
Well i have sort of been busy, well more I started to be busy and had big plans then the weather came along follwed by me doing my back in. Then to top it off I cut a tendon in my hand so the last 3 or 4 months have been hell
Anyway fitted an uprated steering damper which was a bit of a mare as my steering guard got in the way :annoyed: so I had to take the guard off, drill some holes into for the relocation plate and then bolt it to that.
Got another passenger side wing as i wanted to make a neeter job of my snorkel and get rid of the hole that i made when doing the first version.
Ripped the old wiing off

Found a whole at the top of the inner wing which was letting water inside by the glovebox

'welded' it up :wack:

New wing on

Close up of the mod for the snorkel

I then proceeded to drive through a Ford too quick and rip the whole wong off :doh:
I now have another wing at home waiting to go on
Did another P&P day late June and it was mainly faultless except the brakes went off, pedal was rock solid and it just never wanted to stop Thought it was just the mud in the brakes but the drive home wasnt any better. So thats either the servo or the vac pump, so got both off a breaker.
Noticed another whole in the floor just starting to appear by the driver seat so decided to rip the interior out so i could weld it up and then paint the whole floor inside black to hopefully protect it some more.


The hole

So i finally gave in and went out and bought a welder
I also noticed the steering box had finally given up and dumped all the PAS fluid on my drive and the rear diff saw this and though 'top idea' and did the same with the diff fluid out the front seal :wack:
So jobs to do to get it back up and running were
Weld up hole
Paint inside
Fit new diff seal
Fit replacement steering box
Fit new fuel sender
Fit servo and see if it fixes brake problem.
Change all fluids except coolant.
Anyway fitted an uprated steering damper which was a bit of a mare as my steering guard got in the way :annoyed: so I had to take the guard off, drill some holes into for the relocation plate and then bolt it to that.
Got another passenger side wing as i wanted to make a neeter job of my snorkel and get rid of the hole that i made when doing the first version.
Ripped the old wiing off
Found a whole at the top of the inner wing which was letting water inside by the glovebox
'welded' it up :wack:
New wing on
Close up of the mod for the snorkel
I then proceeded to drive through a Ford too quick and rip the whole wong off :doh:
I now have another wing at home waiting to go on
Did another P&P day late June and it was mainly faultless except the brakes went off, pedal was rock solid and it just never wanted to stop
Thought it was just the mud in the brakes but the drive home wasnt any better. So thats either the servo or the vac pump, so got both off a breaker.Noticed another whole in the floor just starting to appear by the driver seat so decided to rip the interior out so i could weld it up and then paint the whole floor inside black to hopefully protect it some more.
The hole
So i finally gave in and went out and bought a welder
I also noticed the steering box had finally given up and dumped all the PAS fluid on my drive and the rear diff saw this and though 'top idea' and did the same with the diff fluid out the front seal :wack:
So jobs to do to get it back up and running were
Weld up hole
Paint inside
Fit new diff seal
Fit replacement steering box
Fit new fuel sender
Fit servo and see if it fixes brake problem.
Change all fluids except coolant.
Similar threads
- Replies
- 27
- Views
- 2K
- Replies
- 9
- Views
- 2K
- Replies
- 9
- Views
- 1K