Bankz's 110 Double Cab

This site contains affiliate links for which LandyZone may be compensated if you make a purchase.
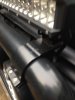
D44 bumper on! Wasnt a perfect fit had to enlarge 4 of the holes to almost 18mm! Just would not fit otherwise.

20180530_132256.jpg


Sadly not compatible with standard steering guards. Usually you can bend the mounts out the way but this is too well made and to thicker steel to work properly with it. So D44 guard ordered...:oops::oops::D:D

Screenshot_20180530-170309_Messenger.jpg


Terrafirmas "Magnetic Finger" was a godsend getting the nuts on the bolts! £10 and a brilliant bit of kit!

20180530_132040.jpg


Also not sure how to drill these ones out just yet... Looks like the steering guard uses the same mounting points (3 bolts in the front xmember) so I could fit that mark and drill but ill need some damn long bits!
(Edit - I found some 120mm long 10mm drill bits, so plan is to drill straight thru the bottom of xmember and out the top. While trying to avoid punching a hole in the rad :rolleyes: - Any other suggestions still welcome :) )

20180530_112001.jpg


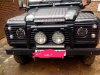
Got a couple A Bars on the way one is a standard a bar for non A/C fenders the other is a low level unit by Terrafirma.

The standard non AC A Bar should let me retain my Lightforce spots but it may sit too high with how the D44 bumper sits. I can have it modified but it depends on a few things - I MUST learn to weld!!

Second bar would involve selling my LF Spots and replacing with x4 5" spots or a single bar. Unsure which yet bur similar to the image below
30221416_1478129775647922_4837005586233032704_o.jpg
 

Attachments

  • Screenshot_20180530-120733_eBay.jpg
    Screenshot_20180530-120733_eBay.jpg
    74.9 KB · Views: 153
Last edited:
Oh yeah of course i deffo need 800watt kf LEDS for driving around at dusk in south london :rolleyes::D:D:D

Speaking of what y'all think of this?

20180531_181821.jpg


Obvs will be coated in FXLiner to match the bumper. Also needs around 70mm added to the center of the bar to properly fit the bumper. I'll bolt in rather than weld in to create easy access for the winch.
 
you know how to make a man go moist!! Portable daylight.
Lovin yer winchy house bumper armageddon prep addition too.

Just seen yer TO shallow A bar been trying to find one like that for ages.

I like the 'face' now it looks like it was to eat something, yer know like a jeep or a freelander....
 
Last edited:
Cheers! Spent long enough looking for a bumper! It came down to this or the Equipe 4x4 bumper but that came in at around £1300 o_Oo_O So the D44 was the choice, not to mention I think it is actually better its very hefty!

Made by Terrafirma TF008SH, Island 4x4 have them in for the cheapest I think. Bolts into the existing bumper holes, well not in my case lol

I know what you mean! It looks a lot more aggressive, I think its down to the amount of space added under the front, should help me out offroading a fair bit, the old one was forever getting wedged and stuck on things!
 
would the 23" be on top of the A bar or below? On top imho looks naff. Inside OK.
I never liked the lightforces, I always wondered what they did with the air flow.
4.5 "s may be the same as I found, once you fit a winch they would get in the way. Depending on how the winch sits.


Cheers
 
Fair point. Not thought about it like that tbh! Probably pretty poor for airflow!

Bar would be below of course. As would the spots.

The angle does make it look a lil taller than it is, its roughly half the height of of the old one.
 
Fair point. Not thought about it like that tbh! Probably pretty poor for airflow!

Bar would be below of course. As would the spots.

The angle does make it look a lil taller than it is, its roughly half the height of of the old one.


I used these to mount my portable daylight, think i am going to lose the Safari spots and put a light bar above and below the A bar. ( after I buy a natty low slung one like yours!) will increase my air flow! Dont need spots, just going with a full narrow spot light bar and two flood bars should be enough to fool the daffodils into thinking its spring!

PS we could meet up on shooters hill drive round in circles and make like a lighthouse!
 

Attachments

  • WhatsApp Image 2018-06-01 at 21.31.09.jpeg
    WhatsApp Image 2018-06-01 at 21.31.09.jpeg
    105.7 KB · Views: 198
  • WhatsApp Image 2018-06-01 at 21.31.10.jpeg
    WhatsApp Image 2018-06-01 at 21.31.10.jpeg
    255.2 KB · Views: 255
Hahaha we should!! Ive seen those clamps before, i tried a set and they snapped when I used them! Thankfully the TF bar has numerous holes for various combos of lights.

Wheel n tyres are
Bowler 16x8
Cooper ST Maxx 285/75/16.


Alsoooo planning my first "Expedition" to the Land Rover Party in Barcelona in late September! Im number 86. Going with a few mates driving down through the Pyrenees then to Barcelona! Should be a good trip and a good 'practice run' for when we actually sort out Morocco.

Bought myself a used OzTent from a friend for a very reasonable price as the first thing to be slightly comfy!
 
Decided to start knocking up my seat extender/risers after work today. Using the old one as a template.
20180607_171422.jpg

All going well till I drilled one hole 2mm too big :mad::mad: which means I cant use an M8 rivnut but have to use an M10 or find the LR ones for £5 a pop

So far leaving it square with an end cap.
 
Decided to start knocking up my seat extender/risers after work today. Using the old one as a template.
View attachment 150848
All going well till I drilled one hole 2mm too big :mad::mad: which means I cant use an M8 rivnut but have to use an M10 or find the LR ones for £5 a pop

So far leaving it square with an end cap.
hell weld it up, grind and re drill the hole or over size it and weld a washer with the correct size hole.
 
Think I found the source of the steering wobble around 40 - 50. Turns out the drivers side swivel bearings where about to collapse. Fell to bits as I removed it!

Wheel bearings dont look much better!

Luckily i have all the bits! :D except a new swivel ball :(
 
Finished the swivel and wheel bearing overhaul. Took a fair while!

Started Friday after work as I knew I didnt have a huge amount of time this weekend to get it done. Managed to get one side totally stripped in 40 minutes! Not bad ay thank god for my buzzgun and impact driver! Though every time I do this I forget to put a tray underneath to catch the oil :rolleyes::rolleyes:

Lucky I decided to overhaul the lot as the top swivel bearing basically fell to bits in my hand as I removed it.

20180609_113330_resized.jpg


Wheel bearings where in a sorry state quite a bit of play and barely and grease in there! New Timken units installed

20180609_113525_resized.jpg


Useful when you don't have a press. Old bearing race with a cut in the side and a hub nut socket to drift the races in.

20180609_114726_resized.jpg


Another tip for doing brake discs, use the wheel to brace the hub. Makes for an easy strip and refit. Though I was just replacing a sheered bolt, thankfully easily drilled out and removed.

20180609_120428_resized.jpg


Shiny teflon coated swivel ball with new races drifted in place.

20180609_124210_resized.jpg


Refilled the hubs with 350ml of proper EP90 as I didnt have any oneshot. Preload set to roughly 14 - 15lbs using some baggage scales :) Thought that was quite clever lol

No leaks thus far :) steering is tighter and more responsive and the vibration at 40 - 50 has gone. Sadly didnt have enough time to do my 6k service but will have to get on with that after work one day.
 
Finished the swivel and wheel bearing overhaul. Took a fair while!

Started Friday after work as I knew I didnt have a huge amount of time this weekend to get it done. Managed to get one side totally stripped in 40 minutes! Not bad ay thank god for my buzzgun and impact driver! Though every time I do this I forget to put a tray underneath to catch the oil :rolleyes::rolleyes:

Lucky I decided to overhaul the lot as the top swivel bearing basically fell to bits in my hand as I removed it.

View attachment 151013

Wheel bearings where in a sorry state quite a bit of play and barely and grease in there! New Timken units installed

View attachment 151014

Useful when you don't have a press. Old bearing race with a cut in the side and a hub nut socket to drift the races in.

View attachment 151015

Another tip for doing brake discs, use the wheel to brace the hub. Makes for an easy strip and refit. Though I was just replacing a sheered bolt, thankfully easily drilled out and removed.

View attachment 151016

Shiny teflon coated swivel ball with new races drifted in place.

View attachment 151017

Refilled the hubs with 350ml of proper EP90 as I didnt have any oneshot. Preload set to roughly 14 - 15lbs using some baggage scales :) Thought that was quite clever lol

No leaks thus far :) steering is tighter and more responsive and the vibration at 40 - 50 has gone. Sadly didnt have enough time to do my 6k service but will have to get on with that after work one day.
preload for double bearing type is only 3lbs,top bush type is 8-10
 
Back
Top