Another 90 Rebuild

This site contains affiliate links for which LandyZone may be compensated if you make a purchase.
Hmmm...... beers named after Landy engines. That's a good idea :)

I'd appreciate you guys, who've done a lot of brake pipes before, casting your eyes over these. I've made up and fitted the front pipes to the calipers. They look ok to me :oops: but before I get carried away and put the fluid in I'd appreciate a look over. I'm a bit concerned about the connections a few pics down.
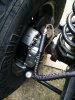
Driver's side
DSC_0192_zpszyxfhn7e.jpg


Passenger side. I did this one first and put the dust shield in to check if it fitted ok
DSC_0193_zps6h9qg0ag.jpg

Can someone check these too please.
This is the flexi hose to solid pipe on caliper connection - seems ok to me.

DSC_0189_zpsridr42l8.jpg

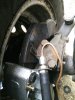
This is the solid caliper pipe in to the caliper connection - not so sure this is right. Will it squash in to a taper to fit the inside of the caliper?
DSC_0190_zpswx1ko9ik.jpg

I've got one more pipe to fit from the kit, but it's too short! This goes from the master down to the valve. I'll have clean it up and use the old pipe.
DSC_0195_zpsabnnf628.jpg


I've also started making up some sound proofing to stick on the seat box. The seat box geometry is bonkers, but I've sussed the angles now and these are ready to stick on, it's just raining too hard to do it! :(
DSC_0182_zpsglgvytip.jpg
I've just finished the lines on my rebuild, it looks like the brackets are on the wrong sides, hopefully the experts will agree the upstand part should be beside the disc either that or I've mine on the wrong way around lol.
 
Last edited:
They look slightly different shape to how on my 1992, but could be angle.
Have you tried moving the wheels lock to lock to check they don't hit suspension or anything?
No I haven't, but that's a good idea, I'll check that out. Cheers.

I've just finished the lines on my rebuild, it looks like the brackets are on the wrong sides, hopefully the experts will agree the upstand part should be beside the disc either that or I've mine on the wrong way around lol.
Which upstand bit? Do you mean the upstand for the brake pipe to be near the disc or the dust shield upstand? I think mine are the right way around.
 
it looks like the brackets are on the wrong sides, hopefully the experts will agree the upstand part should be beside the disc either that or I've mine on the wrong way around lol.

I think you're right. Hadn't made it out first time I looked on phone, but on mine at least the disc guards clip on to the brake pipe thing on top of swivel pin. That could be why they look a funny angle.
 
This is my passenger side
 

Attachments

  • IMG_20160406_080848.jpg
    IMG_20160406_080848.jpg
    58.5 KB · Views: 195
  • IMG_20160406_080835.jpg
    IMG_20160406_080835.jpg
    63.2 KB · Views: 168
No I haven't, but that's a good idea, I'll check that out. Cheers.


Which upstand bit? Do you mean the upstand for the brake pipe to be near the disc or the dust shield upstand? I think mine are the right way around.
those pipe brackets are the wrong way round
 
As said by others, I think them brackets are to wrong way mate.
Struggling to find decent pictures on this computer, but you can just about make it out on here and how the flexi exits on the other side. (nearest the caliper)

 
those pipe brackets are the wrong way round

As said by others, I think them brackets are to wrong way mate.
Struggling to find decent pictures on this computer, but you can just about make it out on here and how the flexi exits on the other side. (nearest the caliper)

Ohhh, bugger. :( My flexi pipes come out on the side nearest the caliper too. Does that mean the dust shield needs to be much closer to the disc? Pleased I didn't put the fluid in. :)
 
Ohhh, bugger. :( My flexi pipes come out on the side nearest the caliper too. Does that mean the dust shield needs to be much closer to the disc? Pleased I didn't put the fluid in. :)
It ends up being very close to the disc, yes
 
It ends up being very close to the disc, yes
Yep, I've had a look under the wheel arch and can see how the shield will go closer. I've got a day off today and it's not raining :), so going out to sort it now. Wheels are coming off to get new pads in, so can sort it all at once. Cheers, all.
 
Sometimes the simplest things are a pain.
If I turn the retaining brackets around the short bit of solid pipe to the caliper looks far too long. :( Straightened out they measure 37cm
 
Sometimes the simplest things are a pain.
If I turn the retaining brackets around the short bit of solid pipe to the caliper looks far too long. :( Straightened out they measure 37cm
before you undo the 2 top swivel bolts support bottom of swivel with a jack.take a bit of weight on the jack it will stop seal leaking and getting squashed at the top
 
Sounds about right. I seem to remember you need about a foot of copper tube to make each one.
Pleased about that :) They do seem longer than what Aaron's seem to be.

before you undo the 2 top swivel bolts support bottom of swivel with a jack.take a bit of weight on the jack it will stop seal leaking and getting squashed at the top
That's a good tip, James. Cheers. I've seen this too late, but that makes a lot of sense. What I did was take one swivel bolt out, just cracked the other one enough to pivot the bracket out then put the first bolts back in and nipped it. Then took other bolt out. If that makes sense :)
Here are some pics of the new set up.
Passenger side
DSC_0200_zpsyffnlh29.jpg

Drivers side
DSC_0199_zpss0jjkbyt.jpg

Thanks for keeping me right fellas.
I'm off to Newcastle Beer Festival now for a celebratory drink. ;)
 
Pleased about that :) They do seem longer than what Aaron's seem to be.


That's a good tip, James. Cheers. I've seen this too late, but that makes a lot of sense. What I did was take one swivel bolt out, just cracked the other one enough to pivot the bracket out then put the first bolts back in and nipped it. Then took other bolt out. If that makes sense :)
Here are some pics of the new set up.
Passenger side
DSC_0200_zpsyffnlh29.jpg

Drivers side
DSC_0199_zpss0jjkbyt.jpg

Thanks for keeping me right fellas.
I'm off to Newcastle Beer Festival now for a celebratory drink. ;)
or there is that way:)
 
I got the fabric glued back on to the roof linings this afternoon. Very difficult job and didn't turn out as well as I hoped, but I'll have to live with it. The corners were the hard part as they would not glue down, instead the fabric 'spans' the radius of the corner so there is a gap underneath.
DSC_0203_zpsxhutlse7.jpg


DSC_0204_zpsaap00ufy.jpg


I started fixing bits of the bonnet catch to the slam panel and realise there was a bit missing. I must have drilled the rivets out and taken iy off before I sent it to get galvanised. This picture shows the rivet holes.
DSC_0206_zpssthdyae4.jpg


It was a thin bit of metal that covered the bonnet catch mechanism. I've had a look through the garage, but can't find it yet. I rarely through stuff out, so I'm hoping I still have it.
Does it do anything or is it cosmetic? I'm hoping I can live without it.
 
,think you can still buy said bit of tin ,,,it holds outer bonnet cable and also stops scrotes getting at the cable ,,lol
 
,think you can still buy said bit of tin ,,,it holds outer bonnet cable and also stops scrotes getting at the cable ,,lol
Cheer, GATSO. Not essential then? I've not given up on finding it yet. The garage needs a good tidy and reorganisation. I can't remember why I took it off :oops: I must have had a good reason, but my memory is shocking. I think it's an age thing :( I think I did it because I thought the galv wouldn't get under it to the slam panel, but that's really me developing a theory to explain my actions. :)
 
I don't like to criticise, after all your hard work, but are those metal brake pipes going to foul on anything when the wheels are turned from lock to lock? If they were mine I'd nip a couple of inches off, re-do the flare and try and gently bend them in a bit closer to the calliper. They look a bit vulnerable sticking out like that.
Headlining doesn't look too bad at all. A lot better than mine at the moment. It looked a bit depressing all peeling off a few posts ago!

That's not criticism, Brown. It's a genuine point. I'm not sure, is the answer. If I ever get it started again that will be one of the first things to check. Carefully turn the steering and see what happens. The pipes did seem to be a bit long. I don't have a flaring tool. I bought all the pieces in a made up kit.
The headlining is 'ok', but not as good as I'd hoped, It's hard to get fabric to fit smoothly on to a 3d curve, which is what you have in the corners.
 
When I've done mine I've tried to get the sort of line that Aaron's followed, so they're less likely to get caught on anything. A basic flaring tool isn't that dear and is a real asset. When I did my brakes about three years ago I tried first of all to buy the correct bits of pipe ready made. But the fit wasn't great, even ordering with the relevant part numbers, so I ended up buying a roll of tube and a flaring tool and managed to do a much better job said he modestly.
 
Back
Top