guzzi lemans
Member
- Posts
- 72
- Location
- cloud cuckoo land
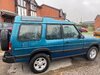
All the joys of Landy owner ship, with bells on it.
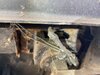
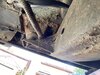
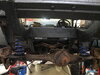
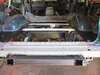
Started to replace some of the body mounts which led to replacing the rear cross member, rear floor, side skirts, repairing the near side wheel bay, replacing the tank top strap and making up a replacement chassis mount on the rhs, a number of repairs needed to the chassis rails and a shock mount. As the springs etc were off they have been replaced, and new bushes. A frame top pivot and bushes replaced, lower link to do when its off the ramp. moving forward, the ns rear outrigger is to be replaced, and some repairs to the foot wells, the sponge masquerading as insulation was sticking out the side of the floorpan when interior was stripped out, bad repairs to cills and front wings are being sorted and front body mounts replaced. new springs/shocks/mounts etc for the front with bushes to do.
weird turnbuckle rear seat belt mounts in floor replaced, and dinitrol cavity wax to inject.
chassis now looks good having been stripped back to good metal with proper repairs made no patches here!
hopefully the floor will go in this week, and the front end made good with wings and doors back on.
honourable mentions must go to YRM Metal solutions for the supply of the galvanised panels, mounts etc, Rimmer bros and JGS for the running gear and incidental parts. Dishonourable mention to the supplier with restrictive terms who will not get any business from me again ever for any of my landies or any other vehicles.
Next month is engine & transmission service, replace timing belt, check turbo for wear, new brake discs, pads and maybe new callipers as they look crap, might update to improve the discs rather than standard.
At least my v8 is ok, Japanese re-import, with regular dinitrol cavity wax. Pity it costs so much to run, lpg is getting scarce.
I didn't bother with pictures of the floor etc as it was too depressing.