1975 Series 3 Rebuild (The second time around)

This site contains affiliate links for which LandyZone may be compensated if you make a purchase.
Progress tonight :)

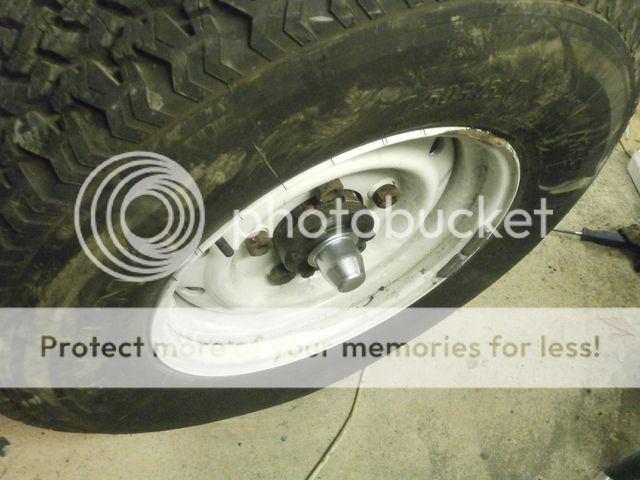
Wheel bearing adjusted and new drive flange fitted. The britpart dust covers are a tight fit to say the least!


Shocks fitted and brakes bled up. A trick i found to fit the split pin in the bottom shock mount is to use a valve spring compressor to compress the bush enough to get the washer on and pin in the hole


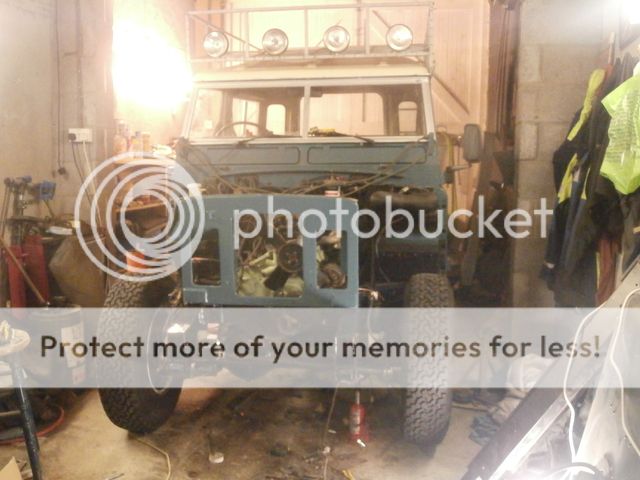
Also found time to fit the front panel. I was just going to paint the back of it to protect it when the other bits get refitted but ended up rollering the front and the top as well


Getting there now

 
More progress but no pics yet.

Firstly i refitted the battery tray and then Refitted the radiator and filled up with coolant (tested with my antifreeze tester and is good to -15). Ten i fitted the battery and fired her up. Runs nice and sweet ;D with no load on it it wasnt quite getting hot enough to open the thermostat so today I refitted the prop shaft and refilled the gearbox and transfer box with oil. tomorrow I shall fire up the engine and then run through the gears with the transfer box in neutral to put a bit of load on the engine. I found this helps get it up to temperature when its stationary.

All the mechanical bits are done now to get her moving again, now its just bodywork and electrics :)
 
More progress " But no pictures until Photobucket is back online as its down for maintenace :(

Temptation got a hold of me and I had a little spin in her up and down the drive, goes quite nicely, at least it seems to go in a straight line!

Also got hold of a new door so swapped the lock over from my old door and hung it in position on a new hinge as a reference for repairing the bottom of the bulkhead. Did a bit more painting in the engine bay as well as refitting my leccy fan. Also made a start on repairing the passenger side wing (Not as bad as I thought, will swap the front panel and inne wing section off the doner wing I have (the other bits are worse than the crash damaged one believe it or not)

Pics to follow when photobucket gets going again
 
Pics! Eventually got photobucket to work

Radiator re-fitted


Then fitted the electric fan and carried out a trial fit of the emergency barbecue... erm I mean Rocky mountain maltese cross grill


This pic shows the new stainless J-clips and bolts used to hold the wings on. Yes the bulkhead looks manky but thats old silicone that needs coming off. Wouldnt recommend trying to seal wings with mastic as paint just comes off


Also here is a shot of the new door. Yes purists, those are M8 Aleen headed countersunk bolts in the hinges. Need to turn the heads down slightly so they sit inside the hinge. Okay for now as the door is only there to get the bulkhead position right for welding the bottom of the door pillar amongst other things


Now on to the passenger wing. This wasnt bad but the inner engine bay side and front bit were too far gone really so swapped the outer edge on to a set off a 2A. If you wonder why I didnt just use the 2A wings, some cock womble had ripped them off the bulkhead ripping the skin

 
Cracking job mate. I followed both your rebuilds with great interest. One question. Why are you fitting a alte Series IIA grille when your vehicle is a Series III? Back in the 1990s, there was a horrible trend of making series vehicles look like Defenders and they looked ghastly. The result would neither be the defender that one wanted and nor would it be the series vehicle that one should have been proud of.
 
Reason being because the plastic one was broken and the metal one wont flap around so much.

Also I just prefer it to be honest, the rest of the vehicles no where near original anyway and i wont sell it so it just keep s me happy haha, thers enough s3s on the road to allow mine to be different
 
Got the wing skin bolted up properly tonight with M6 stainless bolts.

Then decided to carry out a dry fit before painting the engine bay side of the wing. Basically it went so well I pianted it in situ. I've decided to sort the dents whilst its on the vehicle. Yes it will be more awkward, hpwever it will be more solid to work with so should be easier to knock dents out. Plenty of room with the wheel off to do so.

Will get pics in a bit when photobucket works again
 
More progress tonight. I began sorting out the drivers side wing whilst my Dad tacked the bulkhead repair piece in place.

More shots of the passenger wing showing the painted side as well as the electric fan fitted and new sidelight/ indicator assemblies


Wing skin off


The dent that need to come out


Bulkhead repair starting to take shape


Yes, unfortunately I have to rebuild the front end of the series (or Margaret as she's been christened by my one of my mates) after a disagreement with a tractor. Whilst I'm at it I shall be upgrading and improving as I go along to really futureproof it and make it much nicer to use as a daily. Im not talking power steering (I dont like the feel of a ps setup on a series, had a go in one once and didnt like it) Im thinking of soundproofing as well as curing the numerous oil leaks she has as well as a few interior jobs.

In the accident she damaged:
Front bumper,
Both front wings,
Lost the indicator and sidelight lenses - all lights however still work suprisingly since the bloody things are britpart
Drivers side door bottom
Drivers side sill
Front apron (Dont care as im fitting a capstan winch)
Drivers side shock absorber was pierced leaking all its oil out,
Drag link bent slightly will swap for HD ones
Tubby the door has a massive dent
Bulkhead twisted at the bottom in front of door

Theres no chassis damage so all easily repairable, luckily im friendly with a few local places dealing in second hand landy bits

View attachment 93288 View attachment 93289 View attachment 93290 View attachment 93291 View attachment 93288 View attachment 93289 View attachment 93290 View attachment 93291 View attachment 93288 View attachment 93289 View attachment 93290 View attachment 93291
That's a nasty case of tractor rash .I got Ford focus rash on mine
 
Got all the lights working on the passenger side and the bulkheads getting there now. Ordered a new ABS drivers side wing panel (saves time fitting it over knocking the numerous dents out the other one). Also ordered a bumper so once the door and drivers wing is back on i can fit my capstan winch!
 
Hi Sam nice rebuild, again! I've got a very similar series 3 to yours that I am currently rebuilding but I just have a couple of questions. I've just got a new galvo bulkhead that came with the servo tower and servo for a series 3 and I notice that you have one on yours, did you just use the old master cylinder on it? You also have the 2.5na with the upside down engine mount on the drivers side, when the std mount is removed from the chassis you lose one of the battery tray legs. What modification was done to your to remedy the loss of a leg on the battery tray? Mine is some hideous combination of weld, bolts and metal shelving! Not done by me I add! I will be ordering a galvo chassis for mine in the next month or so and it makes me a bit sad to have to cut it up when it arrives. Thanks
 
My battery tray has the four legs however it has been moved forward. I didnt do the conversion though, my granddad did when he had it. The master cylinder on mine is the one for the servo, single line. Mine was originally non servo so had to get a servo cylinder for it. Will get some pics for you tomorrow evening of the battery tray as the drivers wing is off and will PM them across to you
 
Got my bumper in the post from Paddocks on Saturday and fitted it loosely. The bumper bolts I got from them are M8s and seem much too small for the holes so i will be swapping them for M10s.


Then I fitted my ABS wing skin to the drivers wing and test ftted it to see how it fitted against the bulkhead repair and it fits pretty good. I also solved a little niggling problem I had. Ever since fitting the front panel I had noticed the dumbirons looked a bit misaligned and the panel looked square and the measurements were spot on. Turned out the panel was too far in to the engine bay on the drivers side by 5mm giving the optical illusion. Slackened the bolts and twisted it into its right position and all is good and nice and square now :)


Also test fitted the grill again to see how its all looking (nothings drilled yet its just hanging loosely, keeps it out of the way mainly to stop it getting bent.


I also took the opportunity to see how the capstan winch would look.


Its an Aeroparts front recovery capstan winch I picked up complete for £100 (apart from the drive dog which I have sourced). Needs new oil seals and possibly a bearing as well as needs the pivot repairing (apparantly its got the later, simpler linkage on it).
 
Back
Top