You are using an out of date browser. It may not display this or other websites correctly.
You should upgrade or use an alternative browser.
You should upgrade or use an alternative browser.
1965 Series 2a Station Wagon in Holland
- Thread starter Stretch
- Start date
This site contains affiliate links for which LandyZone may be compensated if you make a purchase.
You can buy all of the parts separately for those cheapo bench sand blasting cabinets. The gloves cost from about 15 euros a pair here in Holland. The blasting gun was also about the same price.Look forward to you completing this - the things from the mail order tool companies seem a little pricey for what they are!
I guess the blasting gloves will be the hardest part to find for it?
I'll do a list of the costs when it is done for you. The main reason I'm doing this though is that I've got free wood. If I had to pay for the wood I would have been stuffed...
...Even so the costs are mounting up...
Jam1
Well-Known Member
- Posts
- 1,315
- Location
- Staffordshire
Nope! I'm guessing lots are interested but just watching quietlyOh - I didn't think many were interested in that. Perhaps you're a cast of one (?)...
Are the gloves available on the bay of fleas? Sorry, don't know why I am asking - I could just go and look for myself! LOL
DIY'ing a blasting cabinet makes a lot of sense: you can build it for your requirements and space available! Sadly, I don't have any space available, but I really like this idea")
DIY'ing a blasting cabinet makes a lot of sense: you can build it for your requirements and space available! Sadly, I don't have any space available, but I really like this idea
There are indeed many for sale on the bay - starting at about 8 quid.Are the gloves available on the bay of fleas? Sorry, don't know why I am asking - I could just go and look for myself! LOL
DIY'ing a blasting cabinet makes a lot of sense: you can build it for your requirements and space available! Sadly, I don't have any space available, but I really like this idea
The versions that I think are the most interesting to the DIY cabinet builder are the ones with the holders included =>
There's a much much cheaper option from a seller in Hong Kong (!)
Still having the holders might help. I'm probably going to be modifying some heating duct or perhaps some drain pipes. Drain pipes here are either 125mm or 200mm - there is a 160mm version available but it is pretty rare. The holders for my cheapo cabinet are 130 (ish) mm.
The 125mm drain pipe is a bit cramped. I might go for the larger 130mm heating duct if I can get it at a reasonable price (trying to keep well under the price shown in the picture above which I think is a bit much)
Quick bit of a diversion back to the Land Rover.
Midnight shopping again I'm afraid. Bloody lethal.
Got to stop...
...can't resist...
...made a new project (like I need more diversions)...
Fairly hard to find at a reasonable price, optional extra part - LHS series 2a hinge for mounting a mirror - part number 346377


This is the easier to get side - the left hand side of the vehicle. The RHS version is currently about as common as rocking horse doo doo. I know of one place where I might be able to get one NOS but it will probably cost more than 80 quid. So the plan is to modify...
...could be a cock up - I've been told it is hard to do. I'm not sure why - may be I'll discover why later on.
The LHS version was on ebay and I bid 20 quid. Just missed out at 21 quid. However, Dutch ebay sent me an email telling me I was a "lucky bird" (that's a direct translation which is often fun doing because, well, it is often bonkers here - I mean why would Dutch ebay assume I'm a lass? Anyway...) and that there was a "buy it now" - panic! PANIC! PANIC!!!! for 20 quid (my bid!) - hee hee - the man from Del Monte - he said yes...
Meanwhile on Marktplaats ( a Dutch variation of ebay) I got in touch with some one who was selling a whole Safari roof. I got him to sell me the roof vents for 50 euros a pop - which these days isn't a bad price for LWB roof vents that are not totally rusted and seized solid


Some might remember I was cocking about with de-rusting my original roof vents. This has kind of gone OK for two of them but they are pretty ropey. So I have a back up plan just in case Mrs May makes a total pigs ear of the Brexit negotiations and I have to get out of Dodge in a hurry! I still have positive thoughts about the original roof vents and how I'm going to fix them, however. I do have a cunning plan but, perhaps I need to focus on other things first...
(!)
Midnight shopping again I'm afraid. Bloody lethal.
Got to stop...
...can't resist...
...made a new project (like I need more diversions)...
Fairly hard to find at a reasonable price, optional extra part - LHS series 2a hinge for mounting a mirror - part number 346377
This is the easier to get side - the left hand side of the vehicle. The RHS version is currently about as common as rocking horse doo doo. I know of one place where I might be able to get one NOS but it will probably cost more than 80 quid. So the plan is to modify...
...could be a cock up - I've been told it is hard to do. I'm not sure why - may be I'll discover why later on.
The LHS version was on ebay and I bid 20 quid. Just missed out at 21 quid. However, Dutch ebay sent me an email telling me I was a "lucky bird" (that's a direct translation which is often fun doing because, well, it is often bonkers here - I mean why would Dutch ebay assume I'm a lass? Anyway...) and that there was a "buy it now" - panic! PANIC! PANIC!!!! for 20 quid (my bid!) - hee hee - the man from Del Monte - he said yes...
Meanwhile on Marktplaats ( a Dutch variation of ebay) I got in touch with some one who was selling a whole Safari roof. I got him to sell me the roof vents for 50 euros a pop - which these days isn't a bad price for LWB roof vents that are not totally rusted and seized solid
Some might remember I was cocking about with de-rusting my original roof vents. This has kind of gone OK for two of them but they are pretty ropey. So I have a back up plan just in case Mrs May makes a total pigs ear of the Brexit negotiations and I have to get out of Dodge in a hurry! I still have positive thoughts about the original roof vents and how I'm going to fix them, however. I do have a cunning plan but, perhaps I need to focus on other things first...
(!)
Progress with the new sand blasting cabinet (is as follows)
The design of the filtration system could have been done with some care. I could have at least done some rough calculations on the back of envelope like this =>

However, I didn't bother I used the used the much more common "How much? I'm not paying for that!" method. I decided to buy two rather beefy air filters to filter the air coming in and out of the cabinet. The filter on the way in is more to stop sand and dust from coming out (as is the other one actually).
I resorted to what I know so I applogise to the any Land Rover owners reading this - I bought air filters for a Mercedes non turbo OM61X engine. These are nice big beefy filters that have a metal reinforcing strip on the inside and a cushioned rubber ring on the outside that loves to be squashed (to make a nice seal).


These cost about 11 euros a pop. Which isn't too bad in the bigger scheme of things (fits in with the "How much" design criterion)
As I don't want to crawl into the cabinet to change the filter I've built it on the outside

Two M8 bolts used to stop the filter from sliding away when I'm fitting it to the cabinet

Welded a M8 nut onto a bit of crappy 1mm thick steel box section that then holds a bit of threaded bar which then holds the filter cover and filter in place.

The cover will hopefully stop other dust and muck from falling on the filter. There's a gap at the bottom of the cover (of course?!) to allow the air to get in...
...the plan is to get some of that fleece stuff that people bung into cooker hoods as a cover for the filter on the cabinet side: (With any luck) This should stop large silly aimed spurts of sand from settling in the filter.
#########
Holes for hands and gloves have been made

I've gone for the cramped 125mm straight plumbing connector option because I found one and liberated it from the rubbish - yet again fitting in nicely with the "How much?" criterion


...fits like a glove...

#############
Front is fitted and door hole is cut and reinforced


As you can see there are some horizontal planks at the top of the hopper so I can scrounge some wire mesh and place that on top of it and hopefully stop the stuff from falling into the hopper when I'm blasting.
The design of the filtration system could have been done with some care. I could have at least done some rough calculations on the back of envelope like this =>
However, I didn't bother I used the used the much more common "How much? I'm not paying for that!" method. I decided to buy two rather beefy air filters to filter the air coming in and out of the cabinet. The filter on the way in is more to stop sand and dust from coming out (as is the other one actually).
I resorted to what I know so I applogise to the any Land Rover owners reading this - I bought air filters for a Mercedes non turbo OM61X engine. These are nice big beefy filters that have a metal reinforcing strip on the inside and a cushioned rubber ring on the outside that loves to be squashed (to make a nice seal).
These cost about 11 euros a pop. Which isn't too bad in the bigger scheme of things (fits in with the "How much" design criterion)
As I don't want to crawl into the cabinet to change the filter I've built it on the outside
Two M8 bolts used to stop the filter from sliding away when I'm fitting it to the cabinet
Welded a M8 nut onto a bit of crappy 1mm thick steel box section that then holds a bit of threaded bar which then holds the filter cover and filter in place.
The cover will hopefully stop other dust and muck from falling on the filter. There's a gap at the bottom of the cover (of course?!) to allow the air to get in...
...the plan is to get some of that fleece stuff that people bung into cooker hoods as a cover for the filter on the cabinet side: (With any luck) This should stop large silly aimed spurts of sand from settling in the filter.
#########
Holes for hands and gloves have been made
I've gone for the cramped 125mm straight plumbing connector option because I found one and liberated it from the rubbish - yet again fitting in nicely with the "How much?" criterion
...fits like a glove...
#############
Front is fitted and door hole is cut and reinforced
As you can see there are some horizontal planks at the top of the hopper so I can scrounge some wire mesh and place that on top of it and hopefully stop the stuff from falling into the hopper when I'm blasting.
- Posts
- 10,746
- Location
- A bit sarf of Dorking
It's baffling.
Shock horror - genuine Land Rover content =>
Front crankshaft mud shield

Cos I was being a bit of a bloke I ignored the Green Book (didn't read instructions) and assumed the mud shield needed to be removed to get at the front crankshaft seal

I drilled out the rivets...

...only to find it wasn't necessary after all.

Still judging the corrosion under the shield I think it was probably a good thing to have taken to bits after all.

After some cleaning up I resealed the shield to front cover mating surface with Hylomar

Finding replacement rivets wasn't as easy as I had hoped.
Couldn't find a part number in the parts book. Couldn't get some imperial sized fasteners for a reasonable price sent from England so I bought metric
I've used 3mm diameter steel rivets with a 20mm length. The rivets should be a bit shorter (about 19mm) but I'm not going to try and cut them down to size! The rivets should also be a bit wider - 3.2mm is the equivalent metric size.
Mounting the snap in a little vice so the base is supported and not just gripped in the jaws.

Balancing the front cover on the snap (with rivet fitted - and using old rivets the wrong way round in other holes to hold the mud shield in the good place) - hammer and punch the rivet to form

I almost got most of the rivets flat and straight - not too squewie - but as they're a bit under size they wiggled a bit during formation (!)

Front crankshaft mud shield
Cos I was being a bit of a bloke I ignored the Green Book (didn't read instructions) and assumed the mud shield needed to be removed to get at the front crankshaft seal
I drilled out the rivets...
...only to find it wasn't necessary after all.
Still judging the corrosion under the shield I think it was probably a good thing to have taken to bits after all.
After some cleaning up I resealed the shield to front cover mating surface with Hylomar
Finding replacement rivets wasn't as easy as I had hoped.
Couldn't find a part number in the parts book. Couldn't get some imperial sized fasteners for a reasonable price sent from England so I bought metric
I've used 3mm diameter steel rivets with a 20mm length. The rivets should be a bit shorter (about 19mm) but I'm not going to try and cut them down to size! The rivets should also be a bit wider - 3.2mm is the equivalent metric size.
Mounting the snap in a little vice so the base is supported and not just gripped in the jaws.
Balancing the front cover on the snap (with rivet fitted - and using old rivets the wrong way round in other holes to hold the mud shield in the good place) - hammer and punch the rivet to form
I almost got most of the rivets flat and straight - not too squewie - but as they're a bit under size they wiggled a bit during formation (!)
Back to the sand blasting cabinet.
Progress almost ground to a halt. Don't know why - taking ages to do nothing at the moment.
Some fantastic graphics showing the way the air is meant to be drawn out of the cabinet by the bathroom fan =>

I got a bit nervous that the 100mm bathroom fan isn't going to be man enough, so I cut a second hole for another one. This hole will be blocked up for now but is there in case I need to double up the ponies.

Clear building sealant and glue in one is being used to butcher the parts in place (!)
Sealing for parts that need to open and come apart is being aided by draught insulation.

The fan motor box is mounted on top and as you can see the front cover for the filter box is about to go on.

The cheapo perspex sheeting is probably going to be taken back to the shop. It looks too thin for the job. I might be fitting glass instead (as I can get some for free).
Progress almost ground to a halt. Don't know why - taking ages to do nothing at the moment.
Some fantastic graphics showing the way the air is meant to be drawn out of the cabinet by the bathroom fan =>
I got a bit nervous that the 100mm bathroom fan isn't going to be man enough, so I cut a second hole for another one. This hole will be blocked up for now but is there in case I need to double up the ponies.
Clear building sealant and glue in one is being used to butcher the parts in place (!)
Sealing for parts that need to open and come apart is being aided by draught insulation.
The fan motor box is mounted on top and as you can see the front cover for the filter box is about to go on.
The cheapo perspex sheeting is probably going to be taken back to the shop. It looks too thin for the job. I might be fitting glass instead (as I can get some for free).
LordOWar
Well-Known Member
- Posts
- 460
- Location
- North West
A mate of mine uses old Dyson hoovers as his fans. He then buys extra cheapo eBay filters for the Dyson on eBay and swops them out when they clog up. Works well.
I might have to resort to the vacuum cleaner solution. I'm busy with the "how much - I'm not paying that" design criterion at the moment though...A mate of mine uses old Dyson hoovers as his fans. He then buys extra cheapo eBay filters for the Dyson on eBay and swops them out when they clog up. Works well.
...there's always a danger it ends up costing more in the end!
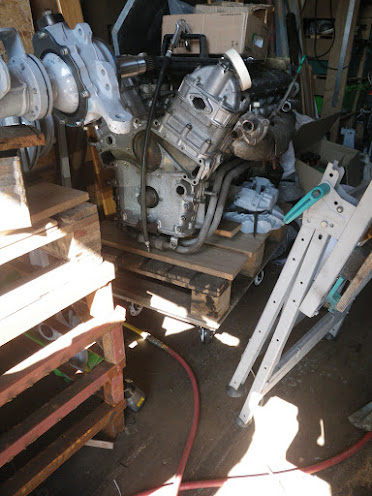
I got fed up with that stupid engine stand yesterday. It is one of those things (like table top sand blasting cabinets) that fall short of the money spent and their over all usefulness.
Because I've run out of table space I've kind of left the engine on the stand but as you can see it isn't really being used in the true spirit that was intended


The front of the engine is being supported via the front engine mount holes in the block.
The back of the engine has just a load of blocks of wood sitting on a lump of oak.
WARNING!!!!
This is a potentially dangerous construction! This is well dodgy - this is exactly the reason why they say not to rest a car on bricks! Not only will / can bricks crumble (if they're not engineering bricks) but they wobble and topple over. The ratchet strap is a very important part of this botch job: It holds the engine and the blocks of wood in place...
This isn't an ideal situation - I need to modify that stupid engine stand so it can actually do what it is meant to do.
###########
Because I've had it with that stupid engine stand the flywheel and the clutch has been fitted

A "trim removal tool" was used to help poke the locking plates upwards whilst the flywheel bolts were being tightened...

...the trim removal tool is also conveniently bent which makes tapping the locking plates into shape a doddle
(Rivet counters: Please ignore incorrect use of roofing hammer - I found it and it was free - so that's all good really)

The eagle eyed will probably notice I'm fitting a series three clutch. This is because I've only been able to find a series 3 flywheel with a decent starter ring. Trying to replace the old starter ring on the original flywheel was an utter cock up. Green book says to drill a hole and then use a chisel to crack the ring off the flywheel. Didn't work well for me - the ring was so ductile I ended up hammering down towards Australia...

...does anyone know what the green spots are for? At least if I've not fitted it correctly it will be easy to change now that I'm not being restricted by that stupid crap stupid crap **** **** stupid crap stupid crap **** **** stupid crap stupid crap **** **** stupid crap stupid crap **** **** stupid crap stupid crap **** **** stupid crap stupid crap **** **** stupid crap stupid crap **** **** stupid crap stupid crap **** **** stupid crap stupid crap **** **** stupid crap stupid crap **** **** stupid crap stupid crap **** **** stupid crap stupid crap **** **** stupid crap stupid crap **** **** stupid crap stupid crap **** **** stupid crap stupid crap **** **** stupid crap stupid crap **** **** stupid crap stupid crap **** **** stupid crap stupid crap **** **** engine stand.
Because I've run out of table space I've kind of left the engine on the stand but as you can see it isn't really being used in the true spirit that was intended
The front of the engine is being supported via the front engine mount holes in the block.
The back of the engine has just a load of blocks of wood sitting on a lump of oak.
WARNING!!!!
This is a potentially dangerous construction! This is well dodgy - this is exactly the reason why they say not to rest a car on bricks! Not only will / can bricks crumble (if they're not engineering bricks) but they wobble and topple over. The ratchet strap is a very important part of this botch job: It holds the engine and the blocks of wood in place...
This isn't an ideal situation - I need to modify that stupid engine stand so it can actually do what it is meant to do.
###########
Because I've had it with that stupid engine stand the flywheel and the clutch has been fitted
A "trim removal tool" was used to help poke the locking plates upwards whilst the flywheel bolts were being tightened...
...the trim removal tool is also conveniently bent which makes tapping the locking plates into shape a doddle
(Rivet counters: Please ignore incorrect use of roofing hammer - I found it and it was free - so that's all good really)
The eagle eyed will probably notice I'm fitting a series three clutch. This is because I've only been able to find a series 3 flywheel with a decent starter ring. Trying to replace the old starter ring on the original flywheel was an utter cock up. Green book says to drill a hole and then use a chisel to crack the ring off the flywheel. Didn't work well for me - the ring was so ductile I ended up hammering down towards Australia...
...does anyone know what the green spots are for? At least if I've not fitted it correctly it will be easy to change now that I'm not being restricted by that stupid crap stupid crap **** **** stupid crap stupid crap **** **** stupid crap stupid crap **** **** stupid crap stupid crap **** **** stupid crap stupid crap **** **** stupid crap stupid crap **** **** stupid crap stupid crap **** **** stupid crap stupid crap **** **** stupid crap stupid crap **** **** stupid crap stupid crap **** **** stupid crap stupid crap **** **** stupid crap stupid crap **** **** stupid crap stupid crap **** **** stupid crap stupid crap **** **** stupid crap stupid crap **** **** stupid crap stupid crap **** **** stupid crap stupid crap **** **** stupid crap stupid crap **** **** engine stand.
- Posts
- 10,746
- Location
- A bit sarf of Dorking
..does anyone know what the green spots are for? At least if I've not fitted it correctly it will be easy to change now that I'm not being restricted by that stupid crap stupid crap **** **** stupid crap stupid crap **** **** stupid crap stupid crap **** **** stupid crap stupid crap **** **** stupid crap stupid crap **** **** stupid crap stupid crap **** **** stupid crap stupid crap **** **** stupid crap stupid crap **** **** stupid crap stupid crap **** **** stupid crap stupid crap **** **** stupid crap stupid crap **** **** stupid crap stupid crap **** **** stupid crap stupid crap **** **** stupid crap stupid crap **** **** stupid crap stupid crap **** **** stupid crap stupid crap **** **** stupid crap stupid crap **** **** stupid crap stupid crap **** **** engine stand.
https://www.livethegreendot.com/ Calming Land Rover owners the world over.
Thanks but I a feeling a little bit more than positive thinking is required for that (cut and paste obscenities here=>) ______ engine stand. I think an angle grinder and a welder is probably going to be more effective. Funny what google kicks up on searches though isn't it? (Unless of course you've had to sit through one of their training courses in which case you have my sympathies - I have a simple rule for anything that uses "etc" as part of its description, it is quite obviously going to be utter utter utter _______)https://www.livethegreendot.com/ Calming Land Rover owners the world over.
- Posts
- 10,746
- Location
- A bit sarf of Dorking
Thanks but I a feeling a little bit more than positive thinking is required for that (cut and paste obscenities here=>) ______ engine stand. I think an angle grinder and a welder is probably going to be more effective. Funny what google kicks up on searches though isn't it? (Unless of course you've had to sit through one of their training courses in which case you have my sympathies - I have a simple rule for anything that uses "etc" as part of its description, it is quite obviously going to be utter utter utter _______)
Google training courses? I had no idea that such a thing existed - I'll Yahoo! that.
Anyway, you think yours is a tad unwise....
It's not completely stupid - the castors are bolted onto 19mm ply.
Similar threads
- Replies
- 6
- Views
- 1K