You are using an out of date browser. It may not display this or other websites correctly.
You should upgrade or use an alternative browser.
You should upgrade or use an alternative browser.
Freelander 2 (LR2) Freelander 2 diesel starting on 3 cylinders, now running properly, after cylinder head change.
- Thread starter Nodge68
- Start date
This site contains affiliate links for which LandyZone may be compensated if you make a purchase.
Alibro
Well-Known Member
- Posts
- 7,422
- Location
- Northern Ireland
Glad to hear it's going a bit better John. I'm sure you'll get it going 100% soon.I've just taken him for a drive, and he's miles better, much more responsive, and definitely more powerful and loads less noise too.
However there still seems to be a slight misfire evident, more like a flutter under 75% power and above, over 2500 RPM.
I'm unsure as to the cause, but I'm going to try the crack position sensor first, as I've read these can cause missing as the revs go up.
It could be an iffy injector too, but I've a good spare which I can substitute 1 by 1 to prove those.
There's also a small amount of air getting in to the fuel intake, which could also be the cause, which is definitely worth investigating.
")
Thanks Ali. It's definitely much better, just not quite perfect, yet.Glad to hear it's going a bit better John. I'm sure you'll get it going 100% soon.
andyfreelandy
Well-Known Member
- Posts
- 6,069
- Location
- Devon
I'm unsure as to the cause, but I'm going to try the crack position sensor
If it's high on drugs then it will misfire a bit!!!
If it's high on drugs then it will misfire a bit!!!
Lol, well spotted. Make you wonder what auto-correct is thinking though.
- Posts
- 2,103
- Location
- Hertfordshire
YouTube linky.
Well done, at least it's running on all 4 from cold & has got it's mojo back
, I always did wonder about the old head when I saw how damaged it was. Having to lap valves in for that amount of time as you know, will alter the width of the valve sealing area which only needs to be about 1-1.5mm (unless you had the other angles re- cut ? Once you get that slight hesitation sorted you'll still have a 'cheap' fully sorted FL2.I keep thinking about getting a FL2 & part company with the FL1 & D2, (when I get round to finishing the suspension/brakes/d. shaft oil seal on the FL1) I might start looking, all the best.
Well done, at least it's running on all 4 from cold & has got it's mojo back
It is definitely better when cold.
Last edited:
Arctic2
Well-Known Member
- Posts
- 3,001
- Location
- Westmidlands
Hi John.
I have just watched the video thanks for posting it up, great to hear it fired up ok, engine seems to be rocking a little though is that due to a weak or torn lower engine mount/tie bar, i think you mentioned it in another post somewhere, once you have fine tuned the car it will run great i have no doubts, once again thank you for sharing your knowledge on here.
I have just watched the video thanks for posting it up, great to hear it fired up ok, engine seems to be rocking a little though is that due to a weak or torn lower engine mount/tie bar, i think you mentioned it in another post somewhere, once you have fine tuned the car it will run great i have no doubts, once again thank you for sharing your knowledge on here.
cut ? Once you get that slight hesitation sorted you'll still have a 'cheap' fully sorted FL2
Comparatively cheap, although if my time was factored in, it's not such a bargain.
It's taken about 20 hours to do the head change this time, and that's on top of the 30 hours for the previous engine repair, excluding the rear diff rebuild.
However now it's driving better, it seems to be worthwhile.
Thanks.I have just watched the video thanks for posting it up, great to hear it fired up ok
I'm pleased the whole 3 cylinder starting is a thing of the past, and I believed was the reason the engine was worked on before I got it.
I'm sure there's an exhaust valve (cylinder No 3) not seating when cold on the old head. This was on top of the issues caused by the nut!!
I have just watched the video thanks for posting it up, great to hear it fired up ok, engine seems to be rocking a little though is that due to a weak or torn lower engine mount/tie bar, i think you mentioned it in another post somewhere,
Yes, the lower engine bush is allowing the engine to rock quite a lot. The camera was clamped to the bonnet safety latch too, which wouldn't have helped.
Arctic2
Well-Known Member
- Posts
- 3,001
- Location
- Westmidlands
Comparatively cheap, although if my time was factored in, it's not such a bargain.
It's taken about 20 hours to do the head change this time, and that's on top of the 30 hours for the previous engine repair, excluding the rear diff rebuild.
However now it's driving better, it seems to be worthwhile.
John 50 hours or more in total lets say at a minimum of £40 an hour and you are looking at £2000 plus, then you have to hope the garage have done the job right, in your case you know it's been done right
that can be the reason why some people would have sold the car on or just write it off cost parts and labour. Yes the camera fixed to the car would make the engine seem to rock more than it should
Pictures of the strip down, and rebuild with a low mileage (under 9k miles) cylinder head.
Here are many pictures, which I'll add descriptions as time allows.
The engine before work begins

Injectors out, as an assembly with the rail.

Inlet manifold off.

Crankcase vent cover off.

Structural top cover removed.

Timing chain with tensioner in the running position.

Timing chain from the drive belt end.

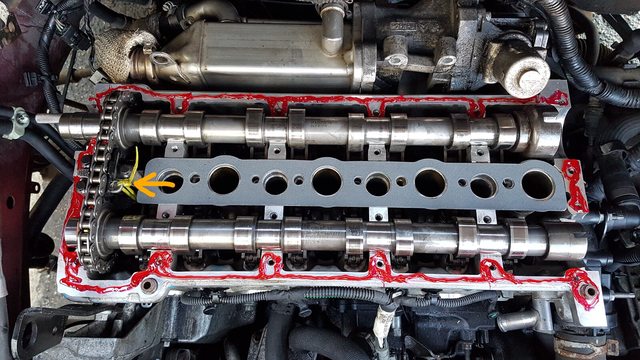
Cams removed as an assembly

Head bolts visible when cams are removed.

EGR assembly removed.
 The exhaust manifold heat shield comes off next.
 Heat shield off.
 Exhaust manifold is next.
 Head bolts needed some extra leverage to shift.
 Head off. Pistons look ok. The injector spray pattern is clearly visible on the piston crowns.

The cross hatching I did is still clearly visible, even after 2500 miles.
 looks like there's minimal blowby though. There are a couple of stuff lines on the bore, the origin is unknown.
 Old head off, along with the gasket.
 There is definitely soot in the lower port of cylinder No 2 (second from the right), suggesting this valve was leaking.
 New head ready for cleaning. Note the later cams are steel, as opposed to the earlier cast cams.
 Undoing the crank pulley bolt, which needed some extra leverage.
 Wear witness marks on the timing belt cover.
 Replacement head is nice and clean.


 Later exhaust manifold bolts, with E torx ends to aid fitment.
 Block deck cleaned for HG, and new thermostat seal in place.
 HG in position.
 Head cleaned ready for fitting.
 New head in position and torqued down, and thermostat bolted on.
 Cams installed.
 Timing set correctly.
 Structural top cover cleaned ready for fitting.
 Cleaned seal surface, with correct sealant ready.
 Head coated with the sealer. I used plenty this time. Last time I used much less, and it leaked a bit.
 Structural top cover bolted down. Note extra sealer around the bolts, which the new head had evidence of.
 Crankcase vent top cover in place.

Timing belt installed and tensioned.

New glow plug, to replace the single failed one.

Lower belt pulley. Note the elongated key slot, so timing can be set spot on.
 CAS reluctor ring in place. Note the tight fitting key slot.
 Special single use only bolt.
 Damper pulley in place. No bolt fitted yet.
 Engine almost ready for a test start. Just the fuel filter to install, and the EGR transfer pipe to install.

Here are many pictures, which I'll add descriptions as time allows.
The engine before work begins
Injectors out, as an assembly with the rail.
Inlet manifold off.
Crankcase vent cover off.
Structural top cover removed.
Timing chain with tensioner in the running position.
Timing chain from the drive belt end.
Cams removed as an assembly
Head bolts visible when cams are removed.
EGR assembly removed.
The cross hatching I did is still clearly visible, even after 2500 miles.
Timing belt installed and tensioned.
New glow plug, to replace the single failed one.
Lower belt pulley. Note the elongated key slot, so timing can be set spot on.
Last edited:
Alibro
Well-Known Member
- Posts
- 7,422
- Location
- Northern Ireland
You're a brave man John, changing a HG on a K series was daunting enough for me.
Well done.
Well done.
Brave or stupid maybe.You're a brave man John, changing a HG on a K series was daunting enough for me.
Well done.
I like the K series, it's an easy engine to work on.
I always did wonder about the old head when I saw how damaged it was. Having to lap valves in for that amount of time as you know, will alter the width of the valve sealing area which only needs to be about 1-1.5mm (unless you had the other angles re- cut ?
I don't believe the starting on 3 cylinders was down to the head damage.
The cylinder that wasn't firing when cold was No3. The cylinder that was damaged was No2, so it wasn't that.
I tested all cylinder power contributions by disconnecting the injector wires in sequence (I know it's a no no), but the only cylinder that made no difference when disconnected was No3. You could also hear that one cylinder was leaking straight into the exhaust, if you listened to the tail pipe.
I believe No3 has a sticking exhaust valve, which didn't start sealing correctly until it had warmed up sufficiently, which would account for the 3 cylinder start, no power contribution, and the rhythmic hiss from the tail pipe.
No2 was definitely down on compression, as it was clear that at least one inlet valve wasn't holding tight on the firing stroke, hence the new layer of soot in the lower intake port. However I believe the other valves were sealing acceptably, so the engine was able to run, actually not badly considering the damage to the head.
I am however glad that I've now got a good engine, which hopefully will give many more years service, at least until I can justify buying an EV, which by the looks of fuel prices, won't be long.
- Posts
- 2,103
- Location
- Hertfordshire
Well it sounds ok to me & no different from the neighbours FL2 on start up. I know what you mean about labour time spent, if I add up the hours I've spent on my FL1 & D2, (to be fair the FL has been great really but sorting all the D2 problems has been costly & very time consuming), it would run into the beyond economical repair category !Comparatively cheap, although if my time was factored in, it's not such a bargain.
It's taken about 20 hours to do the head change this time, and that's on top of the 30 hours for the previous engine repair, excluding the rear diff rebuild.
However now it's driving better, it seems to be worthwhile.
but I find all is forgotten when you drive them with that feel of satisfaction of a job well done. As for the aches & pains you mentioned being in my late 50's crawling over,in & under vehicles on a drive is no fun so you have my sympathy
.Anyway lets hope bar a little tinkering & routine servicing, it gives back what you've put into it ! All the best.
Arctic2
Well-Known Member
- Posts
- 3,001
- Location
- Westmidlands
Once again thank you John for all the photos and explanations with them, little question what is or was the cable tie for in the photo below.
 1
1
Also noted the QH disc box are those front discs from QH and if so how do you rate them please.
Also noted the QH disc box are those front discs from QH and if so how do you rate them please.
little question what is or was the cable tie for in the photo below.
That cable tie is to hold the cam chain tensioner shoe in the retracted position.
There's supposed to be a plastic resettable holder (visible in one of the strip down pictures), but it seemed to be missing, so the zip tie was just holding it retracted so I could fit the cams.
Also noted the QH disc box are those front discs from QH and if so how do you rate them please.
QH are as good as any really. I only used QH, because that's what Advanced Factors supplied in the kit.
So I figured I'd better update this thread for the future, now that I've sold the FL2.
I ended up doing the head gasket again.
The car had started to pressurise the coolant, and this was accompanied by a misfire, especially when using more than about 50% throttle when cold.
Because of the coolant pressurising, I stripped the head off for replacement, as the fault could only be head or gasket related.
As it turned out, the HG was the issue. It had failed between the centre cylinders, and there was staining between No1 cylinder and the adjacent coolant way.
This time I had the head re-faced, as there was some minor burning where the gasket had failed between the cylinders, I probably should have had it re-faced before I did the job last time too.
I also used a BG head set last time, which may have been a factor in its early demise, so this time I went genuine or OE for the part needed. Even the BG set bolts broke when trying to remove them, adding to the time it took to strip the engine down.
So avoid BG parts like the plague.
Here's a few pictures of the relevant parts of this post, as anything normal is already shown above.


Hopefully the engine will now have a long and reliable life with the new owner.
I ended up doing the head gasket again.
The car had started to pressurise the coolant, and this was accompanied by a misfire, especially when using more than about 50% throttle when cold.
Because of the coolant pressurising, I stripped the head off for replacement, as the fault could only be head or gasket related.
As it turned out, the HG was the issue. It had failed between the centre cylinders, and there was staining between No1 cylinder and the adjacent coolant way.
This time I had the head re-faced, as there was some minor burning where the gasket had failed between the cylinders, I probably should have had it re-faced before I did the job last time too.
I also used a BG head set last time, which may have been a factor in its early demise, so this time I went genuine or OE for the part needed. Even the BG set bolts broke when trying to remove them, adding to the time it took to strip the engine down.
So avoid BG parts like the plague.
Here's a few pictures of the relevant parts of this post, as anything normal is already shown above.
Hopefully the engine will now have a long and reliable life with the new owner.
Last edited:
Similar threads
- Replies
- 12
- Views
- 6K
- Replies
- 3
- Views
- 2K