Well, we all knew what it would be like didn’t we.. ffs.
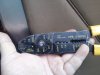
Drivers side is better. I de-loomed and pulled wiring through. Had a stupid moment and started unplugging more than I needed to but realized luckily.
This is a days repair. Nothing scary until the floor and bodge around the inner wing mount. I’m just happy the brace is good so I can tee off it


Drivers side is better. I de-loomed and pulled wiring through. Had a stupid moment and started unplugging more than I needed to but realized luckily.
This is a days repair. Nothing scary until the floor and bodge around the inner wing mount. I’m just happy the brace is good so I can tee off it
")