You are using an out of date browser. It may not display this or other websites correctly.
You should upgrade or use an alternative browser.
You should upgrade or use an alternative browser.
SWB re-chassis
- Thread starter Rubins4
- Start date
This site contains affiliate links for which LandyZone may be compensated if you make a purchase.
Rubins4
Well-Known Member
- Posts
- 813
I've got a bit more done to the old girl over the last week or so;
New mud shields received- Britpart, but better than expected in all honesty but possibly made from Chinesium. They're getting a coat of primer and chassis black for a few minutes more longevity, but the primer didn't take in places, must be contamination despite giving them a good wipe down with thinners.


Started looking at the rear tub: I know the main supports were mostly shot but it seems the top hat sections are too, as well as the floor section. With the new supports, do I need to get those fillet things? The new items were sold as the correct part for series too?


For anyone going to do this job, there are dozens of spot weld holding the rear floor in which will need to be drilled out, you cant just drill out the obvious rivets
New mud shields received- Britpart, but better than expected in all honesty but possibly made from Chinesium. They're getting a coat of primer and chassis black for a few minutes more longevity, but the primer didn't take in places, must be contamination despite giving them a good wipe down with thinners.
Started looking at the rear tub: I know the main supports were mostly shot but it seems the top hat sections are too, as well as the floor section. With the new supports, do I need to get those fillet things? The new items were sold as the correct part for series too?
For anyone going to do this job, there are dozens of spot weld holding the rear floor in which will need to be drilled out, you cant just drill out the obvious rivets
Rubins4
Well-Known Member
- Posts
- 813
Hi Gang. Long over due update on Harry.
So i was talking about replacing the tub floor due to the original wearing through at the fixing points due to galvanic corrosion. I got the old floor out using a normal drill bit (6 or 7mm) and a special spot weld drill bit which are about 20 quid for 2 (bit steep, i thought). Anyway, ended up with this and this...


I ordered 3 new lengths of the re-enforcing bars from YRM (about 11 quid each) and found a local metal works who cut me a sheet of 2mm 5251 aluminium for £20 (YRM price for similar sheet albeit with pre-drilled holes is £50). I also ordered 3 of the ribs which go from side to side as the originals were shot too.

These are the new bits waiting to go together...

The long thin runners are now attached to the new floor and the floor is attached to the tub (you have to do that in one go). Now I just need to attach the ribs side to side, etch prime/paint the load bay and seam seal underneath. Any recommendations as to the best seal to use? I'm thinking a no-setting type as per OEM spec. I'll be using some DPC or similar totry and seperate the steel ribs and the alu parts to provent future corrosion.
I've also been having radiator issues. I refitted the original only to find I had put a pin hole leak in one of the fins whilst man-handling it I tried to solder it up but made a mess of it...

The hole just kept getting bigger and bigger as the wall thickness of the fins was like cigarette paper due to corrosion. It was also getting a bit rough on the other side...

I looked at the options (second hand, new good unit, new bad unit or recore) and decided on a recore. Second hand are unknown condition and hardly worth the bother, new good ones are in excess of £200, and new bad ones are made of plastic. I found www.gm-radiator.com/ who supplied a new core, very smart it is too...


I stripped the old rad down with a blow torch and a screwdriver to scrape the molten solder away. First you have to take the mounting frame off the rad, then the header tanks off the old core. I used this video for inspiration...

Once apart, you get some nasty old brass header tanks. Even though they may be nasty, they are still brass and therefore infinitely better than the plastic ones produced these days.

Look at the sediment build up in there!

I then got these shot blasted at a local place...


My plan this weekend is to solder the tanks on to the new core and make sure its water tight, and perhaps get some primer on it all. I can do all of that at home in the evenings so perhaps I'll concentrate on getting the tub back together and back on to the chassis as can only get to that at the weekends.
So i was talking about replacing the tub floor due to the original wearing through at the fixing points due to galvanic corrosion. I got the old floor out using a normal drill bit (6 or 7mm) and a special spot weld drill bit which are about 20 quid for 2 (bit steep, i thought). Anyway, ended up with this and this...
I ordered 3 new lengths of the re-enforcing bars from YRM (about 11 quid each) and found a local metal works who cut me a sheet of 2mm 5251 aluminium for £20 (YRM price for similar sheet albeit with pre-drilled holes is £50). I also ordered 3 of the ribs which go from side to side as the originals were shot too.
These are the new bits waiting to go together...
The long thin runners are now attached to the new floor and the floor is attached to the tub (you have to do that in one go). Now I just need to attach the ribs side to side, etch prime/paint the load bay and seam seal underneath. Any recommendations as to the best seal to use? I'm thinking a no-setting type as per OEM spec. I'll be using some DPC or similar totry and seperate the steel ribs and the alu parts to provent future corrosion.
I've also been having radiator issues. I refitted the original only to find I had put a pin hole leak in one of the fins whilst man-handling it
I tried to solder it up but made a mess of it...The hole just kept getting bigger and bigger as the wall thickness of the fins was like cigarette paper due to corrosion. It was also getting a bit rough on the other side...
I looked at the options (second hand, new good unit, new bad unit or recore) and decided on a recore. Second hand are unknown condition and hardly worth the bother, new good ones are in excess of £200, and new bad ones are made of plastic
. I found www.gm-radiator.com/ who supplied a new core, very smart it is too...I stripped the old rad down with a blow torch and a screwdriver to scrape the molten solder away. First you have to take the mounting frame off the rad, then the header tanks off the old core. I used this video for inspiration...
Once apart, you get some nasty old brass header tanks. Even though they may be nasty, they are still brass and therefore infinitely better than the plastic ones produced these days.
Look at the sediment build up in there!
I then got these shot blasted at a local place...
My plan this weekend is to solder the tanks on to the new core and make sure its water tight, and perhaps get some primer on it all. I can do all of that at home in the evenings so perhaps I'll concentrate on getting the tub back together and back on to the chassis as can only get to that at the weekends.
Land Raver
Well-Known Member
- Posts
- 2,015
- Location
- In the dog house
Interesting stuff - both the rad and the tub floor! Thanks for posting this
Turboman
Mab An Gov
- Posts
- 60,151
- Location
- Lathrowda, Kernow
Hi Gang. Long over due update on Harry.
So i was talking about replacing the tub floor due to the original wearing through at the fixing points due to galvanic corrosion. I got the old floor out using a normal drill bit (6 or 7mm) and a special spot weld drill bit which are about 20 quid for 2 (bit steep, i thought). Anyway, ended up with this and this...
View attachment 126055
View attachment 126056
I ordered 3 new lengths of the re-enforcing bars from YRM (about 11 quid each) and found a local metal works who cut me a sheet of 2mm 5251 aluminium for £20 (YRM price for similar sheet albeit with pre-drilled holes is £50). I also ordered 3 of the ribs which go from side to side as the originals were shot too.
View attachment 126057
These are the new bits waiting to go together...
View attachment 126058
The long thin runners are now attached to the new floor and the floor is attached to the tub (you have to do that in one go). Now I just need to attach the ribs side to side, etch prime/paint the load bay and seam seal underneath. Any recommendations as to the best seal to use? I'm thinking a no-setting type as per OEM spec. I'll be using some DPC or similar totry and seperate the steel ribs and the alu parts to provent future corrosion.
I've also been having radiator issues. I refitted the original only to find I had put a pin hole leak in one of the fins whilst man-handling it
View attachment 126059
The hole just kept getting bigger and bigger as the wall thickness of the fins was like cigarette paper due to corrosion. It was also getting a bit rough on the other side...
View attachment 126060
I looked at the options (second hand, new good unit, new bad unit or recore) and decided on a recore. Second hand are unknown condition and hardly worth the bother, new good ones are in excess of £200, and new bad ones are made of plastic
View attachment 126062
I stripped the old rad down with a blow torch and a screwdriver to scrape the molten solder away. First you have to take the mounting frame off the rad, then the header tanks off the old core. I used this video for inspiration...
View attachment 126063
Once apart, you get some nasty old brass header tanks. Even though they may be nasty, they are still brass and therefore infinitely better than the plastic ones produced these days.
View attachment 126064
Look at the sediment build up in there!
View attachment 126065
I then got these shot blasted at a local place...
View attachment 126066
View attachment 126067
My plan this weekend is to solder the tanks on to the new core and make sure its water tight, and perhaps get some primer on it all. I can do all of that at home in the evenings so perhaps I'll concentrate on getting the tub back together and back on to the chassis as can only get to that at the weekends.
Nice tidy job!
Rubins4
Well-Known Member
- Posts
- 813
Right then, after much pokey, jiggling and burning of fingers, I've got it all back together! I'm afraid i haven't taken as many photos as I thought of the process for the floor tub, the floor plate also has a couple of coats of Marine Blue on it now. Paint to try and separate the steel ribs and alu plate, but the rivets will introduce galvanic corrosion regardless.


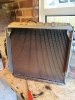
I took a few more of the rad which is now all back together too.


I hadn't cleaned the flux off at this point so the black spots which look like the solder is coming away from the tank isn't actually that at all. I did test the pre-painted tank in the bath and there was one spot of bubbles coming from the upper hose inlet which I went over again with the solder. Corners looked good-


Covered with a couple of coats of high temp paint out of rattle cans.
Now, word of warning to all though considering this - make sure you have the fan shroud with you when you solder the mounting frame back on. Did the holes line up afterward...did they bugger. I've had to bodge it, but the rad and shroud are now back on the chassis and do not appear to be leaking. Haven't fired the motor up yet though, so we'll see.
I have also refitted all the lights to the back end, just need to check the wiring and try and start the bugger...
I took a few more of the rad which is now all back together too.
I hadn't cleaned the flux off at this point so the black spots which look like the solder is coming away from the tank isn't actually that at all. I did test the pre-painted tank in the bath and there was one spot of bubbles coming from the upper hose inlet which I went over again with the solder. Corners looked good-
Covered with a couple of coats of high temp paint out of rattle cans.
Now, word of warning to all though considering this - make sure you have the fan shroud with you when you solder the mounting frame back on. Did the holes line up afterward...did they bugger. I've had to bodge it, but the rad and shroud are now back on the chassis and do not appear to be leaking. Haven't fired the motor up yet though, so we'll see.
I have also refitted all the lights to the back end, just need to check the wiring and try and start the bugger...
Attachments
Land Raver
Well-Known Member
- Posts
- 2,015
- Location
- In the dog house
Nice workRight then, after much pokey, jiggling and burning of fingers, I've got it all back together! I'm afraid i haven't taken as many photos as I thought of the process for the floor tub, the floor plate also has a couple of coats of Marine Blue on it now. Paint to try and separate the steel ribs and alu plate, but the rivets will introduce galvanic corrosion regardless.
View attachment 127304
View attachment 127305
I took a few more of the rad which is now all back together too.
View attachment 127306
View attachment 127307
I hadn't cleaned the flux off at this point so the black spots which look like the solder is coming away from the tank isn't actually that at all. I did test the pre-painted tank in the bath and there was one spot of bubbles coming from the upper hose inlet which I went over again with the solder. Corners looked good-
View attachment 127308
View attachment 127310
View attachment 127311
Covered with a couple of coats of high temp paint out of rattle cans.
Now, word of warning to all though considering this - make sure you have the fan shroud with you when you solder the mounting frame back on. Did the holes line up afterward...did they bugger. I've had to bodge it, but the rad and shroud are now back on the chassis and do not appear to be leaking. Haven't fired the motor up yet though, so we'll see.
I have also refitted all the lights to the back end, just need to check the wiring and try and start the bugger...
Rubins4
Well-Known Member
- Posts
- 813
So got a bit further over the weekend....
Rear tub back on...

That's held on with a stainless screw set from YRM. Now having got it back on, i found a tub of old bolts helpfully labelled 'Tub Fittings' full of much smaller, mostly sheared nuts and bolts. I'm not sure where they came from. I also have a couple of right angle brackets and plates... can anyone shed any light on these?

The E shaped plates look like they go in the gap between the tub mounting points and the chassis tabs, question is, I have 9 places they could go and only 5 plates (shims?). I really dont know where the 2 brackets at the bottom go, and ideas?
Anyway, couple of pictures of the tub, inc painted floor plate and the rad back in...


Rear tub back on...
That's held on with a stainless screw set from YRM. Now having got it back on, i found a tub of old bolts helpfully labelled 'Tub Fittings' full of much smaller, mostly sheared nuts and bolts. I'm not sure where they came from. I also have a couple of right angle brackets and plates... can anyone shed any light on these?
The E shaped plates look like they go in the gap between the tub mounting points and the chassis tabs, question is, I have 9 places they could go and only 5 plates (shims?). I really dont know where the 2 brackets at the bottom go, and ideas?
Anyway, couple of pictures of the tub, inc painted floor plate and the rad back in...
barleywine
Well-Known Member
- Posts
- 305
- Location
- Mark Cross, East Sussex
Brackets go at the rear of seat box, corner of door frame for seat belt mounts.
Rubins4
Well-Known Member
- Posts
- 813
IT LIVES!!!
After a bit of battery trouble resolved by a good long charge, I managed to get the engine fired up after 5 years of sitting. Fresh fuel, manually pumped to the carb, cleaned the spark plugs and away she went after a few turns. This is rigged up with jump leads completely bypassing the wiring harness. No need for a new battery or starter just yet but I am going to replace the leads.
If you keep an eye on the coil you can see that its running quite rough, but did get better once warmed up a bit. I dont think the new thermostat is working as the top hose got almost too hot to touch but the bottom was still cold, is it possible to fit the stat the wrong way round?
Anyway, very happy with progress to date, I've done a few other bits but just havent had time to post about it im afraid, I'll try and catch up in the next few weeks.
Edit: Forgot to say, the exhaust is massively blowing at the manifold to downpipe section. Whats the best way of curing this? I havent used any sealing agent or anything.
Rubins4
Well-Known Member
- Posts
- 813
In a bid to sort the blowing exhaust manifold joint, I ordered some new brass studs and nuts to go on with a bit of Gun Gum paste which I hope will make a tight seal. 2 of the 3 original studs came out but I'm struggling with the last one (closest to the block). I used the '2 nut' method, the 'f'ing great mole grip' method, and both methods together but she's tight. Any more methods to try before I have to take the manifold off?
I've also refurbed the inner sills and got some new outer sill panels to replace the bashed originals. The inners sills have gone back into to place but leave a slightly bigger gap at the front than I'd hope. Here we are looking into the drivers footwell from the side...

And here we are looking in the same footwell from above... (the passenger side is much the same)

That gap looks a bit big by my reckoning.
There doesn't appear to be any adjustment at this end as its butting up to the bulkhead via the chassis outrigger.
At the rear end, the sill is bolted directly to the rear tub via a right angle bracket. I've tried adjusting it with my Persuading Stick but there doesn't appear to be any/enough movement.
So, I'm thinking the tub is too far backwards. Its currently fitted with the seatbox in place which lines up ok, but I wonder if the front edge of the tub should be mounted forward of the chassis tabs, rather than rear as they currently are.... (this is looking in through the seatbox, looking backwards)

Should the mounting bracket from the tub go on the other side of the chassis tab? Will it even fit that way??
Don't ask about the direction of the bolts, I'm sure there is a perfectly good explanation
I've also refurbed the inner sills and got some new outer sill panels to replace the bashed originals. The inners sills have gone back into to place but leave a slightly bigger gap at the front than I'd hope. Here we are looking into the drivers footwell from the side...
And here we are looking in the same footwell from above... (the passenger side is much the same)
That gap looks a bit big by my reckoning.
There doesn't appear to be any adjustment at this end as its butting up to the bulkhead via the chassis outrigger.
At the rear end, the sill is bolted directly to the rear tub via a right angle bracket. I've tried adjusting it with my Persuading Stick but there doesn't appear to be any/enough movement.
So, I'm thinking the tub is too far backwards. Its currently fitted with the seatbox in place which lines up ok, but I wonder if the front edge of the tub should be mounted forward of the chassis tabs, rather than rear as they currently are.... (this is looking in through the seatbox, looking backwards)
Should the mounting bracket from the tub go on the other side of the chassis tab? Will it even fit that way??
Don't ask about the direction of the bolts, I'm sure there is a perfectly good explanation
LincolnSteve
Well-Known Member
- Posts
- 1,224
- Location
- Lincoln
Won't the position of the tub be determined by the rear mounts on the rear cross member? Apart from maybe a shim there isn't much possible movement.
Rubins4
Well-Known Member
- Posts
- 813
Well I had a think about what you said @Blackburn and thought 'what a good idea', when I got back to it, I quickly realised that it wouldn't help but actually make it worse! The bulkhead is mounted forward of the outrigger so packing in washers would have only moved the bulkhead further away. I would have thought one of you might have spotted that aren't any of you paying attention? Fortunately, on having another look, tightening everything but more got it all together
On to the next calamity, I bought 4 LWB rims from a local landy bloke in order to fit some bigger rubber - the 6.00 x 16's look like biscuits. They came with about a thousand different shades of paint so I got them shot blasted and phosphate primed. Don't they look smart


I've got 4 rivet type rims to go with a rogue welded type which I'll call the spare. I'm going to have a go at spray painting them limestone as the local place wanted 60 quid a rim. I'm sure that's probably reasonable and they would have done a fantastic job, but that's too much cash at the minute and I don't mind if the paints not perfect (you should see the bodywork)
I've been umming and ahhhing about tyres for a while now. I got to Amberley Classic day a few weeks back which was great to see loads of different set ups. I left confident I wanted a 235 85 tyre to give plenty of side wall but not too much width, and an on road bias all terrain tread, and cost was also an issue. My answer was Runway Enduro AT's which I found for about 450 delivered

I was set on these but wanted to talk to my local tyre place about fitting tyres they hadnt supplied and he asked if I'd thought about Avon's? The only Avon's I know about are the Rangemasters but they're about a grand a tyre but he said he could get 7.50 x 16 fitted for less than I can get the Runways delivered! I've had a ganders at a few reviews and the seem to be just what I'm looking for; road bias, hard wearing and suit a series. I think I'll go with these.

Costs for all this is getting a bit out of hand, but that's been the storey since the start. Timeframe went out the window years ago
aren't any of you paying attention? Fortunately, on having another look, tightening everything but more got it all together On to the next calamity, I bought 4 LWB rims from a local landy bloke in order to fit some bigger rubber - the 6.00 x 16's look like biscuits. They came with about a thousand different shades of paint so I got them shot blasted and phosphate primed. Don't they look smart
I've got 4 rivet type rims to go with a rogue welded type which I'll call the spare. I'm going to have a go at spray painting them limestone as the local place wanted 60 quid a rim. I'm sure that's probably reasonable and they would have done a fantastic job, but that's too much cash at the minute and I don't mind if the paints not perfect (you should see the bodywork
)I've been umming and ahhhing about tyres for a while now. I got to Amberley Classic day a few weeks back which was great to see loads of different set ups. I left confident I wanted a 235 85 tyre to give plenty of side wall but not too much width, and an on road bias all terrain tread, and cost was also an issue. My answer was Runway Enduro AT's which I found for about 450 delivered
I was set on these but wanted to talk to my local tyre place about fitting tyres they hadnt supplied and he asked if I'd thought about Avon's? The only Avon's I know about are the Rangemasters but they're about a grand a tyre but he said he could get 7.50 x 16 fitted for less than I can get the Runways delivered! I've had a ganders at a few reviews and the seem to be just what I'm looking for; road bias, hard wearing and suit a series. I think I'll go with these.
Costs for all this is getting a bit out of hand, but that's been the storey since the start. Timeframe went out the window years ago
Last edited:
Rubins4
Well-Known Member
- Posts
- 813
I forgot to say, if anyone's got any tips or can link up any good guidance on spraying that would be great.
Also on the updates, I was struggling to get one of the old studs out of the exhaust manifold to sort the blowing. After a week of plusgas and ****ting with a hammer it came out. New brass studs and nuts in and on, lots of gun gum paste (strange stuff that is) and it appears fine. Photos and maybe a video next time.
I also turned the ignition on for the first time since the new wiring went in. There are still a few earth's to connect and none of the fuses were in, but nothing let the smoke out
Also on the updates, I was struggling to get one of the old studs out of the exhaust manifold to sort the blowing. After a week of plusgas and ****ting with a hammer it came out
. New brass studs and nuts in and on, lots of gun gum paste (strange stuff that is) and it appears fine. Photos and maybe a video next time. I also turned the ignition on for the first time since the new wiring went in. There are still a few earth's to connect and none of the fuses were in, but nothing let the smoke out
I've made a few comments about painting - in particular with rattle / spray cans here =>I forgot to say, if anyone's got any tips or can link up any good guidance on spraying that would be great.
...
https://www.landyzone.co.uk/land-ro...-wagon-in-holland.298002/page-33#post-3995486
And here =>
https://www.landyzone.co.uk/land-ro...-wagon-in-holland.298002/page-41#post-4067377
Using these cans isn't ideal but I fully understand when you're quoted 60 quid a wheel it is tempting to do things yourself.
######
If you want a good finish go for "traditional" spray paint that you can wet sand and polish - there are some coach enamel products on the market that don't allow you to do this. The coach enamel stuff is "apply and hope it comes good": Crud + crap + flies + dust etc in your paint means start again. Whereas with traditional car paint you're able to sand + blend + polish away the problems you might get.
This time of the year however you are getting a bit close to winter - temperature and humidity can ruin your day.
Rubins4
Well-Known Member
- Posts
- 813
Hi Stretch, thanks for the links and info.
Having thought about getting them sprayed, spraying them myself or rattle canning them myself I think I might just brush paint them and not bother with a lacquer.
I'm not looking for a perfect or even a great finish, that would look at odds withe the rest of the body work. A simple paint finish will allow me to touch up any rust or damage in the future which is almost certain to occur regardless of what I do now.
I've been looking at the correct approach to brush applying enamel paint, I need to get some good quality brushes and find out how much paint is needed!
If you're going down the coach enamel route (which I think is a pity seeing how much effort you've put into the project so far) then there's loads of advice about brushing on the paintman website.Hi Stretch, thanks for the links and info.
Having thought about getting them sprayed, spraying them myself or rattle canning them myself I think I might just brush paint them and not bother with a lacquer.
I'm not looking for a perfect or even a great finish, that would look at odds withe the rest of the body work. A simple paint finish will allow me to touch up any rust or damage in the future which is almost certain to occur regardless of what I do now.
I've been looking at the correct approach to brush applying enamel paint, I need to get some good quality brushes and find out how much paint is needed!
One thing I will add that I've found to be a good product no matter which paint / method you are doing =>

Available in the UK from frosts =>
https://www.frost.co.uk/automotive-...-paint/eastwood-paints/pre-painting-prep.html
Whilst it is a bit expensive it is in my opinion well worth the "extortion" as it minimises the chances of paint not sticking to surfaces.
Similar threads
- Replies
- 11
- Views
- 2K
- Replies
- 9
- Views
- 962
- Replies
- 0
- Views
- 494