02 Freelander Gearbox repair

This site contains affiliate links for which LandyZone may be compensated if you make a purchase.

Jrdinger

New Member
Posts
44
Location
N 36.062 W 96.023
Greetings all,

I am new to the forum so I thought I would make a contribution.
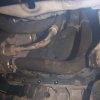
My 02 Freelander recently kicked out the Good Ol' F4 code on the dash panel, and I am going to attempt fix it myself.:cool:

The day it happened, I "limped" into Land Rover Tulsa to have it checked out. After sitting around for few hours, the tech tells me that the ECU is throwing a code for the solenoid, and it would cost a cool grand ( £500 ) to fix, or it would be 3 thousand US ( £1500 ) for a rebuilt gearbox to be installed. :mad:

I subsequently purchased the parts and brought the beast back to my house for repair.:cool:

Here is the battle plan:

1. ) Easiest fix first: I have heard that by pulling the battery for a half hour and letting it sit, you can sometimes get around a repair, as the ECU might be throwing a false code. I figure it's worth a try, but not likely. The Gaylander is sitting without a battery as I type this.

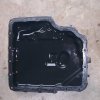
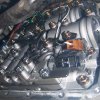
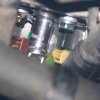
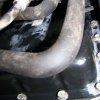
2.) Go after the 2/4 shift solenoid. I understand this will be the most likely to go out... Reverse works fine, First works, and I haven't had a lock-out on the gearbox, so I think I am on the right track. The other 2/4 solenoid may be the culprit as well, but I will cross that bridge when I get there.

3.) Take it to Salt Flats up in the panhandle, and bury it, change my name so I don't have to pay the note, and pack my things and head to Mexico. Maybe trade it for a Toyota. More likely the latter.

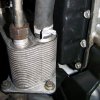
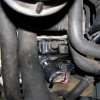
I will include pictures as I go along, should anyone need them for reference later on. This should be at the very least interesting.

Wish me luck!
 
Before you do any repairs, check the two round plugs at the front of the gearbox by the radiator, these can fill with water causing short circuits and poor connections.
 
End of Day One and I managed to get access to the valve body, but now I fear that the Land Rover dealer sold me the wrong parts ( Imagine! ).

For any newbie who has the pleasure of attempting this at home I have the following advice:

1.) Don't try to work around the fluid cooler up front. Just pull the thing off and get it over with. Its not worth the trouble to try to work around it.

2.) The top three screws on the left are a genuine bugger to get at. I don't know if this is due to this corner of the panel getting more heat or moisture or what, but these are not only hard to get to, but hard to break loose. Be patient and you will be rewarded. I broke mine loose with a small ball - peen hammer and a 1/4 cold chisel. I suppose a standard screwdriver would have done as well. These three bolts in particular have low clearance and lots of hoses around them, but they will come out.

3.) Definitely get it up on Jack stands. You don't have enough working room lying on the ground, even after pulling the skid plate. As a matter of fact I am going to pick up the whole front end tomorrow and get some more wiggle room.

4.) Make sure you find the filler nut AND can get it loose before you drain the gearbox. This is a long dead horse I am beating, but it's worth saying again.

I will proceed with the removal of the valve body and replacing the solenoid in the morning.

I am sure Slob and Treworgey have some fun, entertaining comments to make below.

Hilarity will ensue.

Hardy ****ing Har.
 
I wont, I promise....

Does anyone know a quick way to tell if a solenoid is bad? I would hate to put this back together to find out I replaced a good part...
 
dearot, I did pickup your message from a few days ago.. I just ot the car a few months ago, so I may not have described it accurately. Its an 02 MY with a V6 in it, obviously North A Merican version.

They never moved the hood release. Its still on the passenger side. And it has two glove boxes.

Does this happen in reverse with Fords sold in the UK?
 
Does anyone know a quick way to tell if a solenoid is bad? I would hate to put this back together to find out I replaced a good part...


simple - put volts across the two contacts - that should operate the solenoid. The problem is knowing wot volts operate it - I wud guess 12volts - but it could be 5volts. Obviously putting 12volts across a 5volt device wont do it any good.
 
simple - put volts across the two contacts - that should operate the solenoid. The problem is knowing wot volts operate it - I wud guess 12volts - but it could be 5volts. Obviously putting 12volts across a 5volt device wont do it any good.

So start with 5 volts. If it moves, all well and good, look for something else. If nothing happens it is either a knackered 5 volts solenoid, it which case you can't break it more by giving it 12 volts, or a 12 volt solenoid. So then give it 12 volts. If it moves, all well and good, look for something else. If nothing happens, it is either a knackered 5 volt solenoid, or a knackered 12 volt solenoid. Either way, it needs replacing.

The other way is to measure the voltage at the connector (car wiring end) when the solenoid is called for.

As a footnote, if you have to buy a new one, it will probably say somewhere on the packaging what voltage it is, so don't forget to let us know.

Be careful where you source 5 volts and 12 volts from, and make sure the test leads you are using are fused. Otherwise it might be tempting to use 12v from the car battery, but if the solenoid is u/s you could be putting a dead short across the battery terminals, which would be "entertaining" to say the least.
 
data&


but dont forget lots of solenoids have a diode across them - so if yu put the voltage across it as a reverse polarity it wont work either.
 
sol002.gif


but dont forget lots of solenoids have a diode across them - so if yu put the voltage across it as a reverse polarity it wont work either.

To check for polarising and/or suppression diodes, set a multimeter to ohms. First measure the resistance with the wires one way round, then swap them round and compare the readings. If the readings are the same, there are no diodes fitted (or they're u/s). If they differ by a lot, then there are diodes fitted.

If it turns out there are diodes fitted to the solenoid, after having done the voltage checks in my last response, go through them again with the wires the other way round
 
OK, fellas... jobs done. Thanks to everyone who helped out.

I promised pics and here they are. The first shot shows the bolts coming off of the gearbox valve block panel, up front and on the drivers side.

The second shot shows the cover (finally!) off. The seal looked like it was in good shape, so I elected to keep it and just clean it up before replacing it.

Third shot is the actual valve block exposed. Refer to the RAVE diagram or Haynes manual to find the solenoid you want to replace. They aren't difficult to get off the block, but the space is, again, a tight one. You may want to remove the whole valve block, but I didn't. A word of caution: the bolt will slip back into the block if you aren't careful. Take your time and you can replace the solenoid without pulling the whole valve block assembly.

My problem as it turns out was the C shift solenoid. It was the first one I pulled, and it did not work at either 5V or 12V on my multimeter. I believe that all 9 are 5V, if I am reading the RAVE properly.

The fourth shot shows the 10mm driver actually replacing the solenoid. You can see how tight things got.

Fifth shot is the cover going back on...

Shot six is the cooling block going back on. As I posted before, remove this block, don't try to work around it. I wasted a lot of time trying to cut that corner.

Shot seven is for all of those posts I've seen around that ask "Where do I fill my gearbox on my Freelender?". Well, if you need to know, here it is. Its on the top of the valve body cover near the radiator, driver side. Its just a little rubber plug. Pop it on out and you are good to go.

Well, I took it out today and got not F4 code and no leaks, shifting just fine.

I still have to address the "shutting down after running too long problem."

If anyone is familiar with this, let me know. I have heard a number of remedies, but none that have worked. I will save that for a new post.

Again, thanks to everyone who helped.

JR
 

Attachments

  • 100_1661.JPG
    100_1661.JPG
    41.6 KB · Views: 2,035
  • 100_1662.JPG
    100_1662.JPG
    47.1 KB · Views: 2,111
  • 100_1663.JPG
    100_1663.JPG
    41.6 KB · Views: 3,349
  • 100_1664.JPG
    100_1664.JPG
    37.6 KB · Views: 2,089
  • 100_1668.JPG
    100_1668.JPG
    45.3 KB · Views: 1,858
  • 100_1669.JPG
    100_1669.JPG
    34.1 KB · Views: 1,829
  • 100_1670.JPG
    100_1670.JPG
    32.8 KB · Views: 2,063
Good Stuff JR...WELL DONE!!
Do we have a technical section to put this sort of stuff? Or make it a sticky thread....
 
Back
Top