Alantoo
Member
- Posts
- 31
- Location
- Near Stroud in Gloucestershire
Hello,
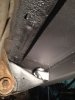
I am currently welding up my 1997 Discovery 300tdi and attach a few images of progress so far.
Like most people I thought it was not as bad as it was and then have found more and more (or rather less and less Discovery) as I took off trim or lifted carpets.
I have ended up trying to rebuild it without laminated joints/corrosion traps where possible. I started off at the front inner wing and made up some bits with flanges there, but subsequently have been moving towards butt joints and fillet welds rather than "lap and plug".
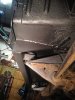
I have used 100 x 60 x 3.5 hollow section for the cills. Sealed the ends and continuous welded body mount brackets made from 80 x 80 x 5mm box section.
The floor support bracket is fillet welded to the floor and seals the front of the cill section.
The A post I rebuilt inside and out, welding the inner layer to the outer from inside before plating it over with the end of the new door seal flange piece. I stuffed a bit of garden hose over the end of the sunroof down pipe (300mm-ish) to deliver any water out of the post base.
On the B post I remade the base and having fillet welded the sides and a bit of the bottom to the cill I stuffed a podger up from below and pulled out the edge to form a drain hole. The original one had a drain hole 30mm from the bottom which sensibly meant there was 30mm of water trapped forever.
I probably will reinstate the plastic cill faring/trim pieces but will not drill into the box section and destroy its air tight integrity. I will glue them on with Tiger Seal…if they fall off they fall off!
The original floor panel stiffening angle strip was yet another wonderful corrosion opportunity. I got rid of the lamination/water trap by folding the edge of my new floor panel down. I plug welded through the old spot weld holes on this one, but on the near-side I will improve that by pre filling the spot weld holes and then butt welding the floor panel in.
At the front of the rear wheel arch I capped the end of the cill and then made up a piece to follow the main curve of the original but then folded a triangular dart down the other side so I could butt and fillet weld it to the end of the cill. This means there is a now 20mm gap between the wheel arch and the rear body mount bracket which will allow the mud and crud to fall through rather than sit and corrode. If I had been a bit smarter I could have left the hollow section 20mm longer and not had to do such a complicated bit of geometry! Unfortunately I was so smart that I had already cut the other hollow section to the same short length for the near-side humph!
I have used the Halfords brushable seam sealer, which is horrid stuff, but may help anywhere my welding did not fully penetrate (perish the thought!)
I sprayed one coat of Vinylast paint then the seam sealer then two more coats of Vinylast. I used that because A) I had some left over from a project B) it acts as a primer undercoat and top coat and will key onto zinc and steel. I have been using zintec sheet and I did not fancy using etch primer on the adjacent original painted metal.
I have some Shutz to go on after I have rebuilt the wing.
I have questions for the forum members re. the best way to do the rear wheel arches rear floor but will do that another day
Hope the images upload okay and they are useful to somebody.
https://get.google.com/albumarchive...jhdIjFVRAHEsoEbxtuoEen?authKey=CPLPw-279OqvNQ
Hmm. Can't find how to embed the images so a link to the Picasa album seems the best I can do.
I am currently welding up my 1997 Discovery 300tdi and attach a few images of progress so far.
Like most people I thought it was not as bad as it was and then have found more and more (or rather less and less Discovery) as I took off trim or lifted carpets.
I have ended up trying to rebuild it without laminated joints/corrosion traps where possible. I started off at the front inner wing and made up some bits with flanges there, but subsequently have been moving towards butt joints and fillet welds rather than "lap and plug".
I have used 100 x 60 x 3.5 hollow section for the cills. Sealed the ends and continuous welded body mount brackets made from 80 x 80 x 5mm box section.
The floor support bracket is fillet welded to the floor and seals the front of the cill section.
The A post I rebuilt inside and out, welding the inner layer to the outer from inside before plating it over with the end of the new door seal flange piece. I stuffed a bit of garden hose over the end of the sunroof down pipe (300mm-ish) to deliver any water out of the post base.
On the B post I remade the base and having fillet welded the sides and a bit of the bottom to the cill I stuffed a podger up from below and pulled out the edge to form a drain hole. The original one had a drain hole 30mm from the bottom which sensibly meant there was 30mm of water trapped forever.
I probably will reinstate the plastic cill faring/trim pieces but will not drill into the box section and destroy its air tight integrity. I will glue them on with Tiger Seal…if they fall off they fall off!
The original floor panel stiffening angle strip was yet another wonderful corrosion opportunity. I got rid of the lamination/water trap by folding the edge of my new floor panel down. I plug welded through the old spot weld holes on this one, but on the near-side I will improve that by pre filling the spot weld holes and then butt welding the floor panel in.
At the front of the rear wheel arch I capped the end of the cill and then made up a piece to follow the main curve of the original but then folded a triangular dart down the other side so I could butt and fillet weld it to the end of the cill. This means there is a now 20mm gap between the wheel arch and the rear body mount bracket which will allow the mud and crud to fall through rather than sit and corrode. If I had been a bit smarter I could have left the hollow section 20mm longer and not had to do such a complicated bit of geometry! Unfortunately I was so smart that I had already cut the other hollow section to the same short length for the near-side humph!
I have used the Halfords brushable seam sealer, which is horrid stuff, but may help anywhere my welding did not fully penetrate (perish the thought!)
I sprayed one coat of Vinylast paint then the seam sealer then two more coats of Vinylast. I used that because A) I had some left over from a project B) it acts as a primer undercoat and top coat and will key onto zinc and steel. I have been using zintec sheet and I did not fancy using etch primer on the adjacent original painted metal.
I have some Shutz to go on after I have rebuilt the wing.
I have questions for the forum members re. the best way to do the rear wheel arches rear floor but will do that another day
Hope the images upload okay and they are useful to somebody.
https://get.google.com/albumarchive...jhdIjFVRAHEsoEbxtuoEen?authKey=CPLPw-279OqvNQ
Hmm. Can't find how to embed the images so a link to the Picasa album seems the best I can do.
Last edited:
")