What have you done to your Freelander today

This site contains affiliate links for which LandyZone may be compensated if you make a purchase.
Clocked up 30k in the new FL1 2001 TD4.
Also, stone hit windscreen yesterday which did nothing for about 2 seconds then turned into a 10 inch crack!!!
Touring Kent at the moment.
 
Today a decided to investigate why the brakes were beginning to judder, and while the car was off the ground, thought I'd change the gearbox oil too. I also swapped the wheels front to back and back to front.

Brakes had some corrosion forming between the hub and back of the rotors.
20220324_153436.jpg

The corrosion was cleaned with a wire brush, and the rotors refitted.
After a test run, it seems that the removal of the corrosion has cured the judder under braking.

The gearbox oil was black and smelling, so I was replaced with some full synthetic 75w90 gear oil.

I also changed the PS reservoir, as the filter can clog, causing issue.
The steering is lighter now, so I'm guessing the filter was partially clogged.
20220324_103328.jpg
 
Joined Nodge in the Covid isolation ward, thankfully it's more of a cold and an excuse to stay home.

In the meantime finally figured out the knocking noise that's been bugging me for like a year. Started to get difficulties changing gear as well recently, which was similar to when I replaced the lower engine tie rod.
Obviously it can't be that though since I replace that pretty recently. Then I realised recently meant about 4 years and 15,000 miles, and it was a cheap Ebay part.

This time I thought I would try and polybush it, I know it will cause more vibrations to come through the cabin. But if I'm running Insa Turbo Dakars tyres half the year I won't notice anyway!
I think I made the same mistake again though and bought cheap Ebay polybushes. Will have to cut down the small bush spacer tomorrow as it's 3mm too wide.

Well I do not recommend poly bushing the engine tie rod. You can feel every single engine and gearbox vibration. On top of that it didn't fix the knocking or the gear change!
Changing the top engine mounts now, if that doesn't fix it I'll look at the gearbox mount which is looking a little ropey.

Might change the clutch hydraulic line, the biting point is closer to the floor than usual so maybe that is on the way out.
 
Today a decided to investigate why the brakes were beginning to judder, and while the car was off the ground, thought I'd change the gearbox oil too. I also swapped the wheels front to back and back to front.

Brakes had some corrosion forming between the hub and back of the rotors. View attachment 261696
The corrosion was cleaned with a wire brush, and the rotors refitted.
After a test run, it seems that the removal of the corrosion has cured the judder under braking.

The gearbox oil was black and smelling, so I was replaced with some full synthetic 75w90 gear oil.

I also changed the PS reservoir, as the filter can clog, causing issue.
The steering is lighter now, so I'm guessing the filter was partially clogged. View attachment 261697
Jeppers that's a lot of rust!

The tail door handle looks miles better, suits the car.
 
Not exactly the Freelander, but had a "moment" with the trailer yesterday.

I took a load of stuff down to the metal recycles - a copper water cylinder, old axle, old chimney, 8 batteries, lots of other bits including a load of old guttering including lengths of 5m. So I needed to lift the front panel of the trailer out for the pieces to hang out the front as well as back. It was getting caught on a screw in the cover which I had to move back about 1/2 inch for it to clear. The cover is a monstrosity of a thing to shift as its so cumbersome and heavy - located in 4 cups at the corners of the trailer.

I have to use a crow bar on each corner to lift it and bung something under the corner and move to the next - in the pic you can see a Freelander engine lower tie bar I used on 1 corner. Anyway, I shifted it OK to remove the panel and back into place. Filled the trailer and back home to put the panel back in. I shifted the cover, slotted the panel back in, then went to put the cover back into place... when it sort of "slipped" and came crashing to the ground.

Luckily no limbs were broken or severed and bonce stay firmly fixed to shoulders. Its a right PITA to get it back up and into place.

TrailerFail_1.jpg


Got it sorted though and back into its 'home'.

TrailerFail_2.jpg


Incidentally, snapped this pic a few days ago. The 220 turbo was outed a while back, but the Freelander's come out in sympathy...

TrailerFail_3.jpg
 
Jeppers that's a lot of rust!
It may be that I didn't clean the hubs up properly when I fitted the rotors last winter. However the car only does short trips, with minimal braking, so it's likely any moisture that gets in, never gets to dry out.
I'll monitor the situation.
The tail door handle looks miles better, suits the car.
I prefer it, and prefer the more solid attachment too. It makes lifting the tail door a much less creaky operation.
I never liked the look of the original handle, it looked like an afterthought to me.
I'd have preferred to fit a body colour later handle, but Rimini Red wasn't a colour option when the later handle came out, so I went with the gloss black instead.
 
Today I actually got round to installing some goodies to the FL2, and discovered some rust too, which needed treatment.
So what were the goodies I installed I hear you ask.
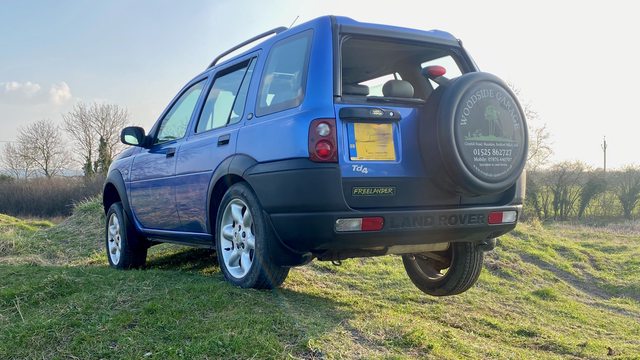
I fitted a rear spoiler to the tail door, and the later tail door handle, complete with a new release button and LED numberplate lights.

First off I needed the temperature to increase, as the spoiler is stuck on with double sided 3M body tape, which needs to be warm to stick properly.

While waiting for the day to warm up, I set about removing the original tail door handle, which I think is about the most ugly design imaginable.
View attachment 261585
First off the interior trim needs removing, which is literally 2 screws and 6 pop studs, and it's off.

The original handle is held on by 6 nuts, which are threaded onto matching studs sticking out the body side of the handle.
Once removed the handle just lifted off, revealing rust where it touches the bodywork. :(
View attachment 261588 A bit of a clean up was needed, then the rust was treated, and the affected area was painted in Bonda primer.
View attachment 261587

I then had to mark out the holes for the longer handle, drilling 8mm holes where needed, and painted the drilled edges to prevent future rust.
The handle was then fitted, along with the new LED numberplate lights, and new release switch assembly.

I then cleaned the boot top with IP and stuck the spoiler on to the cleaned surface, making sure it was as carefully aligned as possible. View attachment 261586
I think it looks loads better than before, and because the longer handle is secured with more bolts, it feels much better to open.

I also took the opportunity to install a couple of sound deadening pads to the boot panel, before refitting the boot interior trim.
View attachment 261589

Of course now that's all done, it means I've no excuses to do the Haldex and rear diff service tomorrow.
I also plan to fit a new air filter, and a new MAF,ias I'm sure it must be at the end of its life after 120k miles.

That looks coolio too ...
 
This morning I changed the lower eng. mount/dog bone as I had a peculiar creaking noise on acceleration & happy to say the noise has now gone. Also noticed whilst underneath the auto g/box selector cable was chaffing so I cut a piece of rubber hose & put that over worn area. Next thing is to change the r/h front suspension unit which will have to wait until tomorrow now as my D2 failed the mot Thursday on a broken l/h front spring so I'll be doing both fronts with the turrets this afternoon, always something to do no matter what the LR :).
20220326_094208.jpg
20220326_093512.jpg
20220326_094154.jpg
 
Finally got round to fitting the new lower stabiliser bracket to the FL2 engine.
I've had it on the shelf in my workshop for 6 months, so figured it was about time I fitted it.
20220330_190624.jpg
20220330_190643.jpg

I forgot to take a picture of it installed, but I'll do that the next time I remove the sump guard.
 
Finally got round to replacing the coolant tank. They are not good quality no matter which 'brand' you buy. They all crack and craze around the neck and weep coolant.
IMG_2042.JPG

So I've fitted a VW coolant tank. I tried to use an old LR tank as a 'cradle' to sit the new one in but it was too high and kept the bonnet up. So I opted for this arrangement.
IMG_2039.JPG
IMG_2040.JPG

Not without a bit of a disaster - I managed to break the T joint on the coolant return pipe from the radiator & jiggle valve to the coolant tank. Carefully drilled out the T union and the broken piece from the jiggle valve's pipe and Araldited in a piece of refrigeration copper pipe. I'll try to source a replacement T joint.
IMG_2041.JPG

Anyone know how I can utilise the VW coolant sensor set-up? With the LR tank I'd fitted a low coolant warning float switch as per Hippo's idea?
 
With the LR tank I'd fitted a low coolant warning float switch as per Hippo's idea?

You could simply wire it to the Ipack temperature sensor, so it puts the high temperature light on.
However you need to know how the level switch works first, it will make or break when empty, but how you wire it will depend on this.
 
You could simply wire it to the Ipack temperature sensor, so it puts the high temperature light on.
However you need to know how the level switch works first, it will make or break when empty, but how you wire it will depend on this.

'Ipack temp' sensor, is that the actual temp sensor on the coolant elbow exiting the forward side of the head? Just cut that wire and have the coolant tank in series with it?
 
Back
Top