What did you do with your Range Rover today

This site contains affiliate links for which LandyZone may be compensated if you make a purchase.
I'm exhausted :confused:

WP_20170626_15_43_08_Pro.jpg


Fitted & working. It was so simple... Would have been easier if both hands were fully operating, but one hand and my belly did the job :D

One thing though, cruise stopped working since I did the valve block. The rubber pipe is cracked like a smashed windscreen so I am hoping it's just that.

Question is, the cruise was working, albeit at 2mph or so below selected speed and would drop speed before banging back on. Now I am guessing the leaking hose caused the problem with the cruise, but is it vacuum operated? If so, it's highly likely this is causing my misfire too, no??

No other cause to be found o_O

Yes to cruise, no to misfire. Have a look at MrGorsky's silicone tube replacement.
 
I'm exhausted :confused:

WP_20170626_15_43_08_Pro.jpg


Fitted & working. It was so simple... Would have been easier if both hands were fully operating, but one hand and my belly did the job :D

One thing though, cruise stopped working since I did the valve block. The rubber pipe is cracked like a smashed windscreen so I am hoping it's just that.

Question is, the cruise was working, albeit at 2mph or so below selected speed and would drop speed before banging back on. Now I am guessing the leaking hose caused the problem with the cruise, but is it vacuum operated? If so, it's highly likely this is causing my misfire too, no??

No other cause to be found o_O
My cruise surges like that and I have a brand new pipe on it. I think it's the wrong setting in the ECU but I'm on my second ecu now and it's same.
Yes, it does use vacuum but not from the engine so it won't be anything to do with the misfire. It has a separate vacuum pump for the cruise control.
 
My cruise surges like that and I have a brand new pipe on it. I think it's the wrong setting in the ECU but I'm on my second ecu now and it's same.
Yes, it does use vacuum but not from the engine so it won't be anything to do with the misfire. It has a separate vacuum pump for the cruise control.

It was working perfectly, then it started the under stated speed with a slight drop then a slam back up to speed. But when I had the car manually inflated, it stopped working. I assumed it was due to the 35mph warning (after all, if it's suggesting not to go above that speed, it makes sense to lose the cruise, right??).

I did have the cruise unit removed, unplugged and no vacuum pipe. I cut off the last 10mm from the pipe and reconnected it. So, do I need to "tell" the cruise ECU we're back on or simply try to replace the whole hose (was thinking on using the same plastic 6mm pipe I used for the air system since I have about 20 metres of it left anyway, some new rubber or even silicone at each end for connections)??

I love this fun & games...Gives me purpose during these dark days of broken its & unemployment :p
 
You shouldn't have to do anything and I don't think it's the 35mph warning stopping it. When mine was jumping all over, I had the 35mph come up a few times and the cruise still worked.
I might still have a leak in mine somewhere, just haven't had time to look.
The air hose will be fine as long as it's got a good airtight seal at each end. The only thing I will say is make sure it's sealed well where it goes through the bulkhead or you'll have freezing feet on a cold day. The replacement hose I used was bigger than standard and wouldn't go through the grommet in the bulkhead so I took the grommet out then drove through Austria in January. I couldn't believe how much cold air can get through such a small hole!
 
The rangie is with the paint man at the moment, so just doing a few bits and pieces. Went over to see progress this morning, can't believe how many dents he managed to find in it, what with that and filling the holes where the PO decided to fit bonnet fastners to it (cos it looks well hard) and light guards (cos I'm a rufty tufty off roader) it's taking him 2 1/2 days to do the dent bashing and filling. Took a few photos for luck.
Sometime in its life one of the rear door pulls (could be mistaken for an ashtray) has been broken and the surrounding door card split, being as I'm already spending loads on it I thought I would try and make a temporary repair. Used plastic (abs) waste pipe solvent glue on the door pull, reinforced with a layer of glass matting. This will go into my door so I can use it with care, for the door card I brushed resin into the break and then reinforced it with a layer of glass matting, I am hoping this lasts for a year or two. Will take some piccies to add to the rest. Going back for a shufti on thurs, can't wait to see it in paint.
It is one of the best feelings going.....resprays.
Did a van moons ago with the new fangled HVLP technology, 3 attempts later I managed a run free coat, with 0.1L remaining from a mahoosive 5.0L tin.
Moral of the story, practice makes perfect.
 
It is one of the best feelings going.....resprays.
Did a van moons ago with the new fangled HVLP technology, 3 attempts later I managed a run free coat, with 0.1L remaining from a mahoosive 5.0L tin.
Moral of the story, practice makes perfect.
My mate who is doing the hard work has been repairing/painting cars and bikes for many years. If anything he is a bit too much of a perfectionist, will not mask any panel except to stop overspray, all rubber etc has to either come off or be moved out the way. He is charging mates rates and it is still dear enough even though I have taken most of the body bits off ready for him, but I do see the amount of work he puts into a job. We are compromising by just colouring the outside panels, I will do the pillars and door edges etc with rattle cans in satin black to save quite a lot of money. As I said in a previous post, this is being done to satisfy me, not as a concours type resto.
If the link works have a look at some of his work here. http://www.vintagevoiture.com/Photos.html
 
It's a soulless quest, ask your friend about guide coats and blocking, it takes forever and if you don't do it, it looks sh!te.
If your gettting it done for less than 2k count yourself lucky AND a mate.
A concours job is 8-10k plus detailing.
 
@Doo, I think I may have taken longer to find a working Biro for you sign my ramp safety waiver than it took you you to do the dirty on the tarmac. Spiffing job;)

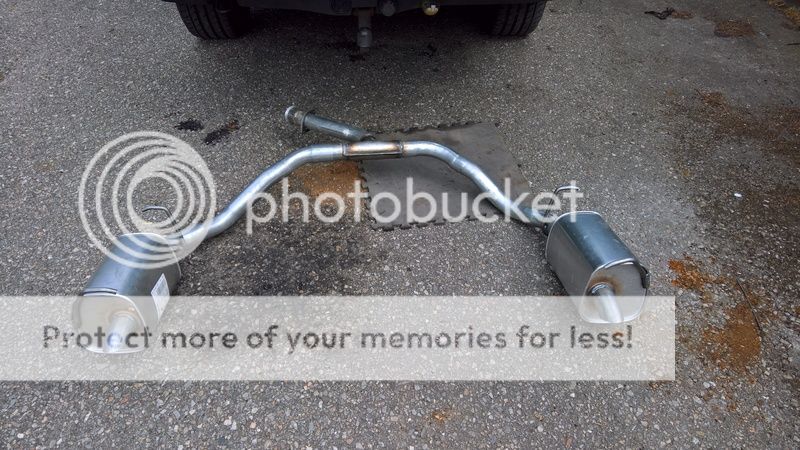
Ahh, now, see, I had her full height (the positive thing about fixing the clean air before the used air :D) my axle stand under the rear chassis on one side and the jack under the other side and my phone zipped up in my jacket pocket (easy to reach). It took me a while as I have to kneel down using right knee 1st, then gently on left (can't bend knee far due to ligament), then I lie down on right side using right arm and roll over on my back. Getting up is a sweary affair. I simply CANNOT use my left arm for anything other than carrying light stuff. Believe me, I've tried :( It hurts like a hurty thing walking on a volcano while wearing no shoes.... I imagine o_O

Anyway, the only fly in the ointment was the clamp to hold one box to the other, it was too small :eek: Popped down to see my mate Khamal and got a 70mm for free :) However, the rest of the system was sufficiently tight that I was able to drive down after letting the pipes warm up and seal the pre-clarted exhaust paste. So it was simply a matter of clamp on, spin up the nuts then a couple of pulls on the ratchet to final tighten.

A very civilized affair really :cool:

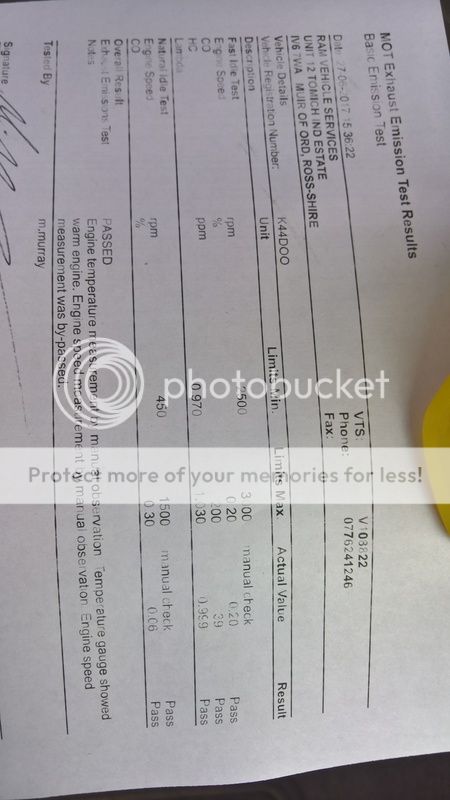
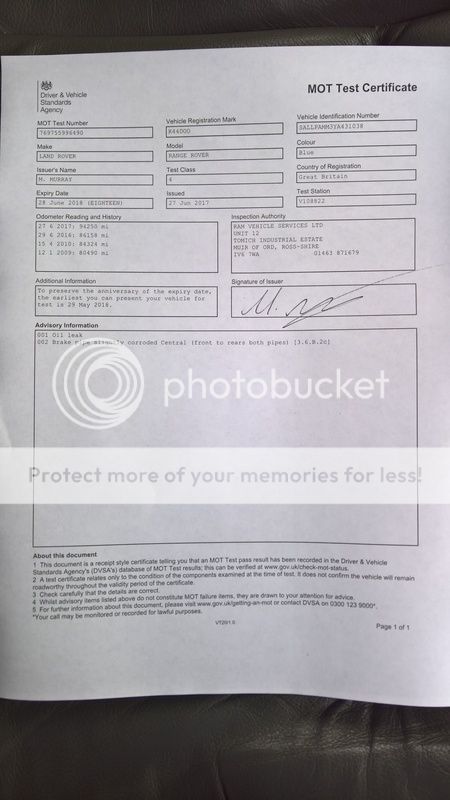
Tested this afternoon. Tester said it was the cleanest 38 he'd ever clapped eyes on :rolleyes::);)

Emissions:

WP_20170627_16_16_50_Pro.jpg


Mechanicals:

WP_20170627_16_16_56_Pro.jpg


You know what they say about old British engines? If there aint no oil under em, there aint no oil in em :D

The air tank is coming off to be de-rusted & painted, so the front to rear brake pipe in question is getting replaced at the same time ;)

I'm happy with that and his comments though :cool:
 
Doing a right too and throw to day with van & caravan then rangie then classic car to get then to a steam fair, woohoo I get to drive the p38, wifes normally got it.
 
All I did today was go and have a look at the prepping in the sprayers workshop, nothing done yesterday as my mate was sorting out the brakes on a suzuki he wants to get on the road. Will go back on monday to take a few piccies of the primer coat with luck.
Had another look at the colour the doris has chosen - OK with my blessing - people are deffo going to see me coming.
Bit nervous now, seemed a good idea at the time.:D:D:D:D:D:D
 
Today I cleaned out the rocker cover / cam cover filter. Getting it off was easy. Good call by Wammers on cleaning it out. It was actually full of oil that was more like jelly. In the absence of brake cleaner or carb-cleaner or the like (sure I had some but must have loaned it out) I cleaned it with petrol, hampered slightly by the overhanging conifer that insisted on dropping needles randomly into my rocker cover. Getting the new gasket in place and back on was an absolute PITFA. I hope it is in place because by this time it was getting dark, not that you can see anything at the back anyway, so it was put in place by touch. No wonder the old gasket seemed to have the odd dab of glue holding it in place. What kind of design has the sound proofing so low and that stupid half-moon shape in such an awkward spot?! I tried lifting it from side to side and pushing the gasket in place with a finger and hope that's done it. And then getting the bolts that hold the exhaust shield in place were little sods to get in too. Yet another 30 minute job that managed to extend to hours. Just to finish off I shut up the garage and then discovered my keys had dropped out inside so I was locked out. So, had to retrieve a key I had left for a neighbour, unlock the house, retrieve spare garage key, unlock garage, retrieve my keys, lock up again and then return spare key to neighbour. What a palaver of an evening.
 

Attachments

  • 20170629_191537.jpg
    20170629_191537.jpg
    493 KB · Views: 108
  • 20170629_191549.jpg
    20170629_191549.jpg
    283.2 KB · Views: 74
Back
Top