TorsionBhudda
Well-Known Member
- Posts
- 1,342
- Location
- Falkirk
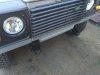
Hi all I thought i'd start a thread for my 1993 Defender 200Tdi. I've owned VAD for almost a year now and is the first Land rover I've ever owned always wanted one since I can remember. The plan is to do a rolling rebuild/Restoration and eventually change the chassis for galv one when funds allow and to add a few modern comforts i.e sound deadening, carpets heated seats etc. I don't use him everyday as I have a van supplied to me by the company I work for also I work away from home a lot and only get home 3 days once a month. When I do get home then I use him constantly if I'm not working on him. When I first bought him he had a nasty habit of trying to kill me if I tried to drive over 40mph The 'Dreaded Death Wobble' but apart from that was a very good example. And since sorting out wobble of death I've enjoyed driving him and look forward to jumping into him when I'm home.
Things I've done so far are.
1. All new Track Rod Ends and Heavy duty Link bars.(old ones absolutely gubbed)
2. All Wheel bearings changed Front 2 were really worn.
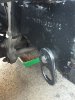
3. Overhauled Passenger side Swivel as had excessive play and was leaking slightly.
4. Full service and all Oil's changed.
5. All new Standard duty Coil springs and Shock Absorbers.
6. New Front Discs and Pads.
7. LED Side and Indicator Lights fitted.
8. RTC Steering Damper
9. Full Clutch Assembly inc Master and Slave cylinders HD Clutch fork.
10. Renewed Wiper cable and Wiper boxes.
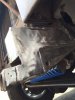
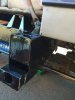
And today I started Replacing the Steering box as old ones Leaking and Ball joint is worn should have that finished tomorrow.
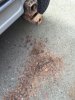
The Death wobble was cured with replacing Track rod ends and o/hauling swivel assembly which was carried out December last year just before First MOT which he sailed through and passed without any Advisories") .
.
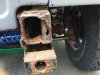
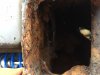
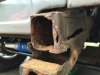
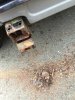
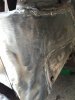
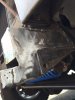
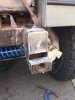
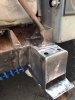
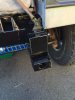
Since then it has become apparent that I will have to do some welding to the chassis before the next MOT I'm hoping to have that completed over the next 2 weekends before I go away again.
I'll post some pics up not got many but hopefully by starting this thread I will get into habit of taking them as I work on him so I can post them here.


Things I've done so far are.
1. All new Track Rod Ends and Heavy duty Link bars.(old ones absolutely gubbed)
2. All Wheel bearings changed Front 2 were really worn.
3. Overhauled Passenger side Swivel as had excessive play and was leaking slightly.
4. Full service and all Oil's changed.
5. All new Standard duty Coil springs and Shock Absorbers.
6. New Front Discs and Pads.
7. LED Side and Indicator Lights fitted.
8. RTC Steering Damper
9. Full Clutch Assembly inc Master and Slave cylinders HD Clutch fork.
10. Renewed Wiper cable and Wiper boxes.
And today I started Replacing the Steering box as old ones Leaking and Ball joint is worn should have that finished tomorrow.
The Death wobble was cured with replacing Track rod ends and o/hauling swivel assembly which was carried out December last year just before First MOT which he sailed through and passed without any Advisories
.Since then it has become apparent that I will have to do some welding to the chassis before the next MOT I'm hoping to have that completed over the next 2 weekends before I go away again.
I'll post some pics up not got many but hopefully by starting this thread I will get into habit of taking them as I work on him so I can post them here.