You are using an out of date browser. It may not display this or other websites correctly.
You should upgrade or use an alternative browser.
You should upgrade or use an alternative browser.
The Restoration Hall of Shame
- Thread starter dirtyrhino
- Start date
This site contains affiliate links for which LandyZone may be compensated if you make a purchase.
Landie_Man
New Member
- Posts
- 758
Petrol and thinners
crashbox
Well-Known Member
- Posts
- 12,347
- Location
- In the UK, thankfully.
I had a mate a long time ago who stripped down his mini engine and found one of the pistons was made of oak. Apparently this wasn't an uncommon bodge - I suppose a bit of turned oak is probably as strong as alloy and nearly as fireproof.
I once had a mate as well.

Landie_Man
New Member
- Posts
- 758
you do mean the floor pan right? The floor pan should just be bolted in with a rubber matt sat on top
I once had a mate as well.
:Cry:
you do mean the floor pan right? The floor pan should just be bolted in with a rubber matt sat on top
yeah right
i mean the floor pan, the place around the levers, the sides of the metal below seats
i will take some pics of that this weekend
and maybe i can take them off...
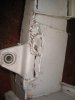
well the bodged footwells may have won the battle but the war goes on. I recently bought a series 3. It failed its mot on a few little things and the footwells. I made the guy get me the failed mot cert to prove this before i bought it. The foot wells have been made from riviting old pieces of bulkhead (which had just been repaired) together in 2 x 2 inch bits. But the war goes on and as the new whole footwell replacements have arrived the angle grinder is going to have fun tomorrow.
well the bodged footwells may have won the battle but the war goes on. I recently bought a series 3. It failed its mot on a few little things and the footwells. I made the guy get me the failed mot cert to prove this before i bought it. The foot wells have been made from riviting old pieces of bulkhead (which had just been repaired) together in 2 x 2 inch bits. But the war goes on and as the new whole footwell replacements have arrived the angle grinder is going to have fun tomorrow.
Dont forget the step by step pics if you can
Ok. It's been a while but work begins. My previous post was about the previous owner making the footwell. Well now I can see why. They have used a LHD driver foot well and I suspect wondered what the holes were for.
Right I have started to remove the old footwell and am realising that I need a door pillar. Which I find easier as I can just cut the whole lot off.


Right I have started to remove the old footwell and am realising that I need a door pillar. Which I find easier as I can just cut the whole lot off.
robbie8922
Member
- Posts
- 52
I can imagine! Would have broke the socket for sure..:5bsifone:
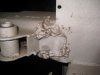
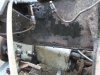
Now that is shoking, I imagine it went through MOT too, covered in underseal.After i had my chassie shot blasted i found this. Ive seen sh*t welding but this is the worst by far.
Landie_Man
New Member
- Posts
- 758

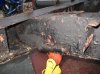
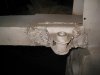
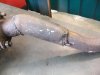
Right. Old footwell out.

Easiest way was drill old spot welds and just cut the rest taking as much rust with it. Here you can see the holes where I am going to pot weld with the mig.

From inside it looks much better. Going to plate the rust gaps from inside.

The door pillar one reshaped with the hammer will get pot welded with the mig again.

Easiest way was drill old spot welds and just cut the rest taking as much rust with it. Here you can see the holes where I am going to pot weld with the mig.
From inside it looks much better. Going to plate the rust gaps from inside.
The door pillar one reshaped with the hammer will get pot welded with the mig again.
Right. Old footwell out.
Easiest way was drill old spot welds and just cut the rest taking as much rust with it. Here you can see the holes where I am going to pot weld with the mig.
From inside it looks much better. Going to plate the rust gaps from inside.
The door pillar one reshaped with the hammer will get pot welded with the mig again.
raise:Thank you for the pics, that will help when i get chance to do something on mine.
ginge1100
Member
- Posts
- 26
is that leprosy ?or maybe genital warts. thought my welding was bad .After i had my chassie shot blasted i found this. Ive seen sh*t welding but this is the worst by far.
storm99
Spreading Joy & Harmony
- Posts
- 21,065
- Location
- Brexited. Living on an island.
is that leprosy ?or maybe genital warts. thought my wedding tackle was bad .
Edited for the hell of it.
Similar threads
- Replies
- 9
- Views
- 3K
- Replies
- 4
- Views
- 2K