storage solutions

This site contains affiliate links for which LandyZone may be compensated if you make a purchase.
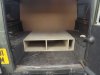
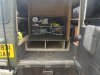
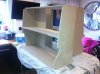
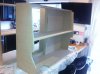
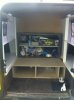
That looks very very impressive mate! Very impressed!

Only thing i would say, if that's a 1500W inverter rather than transformer then make sure it has ventilation and get a fan on it (redhand very kindly supplied me with a good fan for my inverter)

Cheers matey !

Yes it is an inverter. It has a built in fan, does'nt get used for much realy other than charging mobile phones etc .......
 
Cheers matey !

Yes it is an inverter. It has a built in fan, does'nt get used for much realy other than charging mobile phones etc .......

fair enough, i'd personally still put some ventalation in, mine has an inbuilt fan, but, i wouldn't expect it to last long in an enclosed space... but... i run toasters and heat guns off mine!
 
fair enough, i'd personally still put some ventalation in, mine has an inbuilt fan, but, i wouldn't expect it to last long in an enclosed space... but... i run toasters and heat guns off mine!

Totaly agree with you Bump for big stuff!

I have managed to put me Waeco fridge in "F-off I'm not having this any more mode" twice in southern Morocco and only managed to get it going again thanks to a 12v portable fan cooling it down again.
 
I’ve come back to this thread time and time again to read every ones’ thoughts.
I’ve got a 110 CSW that’s 24 years old. It needs some paintwork sorting out as I’ve already had to learn how to weld so I could replace the bottoms of both my front doors. I had to replace the head gasket recently and that was a real challenge as I had never been much of a mechanic. I also had to learn about auto electrics as it has been an uphill battle to keep things working (still not sorted).
And now I have had to become a carpenter. I am just a simple part time primary school caretaker, but I have a chance to take on another small local primary so will become a mobile caretaker. I therefore have had to think of storage for work, camping and when I get to go off road. I also needed to make sure it can all be removed in under half and hour just in case I ever have to get anything big into the back.
I have also decided to remove the rear side windows and fit doors that will open up allowing better access to the rear from the side. I can’t really afford the side opening doors yet so I have made a start on the shelving units.
I removed all the stuff seen in picture one (normal tools etc).
I then removed the dog guard as the dog never gets in the back, she always rides up with me.
I put a bulk head in (I think that’s what its called), I have never done any of this before so I struggled and gave up in the end trying to get the contour right around the roof. In picture two you might be able to see a gap up near the roof windows.
I then made shelving units for both sides, shaped so I can get a laycorn box in and out.
In the base foot well, I’ve started to build a unit ready to take two draw units with a gap down one side for tubes of silicon etc.
The photos show the progress. If anyone would like more, then I am happy to try and post them on here. The gaps you can see are for the draws and in the sides I am thinking of fitting drop down doors with retaining clips to lock them shut.

There is a gap at the top of the shelving and the roof, that because I am going to but a full width shelf coming half way back from the bulk head. This big shelf is going to have a lip on it so I can stick boots and clothing up their out of the way.


I am open to ideas to perfect this, so please help me.

Sorry everyone I can not post/up load the photos of what I have done using some of your ideas sorry.
 
Last edited:
Trax is right laycorn boxes are a perfect fit, but once in a bit difficult to move especially when full.

I have been trying to post the pictures up but I think they may be to big and I don't know how to reduce them.

I will do a few posts if I have too to show what I have tried to do and get some ideas.
 
Here I have another go at adding a few picks.

The first picture shows how I have been carrying tools, kit and stuff for six months now, since getting the landy. Everything ends up just chucked in.
In picture two I have removed all the kit, the dog guard as the dog always sits up front with me and I removed the surrounds around the rear windows.
I plane to take the rear side windows out and replace them with opening locker doors, allowing me to get to the inside back from the side, I will add even more pictures when I fit them.
I then had to try and bake a bulk head, having never done anything like this before I struggled to cut the contours right to make it a nice snug fit, that said the hours it took me have been worth it. I am thinking of putting a drop down Perspex window in the bulk head so I can see through, but either open or close it depending on if I have anything long to carry that I don't want to put on the roof rack.
I then made a box unit up that I am going to put two draws in. I had to leave a small space on one side as the draws would hit the rear door strut/stay. You may have noticed that I have no back on the draw box and the bulk head fits to the top of the box so I have anything long to take I could take a draw out and slide it through under the rear seats.
 

Attachments

  • IMG_0211.JPG
    IMG_0211.JPG
    646.9 KB · Views: 747
  • DSCF1999.JPG
    DSCF1999.JPG
    209.7 KB · Views: 771
  • DSCF2001.JPG
    DSCF2001.JPG
    149.5 KB · Views: 779
  • DSCF2004.JPG
    DSCF2004.JPG
    128.3 KB · Views: 776
Last edited:
ok, Having fitted both the bulk head and the draw box I could then start on the side storage units.
I have a laycorn box to stand on top of my draw unit and I placed that in while I measured either side to see what room I had. I had to make one side small by stepping it in so the laycorn box can be twisted slightly so I can take it out.
I then took my time to make a template of the side contour before making the shelf units.
The first picture shows the shelf units with contoured sides so they fit in nice and snug.
the last two pictures here show the shelf units with backs on, I am sure that might seam odd. Remember that the large open side will face the glass, and when the windows are replaced with gull wing doors I will be able to get the full length of the shelf.
The backs face into the truck and will be up against the laycorn box. The gaps that I have currently left will have drop down door fronts on them so I can close them to keep everything tidy.
 

Attachments

  • DSCF2012.JPG
    DSCF2012.JPG
    185.3 KB · Views: 555
  • DSCF2014.JPG
    DSCF2014.JPG
    186.3 KB · Views: 524
  • DSCF2015.JPG
    DSCF2015.JPG
    172.2 KB · Views: 520
  • DSCF2017.JPG
    DSCF2017.JPG
    165.3 KB · Views: 502
  • DSCF2016.JPG
    DSCF2016.JPG
    165.1 KB · Views: 551
The first picture here shows how I had to shape the shelf bases even around the fuel pipe inlet.
The next picture shows the shelf units in place and the laycorn box.

You may have noticed that I have not gone all the way up to the roof, that's because I intend to fit a shelf all the way across the top but about half way towards the back from the bulk head, so I can put my boots, wet weather gear etc up their out of the way.

I have used small furniture latches to hold the shelving units in place, the top shelf will be fixed the same way. The reason for that is, because I can then unlock everything and take it out quickly if I need to, too allow me to still carry a big load in the back.

The inside of the shelves are going to be painted white to reflect light. Everything else I am thinking of carpeting in grey unless you all have better ideas. I thought about using black flush fitting handles for the draws and door fronts. I am going to fit a thin strip of LEDs in each shelving unit controlled by bonnet switches so when you open a door the LEDs will light up, the main area will be lit with LEDs controlled by a switch by the back door.

Everything I have done so far too me all day Saturday and I hope to get draws and doors done by the end of this week. I will take more pics as I go.

Please let me have your suggestions, that I can incorporate now.
 

Attachments

  • DSCF2009.JPG
    DSCF2009.JPG
    160.3 KB · Views: 544
  • DSCF2023.JPG
    DSCF2023.JPG
    197.3 KB · Views: 615
Hi bluehaze, yes I'm hoping I can get what I think are called double runners.
They should pull out once like a normal draw runner and the again a second time. Iv gone for two draws so if you are standing either side of one it will come out so far you can easily reach the back if the draw without having to clamber in.

The side window doors are still on order so having to load shelves from inside at the moment.

Loads more pictures to come.
 
Thanks bluehaze of to B&Q first thing in the morning then.
looks like I might to order the flush handles from eBay a pack of ten for £31 is a bit more than I wanted to pay as I only need six, but I guess I can sell the rest back on eBay.
Already have piano hinges for the drop down doors.
 
So I did go to B&Q but the longest draw runners they had where 550mm long and cost over £15 a pair. I have enough room to go to 700mm long but they are over £15 a pair plus postage on eBay. As I need two pairs I found a company who sold me two pairs of 600mm long runners for £18 including delivery.

They arrived at the beginning of this week but I have been too ruff to make the draws and fit them. Not wanting to sit and do noting I took the shelving units back out and gave them two coats of undercoat and two coats of high white gloss, my thoughts have been that it will reflect the LED lights making the units easier to work with in the dark.

You should be able to see this was done in my kitchen and took three days, (wife not impressed) but I think it works. Now they are back in and I'm going to get the draws done this weekend, no matter how ruff I might feel. I am hopping to get the cabinet door fronts done too, but I still have not settled on what type of handles to have.
 

Attachments

  • IMG_0349.JPG
    IMG_0349.JPG
    279.3 KB · Views: 481
  • IMG_0350.JPG
    IMG_0350.JPG
    279.3 KB · Views: 490
  • IMG_0351.JPG
    IMG_0351.JPG
    270 KB · Views: 490
  • IMG_0352.JPG
    IMG_0352.JPG
    149.7 KB · Views: 460
  • IMG_0353.JPG
    IMG_0353.JPG
    151.9 KB · Views: 517
  • IMG_0354.JPG
    IMG_0354.JPG
    595.2 KB · Views: 531
Back
Top