storage solutions

This site contains affiliate links for which LandyZone may be compensated if you make a purchase.
This is mine Still needs a bit of fine tuning though.

IMG_1099.jpg


I now have 3 really useful storage boxes in the Right hand side.. Oh and I have a dog guard fitted as well.
 
Thank you RS and good luck with your conversion - keep the pics coming.

Have you thought about making a frame from 1/4 or 3/8 ply board? you could easily incorporate a draw and space for boxes. If thought through you could utilise every last bit of space. I saw a disco recently that had a water container on top of the rhs seat mounts and a gas cylinder on the lhs.
 
I've always thought that the space near the roof is wasted (unless you jam the back full of kit). RS's pic shows an elevated shelf - that makes me think..............
 
Hopefully this makes what I have in mind a bit easier to understand. Apologies that it's not the best diagram. (My discos not as rusty as that one by the way!)
 

Attachments

  • DISCO PLAN.jpg
    DISCO PLAN.jpg
    69.4 KB · Views: 842
redhand does yours rattle around much in the back when off road or have you secured it to the floor?

I've always thought that the space near the roof is wasted (unless you jam the back full of kit). RS's pic shows an elevated shelf - that makes me think..............

The shelf just underneath the quarterlights does look quite handy, but not sure how difficult it would be to get secure it from the roof/ trim, instead of using poles. The best thing is it allows that roof space to be used, without necessarily blocking the view of the back window.
 
redhand does yours rattle around much in the back when off road or have you secured it to the floor?

It bangs when going over bumps fast. Fitting 4 rivnuts and bolting it down is going to be part of the "Fine Tuning" Process I've replaced the rear door card with a chequerplate one. Since that photo was taken. And will be fitting a dropdown cooker shelf.
 
I've always thought that the space near the roof is wasted (unless you jam the back full of kit). RS's pic shows an elevated shelf - that makes me think..............

Here's how I use the space....

Couple of 75mm self inflating matresses folded in two....saves having to roll them up.

adiscoback.jpg
 
Looking good muddyfox.

Mine is now underway, bought timber, and cut out some of the shelves today, got a few more to cut out tommorow, test fit, then carpet & paint. Then hopefully on friday, add mouldings, and hinges, and fit for good.

The top shelf is going to screw down into the same two bolts which hold each roller mount in place. Then will hinge in two places so that it folds up flat against the passenger seats, so that if necessary taller loads can be carried on the lower shelf. I've opted for 12mm ply for top shelf, and then 12mm chip board for lower shelf. I'm hoping it wont be brittle, as it'll have battening underneath to support it, and four supports underneath, to divide the space underneath for boxes. Will post pics up when it's all done and also try and include measurements incase anybody wants to make a similar thing in future.

muddyfox, having that cargo net is a very good idea I think. Handy for coats and stuff like that I imagine. How did you go about attaching the nets, and where did you get them from? I've seen them on mudstuff before so might invest in some.
 
Oh by the way, where did you get that silver trim for to cover the edges of your shelves? and do you know what the proper name for it is?
 
The net was bought in halfrauds. It has hooks on the side which are on the rear passenger handles and hooked to the trim (rear upper windows). For a little extra support there is a strap goes between the two rear grab handles.

I got the 25mm aluminium angle off ebay. The carpet tiles I bought from B&Q (they also sell angle). If you are going to use spray carpet glue, I would highly reccomend the Wickes stuff.
 
Cheers buddy.

Bought the carpet tiles, and black trim from B&Q today.

Test fitted the lower shelf and all is good, just need to put it together, and paint it grey tonight, and then carpet and trim tommorow.

I farked up the upper shelf/ load cover bit, so got some new timber to sort that out, then will paint it tonight, and tommorow carpet, trim, and put hinges.

Then fingers crossed, into the disco it will all go, and I will post pics.
 
The net was bought in halfrauds. It has hooks on the side which are on the rear passenger handles and hooked to the trim (rear upper windows). For a little extra support there is a strap goes between the two rear grab handles.

I like that idea.........

But is it tight enough not to sag?;)
 
The non elasticated strap between the two handles (bit like a rachet strap) stops it bouncing around and sagging. It's been there over two years now and survived many camping trips, to France Scotland and Morocco.
 
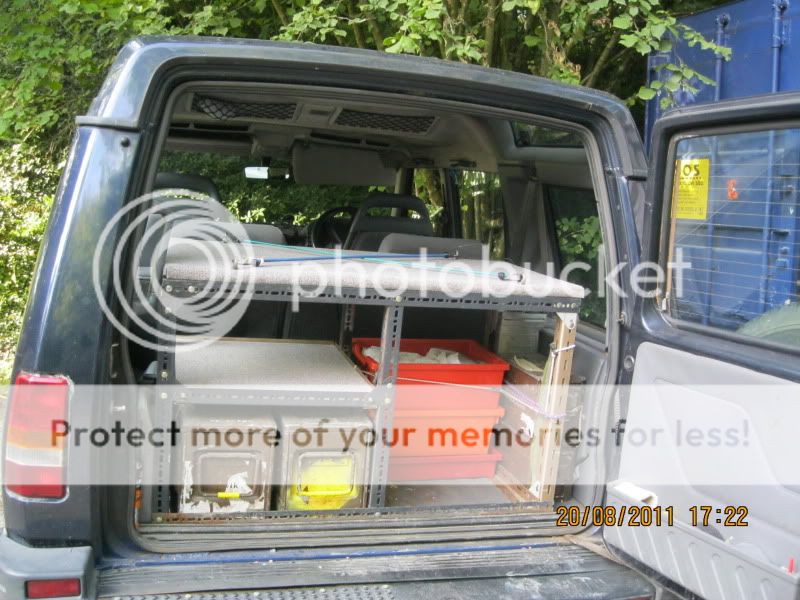
Almost finished finished this about a week ago, but been busy all this week.
Anyway Here are some pictures of it.

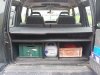
I still need to attach the black plastic trimming properly and adjust the fit of the bottom shelf by cutting about 1/2 inch off the back of the supports so the bottom shelf fits up against the back seats.

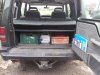
The top shelf didn't work out as I planned, and if I keep it in the landy, then I will hinge it so that it folds up against the rear seats, and screw it down to where the old load cover used to screw.

I will probably, take it out and not use it though, because as you can see, it means that the lower shelf serves very little purpose, due to there only being about a 20cm high gap which is pointless.
I've been planning to fit a dog guard anyway, so will just fit that, take off the top shelf, and then fit some blinds from halfords on the back windows so that people can't see what's in my boot. Simples.

Over all I'm happy with it. It does the job, looks okay, if a little tattier than I had hoped. I don't think it's as smart as it could have been if I'd have taken more time over it but I smashed it out as quickly as I could, and admittedly cut a few corners. For example; at about 10.15 on a Thursday night I was getting a bit sick of slaving over it every evening and was eager to get it finished, so I started painting the boards and since we didn't have any grey paint, (and I couldn't be arsed to delay painting until the next day when I'd got some paint), I mixed my own in a milk carton with black paint, some white wall paint, and a dash of blue hammerite, then left them out in the garden for about 8 hours overnight to dry lol. Not exactly good workmanship by anyones standards but like I said, it's turned out okay.
 

Attachments

  • 20120520_122541 e.jpg
    20120520_122541 e.jpg
    67.8 KB · Views: 820
  • 20120520_122547 e.jpg
    20120520_122547 e.jpg
    72.7 KB · Views: 840
Looking good mate. That 20cm gap could be useful if there was an access hole in the top or for putting a cooker in.
 
Ouu what an inspirational thread :)

Just started to think about kitting out my disco for a trip to Morocco next year, my first decision to make though is do i keep the back seats or rip them out? It's only a 3 door and is only used for laning / off-roading and general work horse, it's never had people sit in the back... to date, but, i'm sure the moment i rip them out is the moment i'll need them :/

Rip them out...then you aint got any room for passengers. But' lots of room to make things comfortable whilst camping etc and easy to get at :). You also have the benefit of having seats that fold right forward allowing even more space in the back for sleeping 'en route'.

I have been looking for the seats from a three door for months.:mad:
 
Back
Top