Series 3 109 - 1973 - Full Restore

This site contains affiliate links for which LandyZone may be compensated if you make a purchase.
Although, I'm now wondering if I'm going to bother with the top hat sections.

The floor will be either 3 or 4mm alu sheet, so thicker than the original. I can't see the top hats adding much integrity to the structure, only stopping the floor flex between the steel supports.

Plus it would save almost £100...
 
Brakes plumbed in and bled up today, need to properly set the brake adjusters and give it another bleed or two to get any lingering air out, but almost done!

Collecting the bespoke clutch line tomorrow, so fingers crossed we will have gears and brakes by tomorrow evening.

I've decided to delay the test drive until the oil leak, timing chain and water pump are sorted though. Order for timing kit went in to Craddocks this morning, so will probably be a job for next week now.
 
The remaining supports for the rear tub are now in place. I've decided I'm going to go without the aluminium top hat sections for now, once I've laid the thicker floor panel I'll decide if it needs extra bracing.

The 4 extra chassis brackets have been welded on today, these are needed because I'm fitting a 2 door pick up body to a station wagon chassis.

Just the L shaped brackets to weld on once I'm in a position to properly align the tub.


I'm also a little concerned to learn that the springs that came with the chassis are 1 tonne rear springs, mounted with extended shackles. The suspension is absolutely solid and rides quite high.

 
It's been a little while since I've managed to get any work done on this, other jobs have taken priority unfortunately.

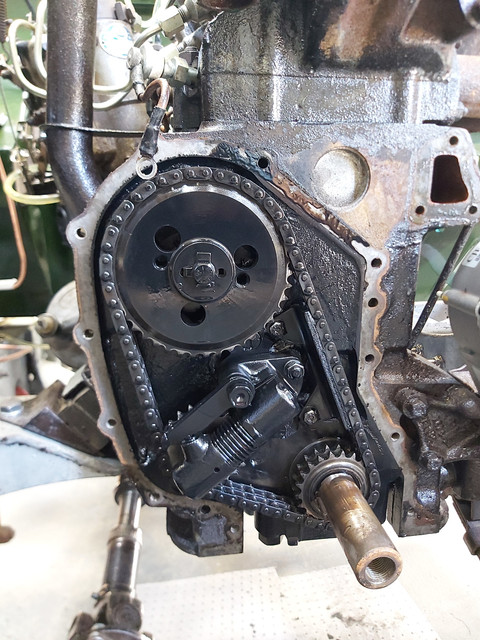
Made a start on changing the timing chain chain gears yesterday, in the hope it will help out with the lumpy running and as a maintenance job regardless.

I've been waiting on the bits from Craddocks for almost 3 weeks, they were still unable to supply the cam gear and chain so ended ordering them from Turners.

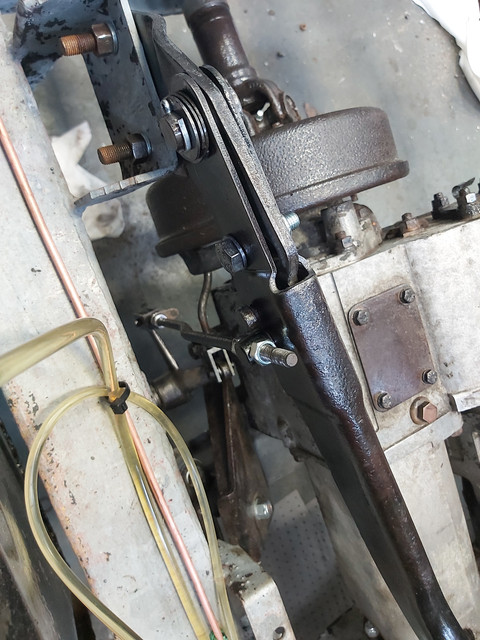
Anyway, water pump off at the same time as it was weeping from the tell tale.

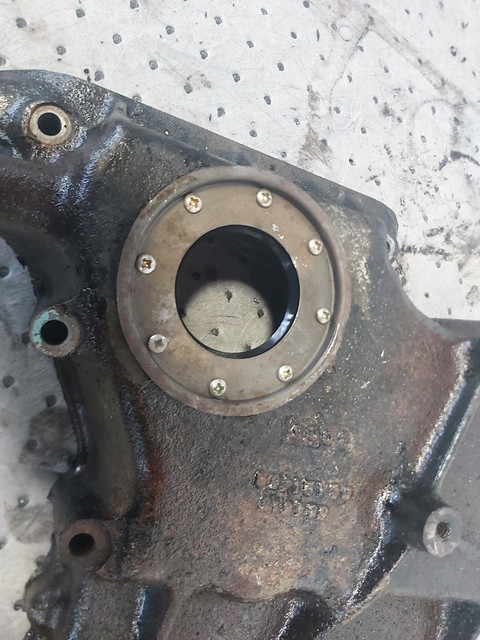
Gear cover off, nothing looking too worn or tired. Changed over the ratchet, spring and elbow on the tensioner. New crank gear and chain.

I had to fit the old cam gear back on, the new one from Turner only had 1 keyway and meant I couldn't get decent tension on the chain. The original wasn't showing any obvious signs of wear so I don't mind too much.

The original tensioner wheel went back on too, the new one from Craddocks was covered in some sort of storage wax which, without a blowtorch to hand, was impossible to get off.

I'll replace the seal before the gear cover goes back on, then it's on with the new water pump and back on with the sump, hopefully curing the leak there too.


Everything torqued and lock tabs bent over now. Surfaces cleaned up ready to be mated and new oil seal fitted into the casing.

Ready for a couple of turns by hand to check the timing (should have been done before I bent all the lock washers over, but hey ho), and the cases getting put back on.


Well, good news in that the coolant leak and oil leak seem to have been fixed. Although I can already feel some play in the Britpart waterpump bearings...

Sump back on, only to find the gasket holes don't line up properly, so for now that's been fitted with instant gasket.

Fired up but still running poorly, seems to be a fair bit of diesel knock (or, hopefully not, some other sort of mechanical knock).

It will idle by itself but doesn't sound too pleasant. Cracking off injectors has the same effect on each cylinder but I'm wondering if the spray pattern isn't great. So may whip them out again and get them back on the pressure tester.

Need to fiddle more with the valve clearances and pump timing before that, to eliminate any easy problems.

However for now, I think I'll progress with the rest of the build to at least get it moving and almost back together.
 
Replacement floor in the tub today. I did away with the longer supports that run front to back, mainly because of cost but as I'm using 4.5mm aluminium for the floor, it should be strong enough to cope.

Just a couple of brackets to replace before the tub is complete and ready for paint.


Handbrake linkage finished off today, adjustment rods cleaned up and rust treated, new clevis joints on both ends and the expander has been stripped and greased.

Adjustd up and a very firm handbrake lever at only 4 clicks.


Hole drilled in the bulkhead for the battery isolator, just waiting for the zinc primer to dry before it can be fitted.

Work continues on the tub with mounting points being strengthened due to the alu rotting/crumbling where it meets the chassis L brackets.
 
Long overdue on updates for this thread, lots of work has been ongoing but unfortunately no photos to accompany.

This afternoon I sorted out insurance and for the first time in 26 years, it's been driven!


Still a lot of finishing touches to complete, the big one being paint (at some point), but for now it's in a place where I can pop to the shops and use it as a weekend toy.

That looks great just as is...there's something 'special' about a crusty looking Defender/Series :cool:
 
I agree, part of me wants to leave it like that. I'll see how I feel when I get more of the little jobs done over the winter, but there's certainly no rush to paint it.
 
@WoodyO , I have a friend who has 3x on the road Series LR's. All are in varying states of disrepair with crusty look, but all are fit & healthy and MOT'd. They are each such fabulous things with enormous character!
 
I am the same, while I may be taking the mechanical rebuild to new standards and will make sure the bodywork and interior are sorted I am not bothered about bashes and paintwork. It will still look like an old landrover outside even it if hopefully drives like new.
Making it all shiny takes away the history and makes you scared of using it
 
Nice an clean underneath, at least for now. Currently no plans to Waxoyl, but might do the axles.

New floor is holding up well, despite only having cross supports, not the long ones.


I spent a good bit of time over a weekend making a new loom from scratch, so I could add relays, extra loom for heated seats etc. It also let me get rid of all of the old brittle wiring and run the new loom through conduit and junction boxes.

New headlight units and lamps all round. Headlights are ran through a relay for on/off, then another switching relay for full beam.


New doors on from Paintman Panels, great fit and seem well made. A bit of a struggle getting the door gaps right, but got close enough eventually. Went for the optional anti burst locks, big improvement.

Without having a shoulder bar for high level seat belts, I've fitted lap belts with rhe receiver in the door side because the inertia reel is too big for the gap.

Also new galv. inner mud arches from YRM, fitted with some packing Washers to allow then to drain between the footwells and arched.


Temporary seats fitted whilst mine are at the upholsterer getting retrimmed and heated seat elements fitted. The top part of the dash is also getting redone, so until that's back the clocks are temporarily fitted with some variable geometry quick release mounts (cable ties).

Rubber buffers for pedal stops and some bent washers and springs for returns. Whilst I'm trying to stay true to the original styling where possible, I'm happy to rework some things to save money.

New ignition switch fitted to the original barrel, wiring waiting to be tidied up when the dash is back on.


New bracket for holding the additional spare to the bonnet. Because they're wolf wheels, the original S shaped brackets and bolts didn't fit, I'm guessing the offset is different.

New loom in the engine bay, relays located above the drivers wheel arch to hopefully stay dry and clean.

New fuse box on the bulkhead, powered by an ignition live relay. Additional relays and fuses for glow plugs etc. Everything runs through the main isolator on the bulkhead with a removable switch.

My attempt to improve the heater fan, which I saw suggested on here previously. I've done away with the snail blower and fitted a 12v bilge blower on the wing, which will collect air engine side of the radiator, hopefully with some sort of ram air effect.

Even without the blower plumbed in and the door tops off, the cab does get warm.


Back
Top