jai_landrover
Well-Known Member
- Posts
- 13,408
- Location
- Luton
A Rough Guide: How to Remove and Replace a Salisbury Differential.
First off.
Undo the Drive flange member bolts x 5 and extract both half shafts.
Undo the drain bung and drain the old diff oil into a tray and dispose of.
Jack your Landy up enough to let the axle hang freely and support the chassis using 2 high axle stands in a safe manner. (Do not put axle stands under the axle.)
Once your Landy is supported and safe for working on you can tackle the diff pan.
Undo all the 17mm bolts that secure the diff pan to the diff housing. It should then look like this:
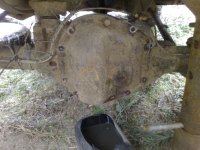
When all of the bolts are removed you need to prise the diff pan from the housing. This can take some time to break the seal always making sure not to damage the pan or the housing surface.
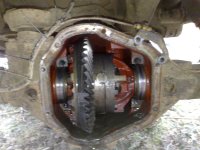
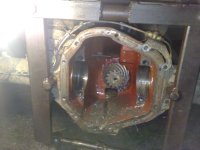
When its off you should see the diff:
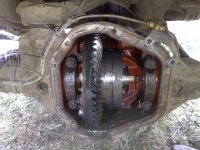
Now undo the bearing caps and release the pressure on all four bolts before removing either of the caps. Note which bearing cap is for the off side and near side they must go back exactly as they were taken off.
Now its time to spread the axle casing slightly to release the pressure on the bearings,
Clean out the holes in the axle thoroughly and hammer the tool in place.
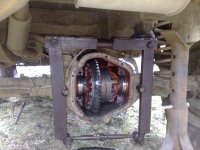
Once you are satisfied that the tool is inserted correctly take up the slack by hand until you feel pressure on the tool. Then you can start to spread the axle one flat at a time do not overstretch the Axle. Mine took 5 flats to give me enough to gently leaver out the diff Assembly. Warning this Diff is extremely heavy! The bearing runners will also want to go flying so make sure you catch them and note which is LH side and RH side. As soon as your diff is extracted release the tension on the spreader.
You should have something like this:
Re assembly is much the reversal of disassembly,
Here it goes,
First I put some old cloth in the axle tubes either side of the banjo and over the pinion, I then used a Stanley blade to scrape and clean the banjo - diff pan, mating face. Take your time here and make sure it’s spotless for any stubborn areas get it clean with a wire brush. Take out all the cloth from the axle tube and make sure it is all removed wipe all the oil and residue from the banjo out through the drain bung. Brush in a bit of degreaser and get the banjo spotless. Also wipe the threads out in the drain bung. Next I cleaned up my diff pan using a wire brush and degreaser. Clean up all the bolts with a wire brush and degreaser make sure you get the threads clean and free of the old loctite. I also degreased the bearing caps and bearing runners keeping note of their exact location and orientation.
Once everything is clean you are ready to re assemble things.
Place the spreader in its locating holes securely and take up the slack by hand. Then tension the axle casing the same amount of flats that it took earlier to release the preloading.
Now the casing is spread the next tasks must be done quite briskly but don’t rush anything.
Get a small amount of EP80/90 and place some in the banjo where the bearings would locate. Also coat the bearings and their runners place the runners on their bearings and lift the diff assy up to the banjo keeping pressure on the diff while reaching for a soft mallet. Be certain that the bearing runners are square and are not cocked out of align before gently tapping either side of the diff assy a bit at a time to get the diff assy in square always holding it in until you are sure it has gone home fully at both ends.
Coat the bearing caps with oil and place them on and tighten the bolts finger tight only.
Try to rotate the diff by hand (make sure the handbrake is off and out of gear) it should rotate with not much effort but bear in mind you are turning the prop shaft so there will be some resistance. If it is really tight there is a problem. Once you are happy that it is in. Remove the spreader and try to rotate the diff again. It should be slightly harder to turn but not much more effort.
Next this must be done quite quickly and swiftly: Remove one bolt at a time from the bearing caps apply loctite and do up finger tight until all four have been loctited then you need to torque them up to (I think 100Lbs Ft I did mine to 120Lbs Ft) changing to a different bolt and turning each bolt a flat at a time the same method as you would if you doing a cylinder head. Once all bolts are up to the desired torque try rotating the diff assy again it should be slightly harder to turn than before but not impossible.
Now it is time to replace the diff pan. Make sure the mating faces of the pan and diff housing are free of oil wipe off and degrease with a cloth the mating faces. You can fit a gasket now or I used RTV silicone sealant. Replace a few bolts to locate the pan and loctite all bolts and torque to the correct torque settings. Leave for silicone to cure and replace drain bung. Refit the half shafts and silicone the drive members and torque up the drive member bolts, once the silicone has cured you can fill the diff with EP80 or EP90 replace filler bung and Jobs a Goodun.
Hope this is of help to some people. Any queries or problems please get in touch. Jai.
First off.
Undo the Drive flange member bolts x 5 and extract both half shafts.
Undo the drain bung and drain the old diff oil into a tray and dispose of.
Jack your Landy up enough to let the axle hang freely and support the chassis using 2 high axle stands in a safe manner. (Do not put axle stands under the axle.)
Once your Landy is supported and safe for working on you can tackle the diff pan.
Undo all the 17mm bolts that secure the diff pan to the diff housing. It should then look like this:

When all of the bolts are removed you need to prise the diff pan from the housing. This can take some time to break the seal always making sure not to damage the pan or the housing surface.
When its off you should see the diff:

Now undo the bearing caps and release the pressure on all four bolts before removing either of the caps. Note which bearing cap is for the off side and near side they must go back exactly as they were taken off.

Now its time to spread the axle casing slightly to release the pressure on the bearings,
Clean out the holes in the axle thoroughly and hammer the tool in place.

Once you are satisfied that the tool is inserted correctly take up the slack by hand until you feel pressure on the tool. Then you can start to spread the axle one flat at a time do not overstretch the Axle. Mine took 5 flats to give me enough to gently leaver out the diff Assembly. Warning this Diff is extremely heavy! The bearing runners will also want to go flying so make sure you catch them and note which is LH side and RH side. As soon as your diff is extracted release the tension on the spreader.
You should have something like this:

Re assembly is much the reversal of disassembly,
Here it goes,
First I put some old cloth in the axle tubes either side of the banjo and over the pinion, I then used a Stanley blade to scrape and clean the banjo - diff pan, mating face. Take your time here and make sure it’s spotless for any stubborn areas get it clean with a wire brush. Take out all the cloth from the axle tube and make sure it is all removed wipe all the oil and residue from the banjo out through the drain bung. Brush in a bit of degreaser and get the banjo spotless. Also wipe the threads out in the drain bung. Next I cleaned up my diff pan using a wire brush and degreaser. Clean up all the bolts with a wire brush and degreaser make sure you get the threads clean and free of the old loctite. I also degreased the bearing caps and bearing runners keeping note of their exact location and orientation.
Once everything is clean you are ready to re assemble things.
Place the spreader in its locating holes securely and take up the slack by hand. Then tension the axle casing the same amount of flats that it took earlier to release the preloading.
Now the casing is spread the next tasks must be done quite briskly but don’t rush anything.
Get a small amount of EP80/90 and place some in the banjo where the bearings would locate. Also coat the bearings and their runners place the runners on their bearings and lift the diff assy up to the banjo keeping pressure on the diff while reaching for a soft mallet. Be certain that the bearing runners are square and are not cocked out of align before gently tapping either side of the diff assy a bit at a time to get the diff assy in square always holding it in until you are sure it has gone home fully at both ends.
Coat the bearing caps with oil and place them on and tighten the bolts finger tight only.
Try to rotate the diff by hand (make sure the handbrake is off and out of gear) it should rotate with not much effort but bear in mind you are turning the prop shaft so there will be some resistance. If it is really tight there is a problem. Once you are happy that it is in. Remove the spreader and try to rotate the diff again. It should be slightly harder to turn but not much more effort.
Next this must be done quite quickly and swiftly: Remove one bolt at a time from the bearing caps apply loctite and do up finger tight until all four have been loctited then you need to torque them up to (I think 100Lbs Ft I did mine to 120Lbs Ft) changing to a different bolt and turning each bolt a flat at a time the same method as you would if you doing a cylinder head. Once all bolts are up to the desired torque try rotating the diff assy again it should be slightly harder to turn than before but not impossible.
Now it is time to replace the diff pan. Make sure the mating faces of the pan and diff housing are free of oil wipe off and degrease with a cloth the mating faces. You can fit a gasket now or I used RTV silicone sealant. Replace a few bolts to locate the pan and loctite all bolts and torque to the correct torque settings. Leave for silicone to cure and replace drain bung. Refit the half shafts and silicone the drive members and torque up the drive member bolts, once the silicone has cured you can fill the diff with EP80 or EP90 replace filler bung and Jobs a Goodun.
Hope this is of help to some people. Any queries or problems please get in touch. Jai.
Last edited: