S3 109 Safari project......

This site contains affiliate links for which LandyZone may be compensated if you make a purchase.
Thought I would pick up the doors and rear tub today. Managed to get my mate with a breakdown truck to sit it on the loadbed on some old tyres. Thankfully it all arrived undamaged! You will see that I had it undersealed with a tintable product which should keep it good for a few years now hopefully!
BF32F980-6D25-4448-B293-66831863EA32.jpeg
C8A75233-B8E7-4862-8951-D61AB9A91ABF.jpeg
EFCC166B-2B23-4BB2-BFCB-DD051EBC29B8.jpeg
B37C4696-02FB-4FCC-987D-A43A6DD4E829.jpeg
2C9344BA-DD54-4885-91E5-47BF113FA86F.jpeg
4D6AA8F2-AE4E-4620-9F47-A7BBE7D4A65C.jpeg
0FC43226-3099-4482-B23E-C392D4E9DA4F.jpeg
 
Thanks. I used a local paint shop that I’ve been using for years. They always turn out good work. It does look a bit like a bit was missed, but it is definitely all painted!:eek:
 
I thought that I would put the rear tub cappings and other brackets on today, just to get them off the workshop floor as they were cluttering up the area. It does also give me a bit of a push to get moving with the rest! I decided to use dum dum strip on the edge of the corner capping to ensure I eliminate any chance of leaks.
 

Attachments

  • 36F5D323-C6CE-44CF-BCFC-1ED8A5B22F88.jpeg
    36F5D323-C6CE-44CF-BCFC-1ED8A5B22F88.jpeg
    396.4 KB · Views: 84
  • 5BEF06C3-D54A-4F03-92A2-BC783543077B.jpeg
    5BEF06C3-D54A-4F03-92A2-BC783543077B.jpeg
    247.2 KB · Views: 121
  • 97E99210-7366-4E0F-9138-A0BC10E05C51.jpeg
    97E99210-7366-4E0F-9138-A0BC10E05C51.jpeg
    272.9 KB · Views: 78
  • A403D3EF-E8AC-44CD-AD64-5A49EF8185C4.jpeg
    A403D3EF-E8AC-44CD-AD64-5A49EF8185C4.jpeg
    256.2 KB · Views: 105
Last edited:
481738A0-0143-4470-B60A-CB9AF9B91750.jpeg
Before bolting down the tub, I ran an earth wire from the fuel sender unit to the chassis and fitted the fuel inlet hoses. Then I cut some old inner tube to make gaskets to insulate the alloy body from the rear crossmember. Cheap and effective ;)
 
While I was on a roll, I fitted the second row seat brackets. I don’t know what it is with galvanisers now, but the quality of work really isn’t great. I have had to grind back snots of zinc on just about every part,
025B35FF-918F-489E-88E8-F4941D07C044.jpeg
otherwise the parts don’t fit properly. I decided to leave the galvanised finish rather than paint them as I think it suits it better.
 
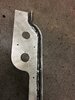
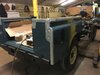
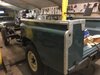
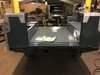
Quick update today….after looking at the bulkhead sulking in the corner I thought it would be worthwhile bolting it on and fitting the bulkhead brackets on it. This will get it onto a secure place to build it up, so that will be the next task! Feeling like I’m getting somewhere now.
E24EE1E4-B887-40FA-80FE-DC2301A732EE.jpeg
3D3ACF29-B531-429E-901E-66B7ACFCD5E1.jpeg
B5C687E5-3F7B-46D1-B7DB-2DF1DAA43717.jpeg
:D
 
I started back on the bulkhead today by cleaning the fly screens and giving them a spray with silver just to smarten them up a bit. Once the paint dried I riveted them on. I bought some black purflex 40 from toolstation and stuck the new vent seals on. Nice to be assembling new bits rather than fighting rust and decay! :D
5EAFD4A4-A9D2-44B2-A1A9-9831FC0D790A.jpeg
1F71658C-FEA9-424D-B5AE-6FEF3659C48A.jpeg
 
5C14A2F9-C3BE-4B49-A580-6E7B7E2BDA85.jpeg
02082BC2-A945-4AC3-9383-4B673BF8BB54.jpeg
1123BD54-DE5F-4510-B1C0-C2B52475F469.jpeg
924BCE36-DA41-4590-9384-8BEAA4531272.jpeg
C94140B4-5E8B-4CFD-B1BA-D3D58F6F9676.jpeg
After fitting the seals I moved onto finishing bolting down the tub. I checked the distance from the chassis mounting points that I fabricated ages ago and there was around 1mm on one side and 2mm on the other. Not too bad by Landrover standards! I checked the prices of body shims and they seemed quite expensive for what they are, so I thought I would try to make some. Starting with some duralumin I marked round a spare shim onto some masking tape. I drilled the holes first then slotted the holes with a cutting disc, then cut them out. After filing the swarf of they were fairly presentable. Fine for spacers that will never be seen ;)
 
I decided to move onto fitting up the fuel filler pipe. I bought a new rubber hose to the tank so fitted that first sliding it down the tank neck to give some space to install the metal filler pipe. After finding suitable bolts and nuts, it was a bit of a faff to tighten up. I topped it off with a new diesel sign and a nos cap. It seems a bit ironic that I am fitting this and half the body is still missing!
1BF2AA20-AB8F-44F1-AEF0-B76A62EAACDD.jpeg
 
B8030594-4EA5-41C2-B799-A5F9D55AAE0C.jpeg
283A3C30-7601-4029-ABF3-E7C99E7032BF.jpeg
The next job I thought I would tackle is the steering column. As I’m using an early 110 column I bought all the brackets with it to make sure I had all the components to hand. I stripped it down, cleaned off the rust on a bench wire wheel. One cleaned off I applied the usual Kurust and primer then a good coat of satin black. Looks pretty decent now :)
 
Last edited:
2465956D-D99B-4AB5-946A-D30BD5337F74.jpeg
CBF28C6F-A169-4ECB-98E8-99CA943F79F5.jpeg
I trial fitted the lower column support bracket but it seems that the footwell doesn’t have the correct holes. Much as I dislike drilling new paint, I pitched in and drilled some additional holes to ensure the bracket is in the right place.
 
Last edited:
D95053BE-A5F4-4518-9A45-42E4B1330BD6.jpeg
8FD1DE70-E971-4863-89BC-087C670A1A1A.jpeg
To top off the bracket mods I thought I would fit the blanking plate, but as you can see it was in awful condition. I decided to make one to replace the original. As the gasket was shot too, I make a new one from rubber inner tube. Once riveted on it looks much more presentable. I hope to get the column in next time with all the brackets fitted and aligned. Fingers crossed that it all fits :D
 
My plan was to assemble the steering column loosely to get it aligned to the steering box. Unfortunately the two riv nuts in the bulkhead didn’t play ball, so those will have to be replaced. I tried to get them to lock without turning in the hole but they were not having it. Need to order some replacements, fit them and put the column back in.
25E3AAFE-1139-4302-91D0-664AAAC20E8B.jpeg
 
While I wait for the riv-nuts to be delivered, I moved to the other side of the bulkhead. The original wiper motor was missing, but I picked up a replacement when I bought the bulkhead. I stripped the wiper boxes and took the spindles out, cleaned off all the old grease which had gone hard and packed with new. This allowed them to turn much more freely. I fitted the whole assembly, using the old bulkhead as a guide, as I had forgotten where everything went! :D. Following on, I fitted the washer jets, tubing and clips. Buoyed up by this initial success, I fitted all the nutserts into the holes in the bulkhead ready for the dash assembly to go back in. That’s a job for next week :)
7EAB6CD3-3D68-44D7-9EF4-4DAE12D5EEA9.jpeg
5DA32C12-FD48-455D-AB64-D037AEEAFE67.jpeg
445889E9-5177-41B3-A36E-7DE715700D3C.jpeg
 
Back
Top