BikerB
Well-Known Member
- Posts
- 7,029
- Location
- Far up North
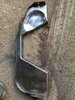
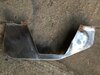
I threw the bracket away for my PWDA valve when I cut up the chassis, there is always something!Thought I would mount the PWDA valve, but as mine never had it from new, I didn’t have a bracket or the location for it on the chassis. After trolling through dozens of websites, I thought I would just make my own. There is also a load of info and discussion on which way round it goes, but it’s as simple as the 7/16” ports go to the front brakes and the 3/16”go to the rear. Mine is a five port version, so I will split two lines to the front and one to the rear. Just need to order up the unions…. View attachment 255926
View attachment 255927
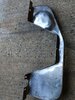
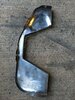
I had pictures of where it went and had to make a new one like you did. As far as the pipes are concerned there is no right way from the parts book so I ran the front to a splitter on the front crossmember and blanked off the spare port in the PWDA with a plug. Mine originally had two separate lines from the PWDA to the front but it looked quite untidy, one pipe looks neater and needs less pipe.
")