You are using an out of date browser. It may not display this or other websites correctly.
You should upgrade or use an alternative browser.
You should upgrade or use an alternative browser.
Remove dials of dashboard???
- Thread starter stefan063
- Start date
This site contains affiliate links for which LandyZone may be compensated if you make a purchase.
- Posts
- 16,482
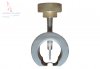
If it follows any logical pattern, you may need a needle puller to remove the needles from the shafts.....
A needle puller is like a tiny hub puller, a thin central pin and 2-3 legs to hold the needle, you turn the centre screw which pushed the pin down and pulls the needle off the shaft.....
We use them at work to calibrate dial gauges etc for the test and inspection gear.
A needle puller is like a tiny hub puller, a thin central pin and 2-3 legs to hold the needle, you turn the centre screw which pushed the pin down and pulls the needle off the shaft.....
We use them at work to calibrate dial gauges etc for the test and inspection gear.
Alan C
Active Member
- Posts
- 263
- Location
- Hatfield, Hertfordshire, UK
I think Stefan is refering to removing the instrument binicle from the dash? Check Rave for the instructions.
2.0_hippo
Well-Known Member
- Posts
- 6,069
- Location
- Hertfordshire
i wouldnt even dream of messing with the dials on mine ! have heard too many horror storys !
would rather pay the extra to get it done professionally.
would rather pay the extra to get it done professionally.
If it follows any logical pattern, you may need a needle puller to remove the needles from the shafts.....
A needle puller is like a tiny hub puller, a thin central pin and 2-3 legs to hold the needle, you turn the centre screw which pushed the pin down and pulls the needle off the shaft.....
We use them at work to calibrate dial gauges etc for the test and inspection gear.
Yes... This is what I need! Only I don't know how this thing look like! Can you post a picture or something? Would be grateful!!!

- Posts
- 16,482
- Posts
- 58,170
- Location
- Preston Lancs.
Yes... This is what I need! Only I don't know how this thing look like! Can you post a picture or something? Would be grateful!!!
Surely you don't need to remove needles to put back light bulbs in LCD?
- Posts
- 58,170
- Location
- Preston Lancs.
I don't need to put light back I need to fix my LCD in the dash! Thank you for the tool will try to find it over internet! And will let you know...
Usual reason for LCD not being visable is backlight bulbs blown. Not a fault with the LCD itself. You maybe going to ruin a instrument panel for the price of a 50 pence bulb.
Last edited:
Alan C
Active Member
- Posts
- 263
- Location
- Hatfield, Hertfordshire, UK
L322's suffer from pixelated faulty dash displays which entail a complete instrument cluster strip down to repair. Known fault on the 2002 on Range Rovers.
Surely you don't need to remove needles to put back light bulbs in LCD?
Actually, you don't have to remove the needles at all, even to repair the LCD. Check RRspeedo.com. They have a very reasonably priced repair kit and instructions. I've just completed this on an L322. Wasn't too easy, but worked out fine. Of course, now I do have to fix one needle because the goofball that tried it before me mucked things up pretty good. If anyone reading this is on my side of the pond and needs this done, PM me. I'm in NE Ohio, USA.
John
Last edited:
wil2813
Well-Known Member
- Posts
- 2,324
hi nice introduction:nopics:Actually, you don't have to remove the needles at all, even to repair the LCD. Check RRspeedo.com. They have a very reasonably priced repair kit and instructions. I've just completed this on an L322. Wasn't too easy, but worked out fine. Of course, now I do have to remove one needle because the goofball that tried it before me mucked things up pretty good. If anyone reading this is on my side of the pond and needs this done, PM me. I'm in NE Ohio, USA.
John
hi nice introduction:nopics:
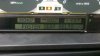
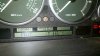
Hi wil2813. I'm not sure if your post was meant with sarcasm or not. I'm sorry if I'm out of line. The procedure involves gently pulling back the speedo fascia a bit to drill 4 holes behind it for access to the screws that hold the LCD in place. I didn't take pics b/c I was following the photos in the instructions, which I believe are copyrighted. It hadn't occurred to me to take my own photos during the repair. Here is a pic of the result, for what it's worth. You can see a bit of the drilled area between the speedo and tach faces. Only two of the 4 holes actually require moving the fascia:
John
Attachments
Last edited:
wil2813
Well-Known Member
- Posts
- 2,324
thankyou john and welcomeHi wil2813. I'm not sure if your post was meant with sarcasm or not. I'm sorry if I'm out of line. The procedure involves gently pulling back the speedo fascia a bit to drill 4 holes behind it for access to the screws that hold the LCD in place. I didn't take pics b/c I was following the photos in the instructions, which I believe are copyrighted. It hadn't occurred to me to take my own photos during the repair. Here is a pic of the result, for what it's worth. You can see a bit of the drilled area between the speedo and tach faces. Only two of the 4 holes actually require moving the fascia:
John
Datatek
Well-Known Member
- Posts
- 46,602
- Location
- Near Poitiers SW France
If you remove the instrument needles, you will need to have kit to calibrate the instruments when you re-fit the needles.
Similar threads
- Replies
- 42
- Views
- 5K