Rear inner sill body mount has come adrift

This site contains affiliate links for which LandyZone may be compensated if you make a purchase.
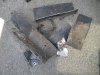
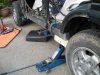
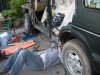
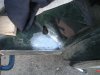
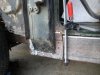
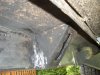
Wiv Daft's help, got the new sill in place, new rear mount welded on, and a hole in the floor fixed!

Plenty more welding to do to get it fixed, but already looking a whole lot better.

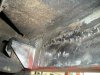
Pics include definite proof that Daft has been known to sleep under Landys :D
 

Attachments

  • DSCN0747.JPG
    DSCN0747.JPG
    311.7 KB · Views: 525
  • DSCN0749.JPG
    DSCN0749.JPG
    328.9 KB · Views: 562
  • DSCN0750.JPG
    DSCN0750.JPG
    316.1 KB · Views: 593
  • DSCN0751.JPG
    DSCN0751.JPG
    301.5 KB · Views: 560
  • DSCN0752.JPG
    DSCN0752.JPG
    298 KB · Views: 594
"Yu could have covered my Tum"

I fort your female fanbase on LZ would appreciate a glimpse of the "real" MHM :D :D :D

Liking the bolt access hole, was it easy to drill?
No probs with a hole cutter :)

I was hoping not to, but the mount had shifted enough that the bolt couldn't be wiggled past the bodywork.

When everything is back, I'll have to patch the hole though, otherwise that'll be another source of rot :eek:
 
Last edited:
Done a quick search, but can't see a consistently positive suggestion for undersealling.

Obviously Waxoyl provides some protection, but I was wondering about using bitumen paint such as used on boats for the underneath of my new sills?

Obviously these areas are subjected to all kinds of damp/salt/rock etc abuse, so wanted to give them a reasonable level of protection over and above a thin layer of Waxoyl... views anyone?
 
Welded the bottom of the A and B posts. Ground it down and it looks pretty average to be honest. This welding lark is bleedin hard :mad: Feels like I need another 5 years of practice!

Not looking forward to the welding-under-the-car bits... That's Friday's job I suspect.
 
pikkeeeeeez!

if it dont look too pretty. grind it flat to orig metal and just go over it again.

Tis my intent, though some of the thinner metal is gorn :( so I'll have to be a bit more careful with the new welds :eek:

I also need to lower my standards regarding what looks pretty...I have done with everything else :D

(Mmmm that's me struck off Mrs Sniff's cake list) :behindsofa:
 
Welded the inner mount today and will tidy up Monday. Looking forward to assembling the interior and then getting the Landy back on the road.

Oh, and then I need to do the other side :)
 
The welding comes with practice. I almost gave up and then - bing!

It's well worth it, I've save hunerts already. My earlier attempts were laughed at by the mot guy but he said they were well strong enough.
 
So front mount and support welded to the new sills. Seam sealant and primer applied.

First coat of paint on, now have to wait for that to go off before finishing the painting.

Lessons learnt:
1) Welding is hard, but when it works it is (a) obvious and (b) quite tidy :)
2) Welding off the car is easier
3) Never assume stuff will line up
4) I'm not a fan of welding but thinking about the money I'm saving makes me happy :banana:


...
5) Did I mention about the welding? :D :D :D

One side done then. Just got to reassemble the passenger side interior and plan the other side... :eek:
 
Great thread. Your an inspiration to us all....:)
Why thank you :eek:

LZ has been the inspiration for me to have the courage to have a go. Plenty of people who have been-there-done-that-got-the-tee-shirt and happy to offer helpful advice.

I've learnt from other people's threads too, so nice to give a bit back.

Learnt from one side, so ready to crack on with the other!

Finally some examples of what birdshi*t welding looks like :p
 

Attachments

  • DSCN0754.JPG
    DSCN0754.JPG
    317.2 KB · Views: 580
  • DSCN0753.JPG
    DSCN0753.JPG
    320 KB · Views: 1,404
Back
Top