Project Rusty.

This site contains affiliate links for which LandyZone may be compensated if you make a purchase.
Meee toooo!!

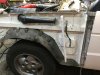
I got rear quarter on today and through two waterproof jackets lol. I have nasty panel gap though :oops:

If I had a day like that with 2 changes of jackets then this thing, for as near as it is to finished as it is, would be going away to become a washing machine or tin cans!!!

I hope Monday is kind with the weather, if it's not then no drama. just do it when it's dry over the next 2 weeks of holidays.

I was just looking at some of my other make work projects that need to be sorted out while I am on my holidays, going to be a busy time and I hope the turkey dinner isn't cold by the time I get done lol :)

Back on the road being the first challenge, but then the on board air, the reversing lamps, the front driving lamps, side flood lamps and so the list goes on :oops:
 
Shame about your MOT fail but at least you know your man looked properly

Yeah but it's a blow :(

It’s perfect here and I’m bastard cleaning and then hitting the road. Have a good day on it

Cleaning? My word how domesticated you are these days lol, I was going to get the cleaning lady from round the corner to come round tomorrow while I am away and go right through the place but inconsiderately she's gone on a cruise for Christmas and won't be back until after Boxing day :mad:

I got time though, nearly done the floor, had a couple of chores and found the fuel tank sender cover plate an quickly gave that a buff over with the flap disc an a coat of primer, hope to get top coat on it tonight, an some other bits painted too.

I did the side repeater l lamps and the poxy drivers side one just isn't working??? New lamp in the passenger side and it was golden, drivers side and nothing, the lamp was blown so not sure about it??? Could just chop it for now and pinch a feed off the front to get it through an then do it properly post pass? Got the new brake light switch to fit still but that won't take long (I wish, nothing goes quick on this bloody thing lol) then maybe re-test Monday?
 
Do it proper. Yu know yu will fret if it isn’t done right.

I know, and I did :)

Starts a bending her back in place, slowly as some pillock cut a bit too far into the floor pan :rolleyes:

IMG_20191221_125130.jpg


Few tacks here and there to enable full manipulation.

IMG_20191221_130848.jpg


Seam weld all the way round :)

IMG_20191221_141709.jpg


Jump in with the grinding wheel and flat it out a bit, ain't gotta be perfect, gonna be hidden by carpets again soon enough and then slap some Primer and top coats on it to smarten it up.

IMG_20191221_144414.jpg


IMG_20191221_151903.jpg


While I had the paint in me hands I quickly grabbed the fuel tank sender cover plate for the boot floor and set about that.

IMG_20191221_112845.jpg


Flap disc on and took the scabbiness off it and a few slaps with the mallet brought it back to rough shape.

Primed and ready for top coat, it got that but no photo for now, it's dark and rainy out there now dont'cha know lol :D

IMG_20191221_113558.jpg


Just needs me some 6mm square plastic nut things for the boot floor and then that can go back on.

While I had the top coat out I blathered that cross member end piece on the outside as well, easy to get to, the inside can be done when I go under to put the top coat over the underside of the welds.

IMG_20191221_151917.jpg


Side repeaters, ho hum.......

IMG_20191221_151944.jpg


So the drivers side is the pain in the hole here :(

IMG_20191221_152001.jpg


Will be investigating further as I delve under the dash for that brake light switch fitting.

Oh look, a brake light switch that needs fitting......

IMG_20191221_152044.jpg


Going to be a while........

IMG_20191221_152053.jpg


Oh well, keeps me out the pub I suppose.
 
Oh, and I need a name for a plumbing part that you’ll know if you could please. Where the drain hole is for the the scuttle panel (the one that spills all over the inner wing :rolleyes:) I want a plug and hose. The plug would be in two pieces so that it can sandwich the wing between it. I then want to route a hose from it. What’s one of those called!?

I used some plastic overflow pipe brought from tool station, the hole in the scuttle only need slightly opening up then bonded in with tiger seal ,it will drain out through the plastic wheel arch protector,
 

Attachments

  • 5558DF8B-47A5-4578-833D-D8E109FAE988.jpeg
    5558DF8B-47A5-4578-833D-D8E109FAE988.jpeg
    257.7 KB · Views: 119
Brilliant dd. It’s funny, we have both been using same primers with no discussion on it. We clearly just got what was the best the local shop had. Mines been no nonsense and rustins. I think that no nonsense is actually pretty good! You brush on once then it goes bit tacky give another brush and it sticks so well. I’m onto the rustins now.
Europa, thank you - was weird after I asked about it I saw you post in the disco thread and thought he’s had same thoughts!! Cheers
 
So a massive thank you to @The Mad Hat Man tonight for the loan of something else I broked whilst tinkering :oops: :eek: Enjoy the booze and the chocs ;)

Already been de-greased and buffed up with a small wire wheel on my dremmel :)

IMG_20191223_200538.jpg


IMG_20191223_210808.jpg


All will be revealed.......

So I got the brake light switch fitted, what a ball ache that is, you have to be a contortion artist to get under there and wield a spanner too lol

IMG_20191223_121112.jpg


Got the driver side indicator working, ball ache that was, had full 12V at the lamp holder and it seems the nice new Phillips capless lamps are just garbage and need to source some better ones for the future, but it verks!!!

Then slapped some top coat over the primer that was wet last time I tinkered, all done now and happy.

Emissions were hooky last time at the MOT so thought I ought get the fuel filter swapped out just in case it were gummed up with year old diesel.

IMG_20191223_144232.jpg


While I was in there it seemed I could quickly get that oil change done and as I was there I thought to myself "well it's only 2 bolts, take but a few minutes while that old sumpo is draining out, come on, lets get that oil thermostat changed" and hey presto, I snapped the ear off the thermostat housing cover :oops:

IMG_20191223_134720.jpg


IMG_20191223_134731.jpg


Spring, washer and the thermostat.

IMG_20191223_135048.jpg


Fitted the new O-ring and as I was nipping it all up it just didn't nip up as it ought and I thought "just a bit more and it's fine" voila sir, crunch and one ear snapped off :rolleyes:

IMG_20191223_143136.jpg


Got the new oil filter fitted though and a bit of paper towel stuffed in the hole.

IMG_20191223_144245.jpg


When I got the new filters it seemed a good idea to get a new sump plug washer, this is some sort of single use crush washer, unlike the old flat copper washer that can be annealed and reused this will be chucked and a new one fitted each time.

IMG_20191223_145103.jpg


So tomorrow I will be fitting the new bits and making sure that I warm the O-ring before I fit the cover and get it all back together.

These things are sent to try us.............
 
Back
Top