Series 3 Progress! time lapse sequence

This site contains affiliate links for which LandyZone may be compensated if you make a purchase.

7Oaks

Member
Posts
53
Location
Sevenoaks, Kent
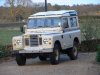
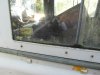
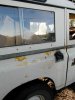
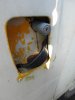
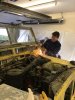
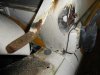
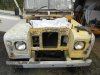
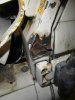
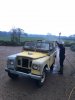
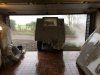
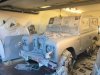
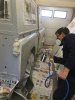
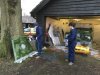
I've been repainting my SIII 88 CSW. It took a couple of weeks to deal with the bits of rust on the bulkhead and remove the old paint. Yesterday I finally applied the first coat of top-coat. Attached is a link to a time-lapse sequence which shows the transformation. Still a lot to do but finally feels like progress!
Link to Flickr.
 
I have same model and would like to respray. Need a workshop. Keep the posts coming. Interested in total hours from start to finish. Do you have an original safari top? Looks great.
 
John, I do have a Safari roof but it had to come off to get it into the garage. I bought a "marquee" on ebay intending to do the work outdoors last summer. But I found the thing was so flimsy it blew about in a gentle breeze. So I had to have a rethink and instead lined the inside of my garage with the sides of the marquee to protect the bicycles and other stuff around the edge of the garage from overspray.

I will do a more systematic series of posts on the way everything worked out, with pictures, but in summary it took me about six months after buying the SIII as a non-runner to get it back on the road and MOT'd. Then I enjoyed running it in it's rat-look for a couple of years before finally getting down to the bodywork on Boxing day, working reasonably full days for the next two weeks. I am lucky to have a good base - a galvanised chassis and a pretty good bulkhead. Otherwise the preparation time could have been much longer. The first week consisted of tearing out the rusty / mossy window channels and fixing the rust holes in the door frames and bulkhead. The second week consisted of sanding off all of the top layer of paint to get back down to the original primer (and some bare metal) and then applying two coats of primer. In all about 84 hours. For most of this time I was helped by a friend, so in all 168 man hours. Then I had to return to my day job until I managed to get back into the garage this Saturday.

I am sure winter is not a sensible time to start a project like this but I just thought I should go for it as I found it very difficult to find a time when I could get off work and find someone to give me a hand during the summer months. But on the whole I've been lucky the temperature hasn't gone tooo low. It was 12 C. on Saturday when doing the first top-coat.
 
Time to add a few more photographs and some details which I hope will be of some use to others. Bear in mind that I have had to make it up as I went along (with a lot of help from this forum) as I am a complete beginner. It's likely that I've done things which shouldn't be repeated. I'm happy for those who know a bit, to point these mistakes out - after all the whole point of this forum is that we learn from each other. So I'll try not to get in a huff if somebody things it is all wrong.

So here goes:

Before – from a distance she didn’t look too bad but on closer inspection the fact that the paint came off in big sheets when jet washed made her look speckled and the window channels were virtually non existant with the windows only held in by the moss garden. (Just tried uploading my pictures but I think they are too big to load - I will try to shrink them)
 
OK - trying again now with the photos resized.
 

Attachments

  • before 1 (1).jpg
    before 1 (1).jpg
    229.4 KB · Views: 129
  • moss garden (1).jpg
    moss garden (1).jpg
    165 KB · Views: 140
  • patchy paint (1).jpg
    patchy paint (1).jpg
    147.5 KB · Views: 171
  • patchy paint 2 (1).jpg
    patchy paint 2 (1).jpg
    110.7 KB · Views: 128
Rust – used a wire brush to remove rust from some relatively small areas of the bulkhead. Then the top layer of paint had to come off – using a £5.59 “surface preparation wheel” from Screwfix (link) – incredibly effective and only went through 3 of them to do the whole vehicle.
 

Attachments

  • bulkhead repair.jpeg
    bulkhead repair.jpeg
    413.9 KB · Views: 139
  • bulkhead rust (1).jpg
    bulkhead rust (1).jpg
    189.4 KB · Views: 124
  • paint removal 1 (1).jpg
    paint removal 1 (1).jpg
    219.7 KB · Views: 137
  • bulkhead rust 2 (1).jpg
    bulkhead rust 2 (1).jpg
    189.6 KB · Views: 123
Primer – I used two 500ml aerosols of U Pol #8 etch primer (£12.99 from Halfords)(link). It would have been better if I had bought a litre pot when I bought the rest of my paint from Smith & Allen as it only costs £6.50. But when I was doing my planning before Christmas I didn’t realise how much bare metal I would expose when stripping the paint – so I just ordered Tractol enamel primer and top coat (£30 from Smith & Allen)(link). After two coats of primer I rubbed back using plenty of 1200 grit wet and dry then washed the whole thing and dried it down with a chamois before moving it back into the garage.
 

Attachments

  • hose down.jpg
    hose down.jpg
    202.5 KB · Views: 126
  • garage washed.jpg
    garage washed.jpg
    181.9 KB · Views: 123
Painting – the garage isn’t the best place to paint – cold lots of dust from woodworking projects. But I did my best to clean the place up. I used a leaf blower to drive as much dust out of the corners as possible and then mopped it all out before finally setting up for painting.

Painting was a learning experience. I’d never used a spray gun before – and had no idea what all the little adjustment screws would do or what an ideal spray pattern should look like. But practicing on the primer makes it reasonably unimportant if you get a bit of a run as these could be fixed when rubbing back and by the time I got to the top coat had got a reasonable idea about how to apply a fine mist of colour. The equipment I was using was a £24 Clarke spray gun from Machine Mart (link) which seems to be easy enough to use (once you get the hang of all the knobs – the instructions weren’t much use). My compressor is a 3HP 14CFM job which cost £270 from this lot. Seems to deliver enough air for the spray gun but not enough to drive an orbital sander that I bought second hand on ebay. I have two water traps in the airline – a big one at the compressor end and a small back-up trap attached to the spray gun.

I used Tractol enamel as it is cheap. I’ve chosen Dark Bronze Green and after ordering the paint I read that Tractol’s DBG tends to be streaky and began to regret my choice but in the event this doesn’t seem to be an issue. Perhaps because I use a big mixing whisk on a power drill to mix in the thinner before pouring it into the spray gun. The technical details sheet and other info I gleaned from the web suggested that I could build up a first coat using multiple layers of misted paint at 15 minute interval so that is what I did. I’ve no idea whether that was a good idea or not but it looks OK. There is a bit of orange peel after the first coat which I will have to rub down but I’m feeling optimistic.
 

Attachments

  • primed.jpg
    primed.jpg
    172.4 KB · Views: 166
  • primer 1st coat.jpg
    primer 1st coat.jpg
    149.7 KB · Views: 132
  • mist coat.jpg
    mist coat.jpg
    261.7 KB · Views: 130
Back
Top