You are using an out of date browser. It may not display this or other websites correctly.
You should upgrade or use an alternative browser.
You should upgrade or use an alternative browser.
p38 diesel injectors
- Thread starter Clock guy
- Start date
This site contains affiliate links for which LandyZone may be compensated if you make a purchase.
- Posts
- 58,170
- Location
- Preston Lancs.
All this gabble and no one has taken a blind bit of notice of the crack testing mentioned in post #8. It is fundamental to correct injector operation.
Grrrrrr
Technician, Bodgit & Scarper Ltd
- Posts
- 20,114
- Location
- Buckinghamshire, UK. ('95 DT)
All this gabble and no one has taken a blind bit of notice of the crack testing mentioned in post #8. It is fundamental to correct injector operation.
You're right but I guess he feels his main issue was the witch's brew that had left crap everywhere rather than the springs or pitting so it should be fine once clean. Easy enough to test the spray pattern into an old plastic bottle. If it doesn't run right then it'll require a professional refurb or just buy a new one. Guess any issues will turn up on the emissions test.
There's a nice home made crack tester here: http://www.peachparts.com/shopforum...334-how-build-diesel-injector-pop-tester.html
- Posts
- 58,170
- Location
- Preston Lancs.
You're right but I guess he feels his main issue was the witch's brew that had left crap everywhere rather than the springs or pitting so it should be fine once clean. Easy enough to test the spray pattern into an old plastic bottle. If it doesn't run right then it'll require a professional refurb or just buy a new one. Guess any issues will turn up on the emissions test.
There's a nice home made crack tester here: http://www.peachparts.com/shopforum...334-how-build-diesel-injector-pop-tester.html
Any diesel engine that has done 100,000 miles or more will have tired injectors. It is of course taken for granted that any amateur mechanic who wishes to clean and reset his own injectors will have a tester and a suitable selection of shims to set crack off pressure.

tarphenry
Well-Known Member
- Posts
- 1,540
- Location
- bury lancs
Methinks sir,you are taking the pith
tomcat59alan
Well-Known Member
- Posts
- 18,611
- Location
- wirral and triquivijate
No he is right.Methinks sir,you are taking the pith
First of all, I am ASE certified, not a dyi mechanic so less of it. Unless that time I spent at college 25 years ago was all a dream. and second, I am sending them off to be pop tested. I am just looking for a base setting for the spring tension before I send them off. I also intend to match the spray patterns of the three damaged ones to the three working ones using the FIP as a pressure and delivery source. I have left those three alone as a reference for just that purpose. I havent got that far yet in the posting as Im still waiting for the new nozzles. Perhaps I didnt make that clear so my bad. sorry.
Grrrrrr
Technician, Bodgit & Scarper Ltd
- Posts
- 20,114
- Location
- Buckinghamshire, UK. ('95 DT)
I'm a tinkerer and a bodger but it usually works out in the end.
tomcat59alan
Well-Known Member
- Posts
- 18,611
- Location
- wirral and triquivijate
You got a crack tester in your shed? What have I saidI'm a tinkerer and a bodger but it usually works out in the end.
keep it clean.Grrrrrr
Technician, Bodgit & Scarper Ltd
- Posts
- 20,114
- Location
- Buckinghamshire, UK. ('95 DT)
You got a crack tester in your shed? What have I said
Don't remember seeing one but to be honest there could be anything in there. I suspect there are lost tribes untouched by humanity since shortly after I built it.
some of the best mechanics and engineers I have worked with have never had a formal education. school can only teach you to read a book. experience teaches you to fix machines!I'm a tinkerer and a bodger but it usually works out in the end.
That said, I am grateful for all this, I just bought myself a pop tester. will be here by next week and I wont be sending off my injectors
D
I'd you ever find the torque setting for reassembly.?I may have to do mine soon. I think I have an injector leaking into the cylinder overnight. On start up it feels like the piston is hydraulicing then when it starts there is lots of smoke which clears and runs and starts fine all day.
Sorry it has taken me some time. It has been an effort to find the answer to this question as it turns out , nobody knows! I have sent an email off to Bosch to find out the answer as I dont like leaving things undone however I do have an answer for you. Please read the rest of my posting today and you will have your answer
wammers
Ty for your input. As it turns out, in this case, shimming is 90% of the time unnecessary when replacing the nozzle assembly in this type of injector. Please read the rest of my posting today and I will explain with science!(sorry forgot to click insert quote so had to name you in edit)
Ty for your input. As it turns out, in this case, shimming is 90% of the time unnecessary when replacing the nozzle assembly in this type of injector. Please read the rest of my posting today and I will explain with science!
(sorry forgot to click insert quote so had to name you in edit)
Last edited:
For those of you that have read this far and have not seen the posting that follows, please be patient it is going to take me some time to put it all down for you but it will be worth it! I will not close till I have finished. I did not intend for this thread to turn into a 'how to' and that was foolish on my part. I should have guessed that this would happen , however, I did not and I have left a great deal out that seems to have cast aspersions on the quality of my work and advice. Please allow me to correct that by starting again. What follows is 'how to' change nozzles as fitted in the Bosch injector KCA 21 S 71. I have taken great pains to be as accurate as I can, gathering information from reliable resources that are referenced in what follows. PLEASE BE AWARE! The following information applies to the above mentioned injector only! While some of the information will transfer to other injectors, there are considerations that need to be taken with other types of injectors that are not mentioned here exempli gratia the need to shim old injectors after a rebuild in order to obtain correct 'crack' pressure. Please use what follows as a guide only and always ask before you take apart a very precise and expensive component of your precious vehicle!
myfirstl322
Well-Known Member
- Posts
- 41,354
- Location
- Hoots mon...
Oh your soooo sensitive, Wammers challenges everybody, your not really that special.
Right, so here we go!
I wont go over why I am doing this, I think that's clear enough and the pics speak for themselves. Suffice it to say that I felt the need to change my nozzles in my 1997 Range Rover DSE with 119,121 miles. I wanted to go all technical and reference everything right down to who I spoke to and when but that's pushing it so I'll only reference the important bits however, I can reference the rest.
My research and efforts have led me to believe that this is something that all of you can do without worry. There is nothing scary in there! (to quote myself and I'll prove it!)
The first thing to do is get the right injector socket. It is 27 mm (thank you wammers ref this forum) It looks like this:
 the reason for the hole in the socket is for the sensor wire you will see later.
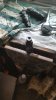
After you have removed the injectors, you will need to place them in a vice and open them. If you look at the injector, there is a section that has two flats and then there is a section that is six sided bolt type. You place the two sided flat section in a vice and use the injector socket to open the injector like so..

Be careful in how you place the injector in the vice. You should center the injector over the threaded bar in the middle of your vice to obtain the best grip and to protect your vice from damage.
Then you use the socket and a breaker bar to open the injector. You may find that one or two of the injectors refuse to open. This is caused by corrosion that is preventing the two parts from turning. This happened to me and I solved it like so....
Remove the injector from the vise and close the vise. Place the injector on the top of the jaws of the vice and tap the injector repeatedly on the flats of the six sided section turning the injector to a new side between taps. Make sure you hit it flat on the flange and don't hit it like you are Thor! Just give it a tap on each of the six sides.

The next thing to do is disassemble the injector. There are a few pieces in here and one that is specific to each injector. The shim is the one that looks like a washer, for all intents and purposes it is, however, it is a specially measured washer and must stay with the injector body that it came from in order for my claims to remain true! Only disassemble one injector at a time to prevent making a mistake that will cost you! The shim is located closest to the injector body(the bit that the fuel pipe from the FIP is attached to or the Fuel Injector Pump for the normal folks and the black leak off pipes or the cloth covered rubber hoses that run between the injectors if you prefer, and the two flats that get put in the vice as piced above) Then you have the compression spring, the needle pin,the nozzle spacer (this is the round oddly shaped one with the two holes in it on one side and a trench turned around the center on the other), the needle ( the short pointy bit), the nozzle (the shinny thick bit with three holes on one end and a very narrow hole on the other. the needle fits inside this), the heat shield ( pay attention to how this is placed in the injector) and the nozzle retainer(this is the big metal bit that forms the outside of the injector and has the 6 sided bolt section). The pic bellow shows them as they belong in order. (be advised! the 4th injector is slightly different!)

You now have taken apart your injector and it is ready for cleaning CONGRATULATIONS! The world didn't end and you are still alive. hehehee
I have no idea what the limit is so ill start a new reply. Have a cup of tea and feel proud you got this far.
I wont go over why I am doing this, I think that's clear enough and the pics speak for themselves. Suffice it to say that I felt the need to change my nozzles in my 1997 Range Rover DSE with 119,121 miles. I wanted to go all technical and reference everything right down to who I spoke to and when but that's pushing it so I'll only reference the important bits however, I can reference the rest.
My research and efforts have led me to believe that this is something that all of you can do without worry. There is nothing scary in there! (to quote myself and I'll prove it!)
The first thing to do is get the right injector socket. It is 27 mm (thank you wammers ref this forum) It looks like this:
the reason for the hole in the socket is for the sensor wire you will see later.After you have removed the injectors, you will need to place them in a vice and open them. If you look at the injector, there is a section that has two flats and then there is a section that is six sided bolt type. You place the two sided flat section in a vice and use the injector socket to open the injector like so..
Be careful in how you place the injector in the vice. You should center the injector over the threaded bar in the middle of your vice to obtain the best grip and to protect your vice from damage.
Then you use the socket and a breaker bar to open the injector. You may find that one or two of the injectors refuse to open. This is caused by corrosion that is preventing the two parts from turning. This happened to me and I solved it like so....
Remove the injector from the vise and close the vise. Place the injector on the top of the jaws of the vice and tap the injector repeatedly on the flats of the six sided section turning the injector to a new side between taps. Make sure you hit it flat on the flange and don't hit it like you are Thor! Just give it a tap on each of the six sides.
The next thing to do is disassemble the injector. There are a few pieces in here and one that is specific to each injector. The shim is the one that looks like a washer, for all intents and purposes it is, however, it is a specially measured washer and must stay with the injector body that it came from in order for my claims to remain true! Only disassemble one injector at a time to prevent making a mistake that will cost you! The shim is located closest to the injector body(the bit that the fuel pipe from the FIP is attached to or the Fuel Injector Pump for the normal folks and the black leak off pipes or the cloth covered rubber hoses that run between the injectors if you prefer, and the two flats that get put in the vice as piced above) Then you have the compression spring, the needle pin,the nozzle spacer (this is the round oddly shaped one with the two holes in it on one side and a trench turned around the center on the other), the needle ( the short pointy bit), the nozzle (the shinny thick bit with three holes on one end and a very narrow hole on the other. the needle fits inside this), the heat shield ( pay attention to how this is placed in the injector) and the nozzle retainer(this is the big metal bit that forms the outside of the injector and has the 6 sided bolt section). The pic bellow shows them as they belong in order. (be advised! the 4th injector is slightly different!)
You now have taken apart your injector and it is ready for cleaning CONGRATULATIONS! The world didn't end and you are still alive.
hehehee I have no idea what the limit is so ill start a new reply. Have a cup of tea and feel proud you got this far.
Attachments

All this gabble and no one has taken a blind bit of notice of the crack testing mentioned in post #8. It is fundamental to correct injector operation.
lol just being polite and answering concerns raised.Oh your soooo sensitive, Wammers challenges everybody, your not really that special.
myfirstl322
Well-Known Member
- Posts
- 41,354
- Location
- Hoots mon...
No you weren't lol, but nice write up, thx, I'd all but forgotten my maritime experience on fabricated block Norwegian V16s with big f/off injectors.
Crack off testing was so easy then with the nice old school adjusters.
Crack off testing was so easy then with the nice old school adjusters.
ok so this got up my nose a bit I'll admit and this was the quote I meant to reply to.Any diesel engine that has done 100,000 miles or more will have tired injectors. It is of course taken for granted that any amateur mechanic who wishes to clean and reset his own injectors will have a tester and a suitable selection of shims to set crack off pressure.
Similar threads
- Replies
- 16
- Views
- 1K
- Replies
- 24
- Views
- 2K
- Replies
- 42
- Views
- 7K