steve2286w
Well-Known Member
- Posts
- 5,171
- Location
- monkeyangerland
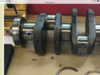
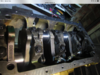
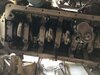
so number 8 on attached must be the other end of shaft so as long as that shaft not moved then ignition timing would ok , I was thinking some kind of backfire if timing out to cause that pressure builds up in exhaust so a timing check might help starting just in case
")