You are using an out of date browser. It may not display this or other websites correctly.
You should upgrade or use an alternative browser.
You should upgrade or use an alternative browser.
My RRC Project
- Thread starter heli_madken
- Start date
This site contains affiliate links for which LandyZone may be compensated if you make a purchase.
heli_madken
Well-Known Member
- Posts
- 104
- Location
- Scotland
Yes its Corroless S2, really nice stuff to work with, sprays nice and flats out well.
heli_madken
Well-Known Member
- Posts
- 104
- Location
- Scotland
Its a specific thinner - https://makercoating.com/thinners-cleaners/21272-corroless-thinner-no-2.html only needs less than 5% with a 1.4mm nozzle spraying at about 90psi.
I noticed that standard thinners doesn't clean the gun very well so dont think it will work when spraying. I use the specific thinner to clean initially then acetone but it is a bugger if you arent meticulous
I noticed that standard thinners doesn't clean the gun very well so dont think it will work when spraying. I use the specific thinner to clean initially then acetone but it is a bugger if you arent meticulous
heli_madken
Well-Known Member
- Posts
- 104
- Location
- Scotland
This is a right mess, worse than the passenger side. I have had to go a long way up the C post to get good metal. The area had been heavily repaired with patches everywhere, underneath them was just rotten through -


RRDave
Member
- Posts
- 62
- Location
- South Derbyshire
Looking fantastic. Thorough quality work for sure Helimadken. I noticed a firm on Facebook recently called Range Rover Restorations. Their repairs looked awful! Considering they charge 15k for a full shell restoration!! Check them out and see what you think!
Looking forward to seeing the end result, in the full knowledge that this car has been restored PROPERLY!!!
Looking forward to seeing the end result, in the full knowledge that this car has been restored PROPERLY!!!
heli_madken
Well-Known Member
- Posts
- 104
- Location
- Scotland
Thanks Dave very much appreciated. I will take a look at Range Rover Restorations, been watching Church House Classics which is entertaining.
Got the wheel arches and boot side floor welded in place -


Door on to check everything lines up -

Next is to do all the patching which is very time consuming
Got the wheel arches and boot side floor welded in place -
Door on to check everything lines up -
Next is to do all the patching which is very time consuming
- Posts
- 6,853
- Location
- South Bucks
Went to Kingley cars a while back, they restore lots of LR stuf, mainly RR classics. One was for sale for silly money, but the guy I spoke to, said it was basically a new vehicle. 
heli_madken
Well-Known Member
- Posts
- 104
- Location
- Scotland
Amazingly they do seem to be selling for those prices.
I guess if you add up all the components, materials and labour involved its a lot of money.
I guess if you add up all the components, materials and labour involved its a lot of money.
heli_madken
Well-Known Member
- Posts
- 104
- Location
- Scotland
Finished the rear quarter so thats all the major body repairs done now. Got some work on the tailgate seam channel to do and in the scuttle area which will be easier to do once the body is off the chassis -


Quick question, is there supposed to be an upstand for the tailgate seal on top of the rear cross member on this 1987 model? -

Be a delay now whilst I do Jury service but next up is body removal
Quick question, is there supposed to be an upstand for the tailgate seal on top of the rear cross member on this 1987 model? -
Be a delay now whilst I do Jury service but next up is body removal
- Posts
- 6,853
- Location
- South Bucks
Fantastic work
heli_madken
Well-Known Member
- Posts
- 104
- Location
- Scotland
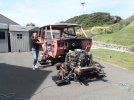
Success!!!

Came off really easy with my wife's help")
I used two engine cranes, the first one is bolted via a piece of angle iron across the rear mounting points for the front seats. I used a leveling cradle to spread the load and more importantly give some control over tilt. I backed this up with a ratchet strap which hooks under the sills but having felt the lack of weight in the body I would say this isn't necessary -

For the back I just used a circular strop around the rear cross member -

This way I could lift the front and back a little at a time.
Just a point for anyone doing this I see a lot of people mentioning 10 fixing points between the chassis and body. There are actually 12 - 2 at the front holding wings in position, 2 at the Bulkhead, 4 in total holding sills in place, 2 at the rear cross member and the 2 I missed which are on the inner face of the chassis directly underneath the rear seat cross member.
So after I found these two fixings the body could be raised off the chassis a few inches and I checked to make sure it was free.
Now the next part of my plan, using wheel skates I removed the front wheels and lowered down using two trolley jacks a little at a time each side -

Then repeated for the rear axle -

Doing this you gain quite a bit of clearance and saves raising the body too far -

It gets quite windy here and it was a little disconcerting watching the body swaying, but wifey held it steady -

In addition wife and I where then able to pull the chassis forward a few inches to clear the engine from the rear of the bulkhead then out to the side, skates worked a treat -

Then lower the body down onto some axle stands, the wooden blocks have a slot in them to locate the blade of the sill -

For safety I will leave the jacks in place but there is no load on them.
Then wheels back on the chassis. Next up is to give everything a good clean, empty fluids and remove the engine and gearbox/transfer box. Still not seeing anything to worry me on the chassis, looks solid -

Really chuffed to get this done I have thought about it for what feels like months
Came off really easy with my wife's help
I used two engine cranes, the first one is bolted via a piece of angle iron across the rear mounting points for the front seats. I used a leveling cradle to spread the load and more importantly give some control over tilt. I backed this up with a ratchet strap which hooks under the sills but having felt the lack of weight in the body I would say this isn't necessary -
For the back I just used a circular strop around the rear cross member -
This way I could lift the front and back a little at a time.
Just a point for anyone doing this I see a lot of people mentioning 10 fixing points between the chassis and body. There are actually 12 - 2 at the front holding wings in position, 2 at the Bulkhead, 4 in total holding sills in place, 2 at the rear cross member and the 2 I missed which are on the inner face of the chassis directly underneath the rear seat cross member.
So after I found these two fixings the body could be raised off the chassis a few inches and I checked to make sure it was free.
Now the next part of my plan, using wheel skates I removed the front wheels and lowered down using two trolley jacks a little at a time each side -
Then repeated for the rear axle -
Doing this you gain quite a bit of clearance and saves raising the body too far -
It gets quite windy here and it was a little disconcerting watching the body swaying, but wifey held it steady -
In addition wife and I where then able to pull the chassis forward a few inches to clear the engine from the rear of the bulkhead then out to the side, skates worked a treat -
Then lower the body down onto some axle stands, the wooden blocks have a slot in them to locate the blade of the sill -
For safety I will leave the jacks in place but there is no load on them.
Then wheels back on the chassis. Next up is to give everything a good clean, empty fluids and remove the engine and gearbox/transfer box. Still not seeing anything to worry me on the chassis, looks solid -
Really chuffed to get this done I have thought about it for what feels like months
Attachments
myfirstl322
Well-Known Member
- Posts
- 41,354
- Location
- Hoots mon...
I knew that was Scotland by the weather.
heli_madken
Well-Known Member
- Posts
- 104
- Location
- Scotland
Yes beautiful Port William on the south coast
heli_madken
Well-Known Member
- Posts
- 104
- Location
- Scotland
Trying to figure out how to deal with this -

Its above the sunroof so I cant brace it from below in any way.
Tried getting it hot and quenching to see if the metal would shrink back, worked a little bit but not enough.
Not worried about how it looks but it will pool the water quite badly which is going to cause problems.
I dare not try to fill it as I am worried with the expansion and contraction of the Birmabright together with the flexing of the roof it will pop the filler off.
Any ideas?
RAW111111
Well-Known Member
- Posts
- 256
- Location
- Nottingham
I’ll be honest. With the quality of the rest of your repairs, I think the most appropriate solution is probably a better used roof skin. They’re only held on with screws and sealant I think.Trying to figure out how to deal with this -
View attachment 290204
Its above the sunroof so I cant brace it from below in any way.
Tried getting it hot and quenching to see if the metal would shrink back, worked a little bit but not enough.
Not worried about how it looks but it will pool the water quite badly which is going to cause problems.
I dare not try to fill it as I am worried with the expansion and contraction of the Birmabright together with the flexing of the roof it will pop the filler off.
Any ideas?
Brilliant work by the way. I was pleased with my body repairs but this is another level.
Rich
heli_madken
Well-Known Member
- Posts
- 104
- Location
- Scotland
Thanks Rich, There are a few used roof's on ebay but all require collection and are a good 700 miles from me.
The design of the glass sunroof is atrocious, Land Rover need a real kicking expecting the roof skin to support so much weight. The metal sunroof which came later had six supporting brackets and is not as heavy. LR should have recalled the glass version and retrofitted the brackets, imagine driving along and a sunroof falls on your head!
Anyway I have a plan
RAW111111
Well-Known Member
- Posts
- 256
- Location
- Nottingham
I thought the metal version were earlier? The glass one shares a lot of components with p38 (I fitted a whole glass from a p38 to mine). Totally agree that it was a strange choice to have it not have stiffening brackets. How far north are you? I’m heading up the west coast from Nottingham next month - maybe a relay could be arranged?Thanks Rich, There are a few used roof's on ebay but all require collection and are a good 700 miles from me.
The design of the glass sunroof is atrocious, Land Rover need a real kicking expecting the roof skin to support so much weight. The metal sunroof which came later had six supporting brackets and is not as heavy. LR should have recalled the glass version and retrofitted the brackets, imagine driving along and a sunroof falls on your head!
Anyway I have a plan
Richard
Bobsticle
De Villes Advocaat
- Posts
- 27,632
- Location
- Manchester
Belting job. I do similar with bondo
Similar threads
- Replies
- 1
- Views
- 558