My RRC Project

This site contains affiliate links for which LandyZone may be compensated if you make a purchase.
Thanks RRDave that is an interesting watch, I have had 3 Disco's never thought they could rust so badly. One thing it did encourage me with was that I splashed out on a new welder, my old SIP Migmate has seen better days and it just happens to be the exact same Parweld machine I have bought in the videos, looks like I have chosen ok, I did a lot of research.

To answer you question from the previous post yes I am taking the front wings off. Everything including the scuttle panel is coming off. Today I took the nearside rear wing off and removed the boot floor.

The inner wing has had some very poor repairs adjoining the boot floor side panel -
upload_2023-3-2_17-12-18.jpeg

As the spare wheel well is pretty rusty and has been patched as well I have ordered a replacement -
upload_2023-3-2_17-13-34.jpeg

The boot floor was only held in place with pop rivets so I removed it. The replacement floor the PO fitted doesnt have the inspection panel to access the petrol tank so I will come up with a way of holding the floor in place to allow removal for future maintenance -
upload_2023-3-2_17-16-51.jpeg

I am not seeing anything scary regards the chassis everything is just surface rust no scaling at all, you can see where I have just wiped it off on the left.

Next up is to remove the petrol tank and the offside wing.

I have ordered two complete sills, inner and outer wheel arches and both boot floor side panels so going to be busy.

Now this is going to generate gasps of horror I am sure. I remember seeing this thread where the body was removed with a singe engine crane - https://www.detailingworld.co.uk/threads/1991-range-rover-classic-csk-2-door.255291/

My mad idea is to use two engine cranes, one connected to a length of angle iron bolted to all four front seat rearmost brackets with a chain fixed in place to the crane so it cant slip. Then a second connected to the rear boot floor cross member, mostly because I think the 4 door shell will be tail heavy.

Then lift mostly at the front to clear the engine and pull the body out to the side. I have had some offers of help so will have steadying support.

What do you think? be nice now :)
 
What do you think? be nice now

Do yourself a favour, scrap it. Haha, only joking. Looks like a good project you have taken on, will be following your build.

Just a thought with lifting the body, I just used 2 bottle Jack's and 2 small acroprops. Lifted it high enough to then slide some 100x100 box section under which rested on some builders stands.


Keep up the good work
Steve
 
From what I can see it looks like quite a nice condition shell, I've got a feeling you've picked good one.
Well I suppose with that lifting technique, it definitely works!
I think I prefer Steve24v method though, just from a stability perspective and not putting too much stress on the body.
To be honest I've never lifted a body so who is to say it wouldn't be a perfectly good idea. I have a 2 tonne engine crane if you need to borrow one, I'm in Derby if you're not too far. But I have a feeling you're in jock land =D
 
Yes the shell although suffering some bad repairs is not as bad as some I have seen. Yep in Jock land absolutely the middle of nowhere!

Wow Steve the height you got the discovery shell too using that method gives me some comfort I can do this without 4 post lifts and fork lifts thank you.

Forgot to mention, you may have seen in an earlier post that due to the registration number the PO had named the car Walter Wange Wover, my wife when she saw the rust came out with a good one today and so for now the car is know as Wusty Wange Wover, made me laugh.

PS whats with the 'garden hose' caps on the fuel tank unused connections
 
I do call mine Rust Rover at times, these names are rather fitting.
Well done for saving her though!
I think the value if these cars has recently dropped a bit and more of them are getting broken for parts. The only way they can be saved is if someone puts a whole lot if time in to fix them. Unless you pay big bucks for a full resto, a lot of resto things I've seen though, I've thought ooh I wouldn't do that, or ooh I don't like how they're repaired that, poor cheap and easy repairs come back to bite you with these cars. I don't think I'd ever trust anyone. Since you'll be doing the work, you'll know exactly what's been done, and you'll probably do a better job than most garages because you're invested in the car, assuming for the long term =D
 
Cheers Dave yes I will be keeping the car for a long time. I hope I can do justice on this build though I have'nt done any serious body repairs or welding on cars since the mid 1990's, more recently been restoring vintage 1970's Honda motorcycles so hopefully I will get back into the swing of it.

I got the front wings, bonnet, windscreen and scuttle removed today -
upload_2023-3-3_17-52-51.jpeg

Inner wings are not bad at all, a couple of repairs but ok.

Scuttle area is pretty good, it will need a couple of repairs but not bad at all -
upload_2023-3-3_17-54-35.jpeg

Headlamp areas are pretty good I know these generally rot so I am pleased with this -
upload_2023-3-3_17-56-6.jpeg

Is this honestly where the outfall from the sunroof is meant to go? no wonder the inner wings rot. This seems to be a trademark of the British motor industry in the 70's and 80's built in short lifespan.
upload_2023-3-3_18-0-5.jpeg

I will have to come up with a solution.

Waiting on a Jerry can delivery so I can drain the petrol tank so next up is to start stripping out the engine bay.
 
Is this honestly where the outfall from the sunroof is meant to go?

Good innit :rolleyes: :mad: It's certainly where they are :rolleyes: - but clearly a better solution is quite easy - be grateful it's not a D1 - which although basically the same vehicle, has the sunroof drains about 2/3rds down the A-post - with the results we might expect :mad::mad::mad: .. I have extended mine to the outside, via the inner sill, and some 15mm copper pipe, which conveniently fits over the plastic LR used.. MOT man laughs about it every year.. tap tapping away with the MOT hammer... AKA, the "Judge" :D:D ;)
 
Those front inner wings look quite similar to mine, you might be surprised how rusty they are once start removing material. Is the mount that connects the inner wing to the bulkhead okay? If that is nearly holed through you might be worth thinking about doing the inner wings you know, and reattach your slam panel/light pods.
Also really check out your body mounts that are on that same connecting piece between bulkhead and inner wings at the back of the front wheels, I thought mine was good, quite hard to see but it has a nice hole in it the other side!
It's one of them things where by the time you've done various patches etc, you might have well done the whole panels. You can buy your wheel well side panels for example, re do the footwells and put new mounts in a lot easier with the wings off. I only say this because this is literally what I've just done and I feel I've wasted time doing my repairs! Unfortunately due to space and not having an indoor working area =(

https://www.landyzone.co.uk/land-rover/range-rover-classic-welding.383402/
 
Yes Disco1 I have to find a better solution, I am in to 3D printing and made myself quite a large printer so I am thinking of designing a channel system that outfalls out into the wheel well, I will come up with something.

Dave I will no doubt find more nasties as I strip paint, I am prepared to replace the front inner arches if needed. The sills and other panels arrived from Frogatts yesterday. The sill section extends across the floor to the joint partway to the transmission tunnel so a good portion of the floor is replaced as well so I am pleased with that. Not actually seen anyone doing this job online so it is going to be different to most repairs I have seen. In some respects it might be easier as I will be able to cut along the joint thats already there and front and back edges and remove the whole sill, only complication is the seat mounts. Well thats the theory anyway I will just have to be careful to support the A and B posts whilst I work.

Far too cold to work outside here (just me getting old!) so I thought I would have a go at a repair rather than constantly taking stuff apart.

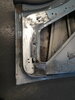
I dont have a replacement N/S rear door, the skin is fine but the rear bottom of the frame is toast -
upload_2023-3-8_17-15-24.jpeg

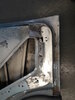
The curved section that looks fine is actually a big cob of filler. Someone made another brave attempt at a repair but ultimately you cant fill fresh air. Havent been able to find any repair sections you can buy and the thought of trying to shape a piece of metal to that compound shape is a non-starter. But what I have got is a spare front door so I cut out a section which seemed to be a good match for the shape -
upload_2023-3-8_17-21-4.jpeg

Shame to cut up a good door but needs must and it looked like it would work.

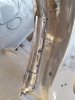
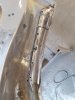
So out came the angle grinder to cut the new panel to size together with some patches required, peeled back the door skin so I could carefully cut out the rotten flange. Followed up with my new welder and hey presto -
upload_2023-3-8_17-24-3.jpeg

Jeez yes I know welds are bloody awful I have no excuse other than to say I will get better!

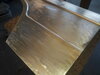
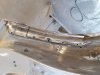
Anyway they are good and strong and with a bit of filler, some rust converter and primer on the bare metal followed by seem sealer and dressing back the door skin it looks presentable -
upload_2023-3-8_17-27-53.jpeg

The primer is only temporary to stop any rust forming. Ultimately I will strip the whole door back to bare metal, treat any areas of rust, use rust resistant primer on the frame and Alocrom 1200 on the door skin. Then I will fill the lower seem inside the door completely with seem sealer then coat with Waxoyl or Dinitrol etc to prevent any further rust.

Weather looks pretty bad for the next couple of weeks here so I may move on to the front door that needs a similar repair.
 

Attachments

  • upload_2023-3-8_17-19-1.jpeg
    upload_2023-3-8_17-19-1.jpeg
    226.7 KB · Views: 74
  • upload_2023-3-8_17-19-21.jpeg
    upload_2023-3-8_17-19-21.jpeg
    226.7 KB · Views: 66
  • upload_2023-3-8_17-19-56.jpeg
    upload_2023-3-8_17-19-56.jpeg
    226.7 KB · Views: 67
  • upload_2023-3-8_17-20-28.jpeg
    upload_2023-3-8_17-20-28.jpeg
    226.2 KB · Views: 70
Looks good! I think you'll get along with this project just fine =D.
I wouldn't worry about that drain tube you know, it should sit on top of the wing panel not where it is on your picture, It doesn't look to be a source of rust on mine.
 
Thanks for the encouragement Dave.

Weather still bad so carrying on with the doors. Next up is the N/S front, in a similar condition to the previous door -
upload_2023-3-13_10-57-20.jpeg

More Formula 1 style repairs with gaffer tape -
upload_2023-3-13_10-58-19.jpeg

I have some spare doors from a later model in very good condition. The skins and hinge mounts are different but I figured the bottom of the frame is the same so I cut out the lower section, removed all the rotten frame and fitted the piece as best I could -
upload_2023-3-13_11-0-5.jpeg

Welded it in place, getting used to the new welder mostly due to buying a decent mask, I can at least now see what I am doing! -
upload_2023-3-13_11-1-45.jpeg

Same process as before, seam sealer, dress back the seam add some filler and temporary primer -
upload_2023-3-13_11-2-59.jpeg

I noticed that the new skins have drainage holes rather than slots which is an improvement as the slots seem to rust out terribly.

The front jamb was rotten in three places most notably the wiring loom grommet area which had cut through some of the wiring. So I cut out all the rot being careful to leave the reinforcing plates in place and welded in some new metal -
upload_2023-3-13_11-4-37.jpeg

Very pleased with how that has turned out so next up is to take a look at the O/S rear door and decide what to do.
 
Those doors should last a few years now. I'm convinced no RRClassic is original. It's a car that needs constantly welding and rejuvenating =D.
Do you have to wait for the weather for dismantling the car? I just hope you have some indoor space to do your restoration? =) for your sake ='D
 
Those doors should last a few years now. I'm convinced no RRClassic is original. It's a car that needs constantly welding and rejuvenating =D.
Do you have to wait for the weather for dismantling the car? I just hope you have some indoor space to do your restoration? =) for your sake ='D

Yes I can see lots of evidence of repairs in the past, it became evident to me today that the car has had probably a full respray at some point. It is a survivor thats for sure not had too much love in the past years but its made it this far despite all the very poor 1980's practice of bare metal unpainted parts.

I have a good sized garage but it isnt tall enough to lift the body off so I will have to do this part outside. My plan is to get the chassis into the garage to work on leaving the body outside. I can then alternate on good days working on the body and then the chassis. Its just getting to this point that will slow me down but spring is on its way so I am hopeful. In the meantime I can work on doors and wings etc.
 
Last edited:
So the O/S rear door has turned out to be not too bad in terms of the frame -
upload_2023-3-14_17-30-9.jpeg

Just a small patch to weld in on the right hand side, good sand down and treat any rust -
upload_2023-3-14_17-31-15.jpeg

The skin looked a little worse for wear -
upload_2023-3-14_17-32-5.jpeg

At some point the car has been resprayed and the paint has lost adhesion with the door so it had lifted off and allowed corrosion. Stripping off the paint it doesnt look too bad though -
upload_2023-3-14_17-34-6.jpeg

It hasnt gone porous and feels sound so I have given the skin a clean and corrosion removal with Deoxidine followed by a treatment using Alocrom 1200 which turns the metal a golden colour. This should prevent any further corrosion -
upload_2023-3-14_17-40-2.jpeg

This door has been completely stripped now so I will put it to one side and move on to the next door, hopefully get them all in this condition by the weekend
 

Attachments

  • upload_2023-3-14_17-40-52.jpeg
    upload_2023-3-14_17-40-52.jpeg
    182.6 KB · Views: 71
Last edited:
I think that's pretty much the same as mine, had a relatively easy life but still fallen foul of the typical rust areas.
Phew I was worried you might be doing it outside! If I were you I'd get the chassis done fully first then you can leave that outside and keep the body dry, I'm doing just a few repairs on mine and outside some bits are rusting after just a few days if I leave them bare metal.
Look like you're getting on with it though! Good luck =)
 
It is amazing how quickly things rust yes, I have bought a decent cover to use but it is still going to be a problem. To make things worse I live right next to the sea, the salt air here is vicious everything rusts amazingly quickly.

Got the second door stripped today but wow-
upload_2023-3-15_18-18-47.jpeg

There was a ton of filler on the skin over 6mm thick in places. No way do I want to put that much filler back on, I am going to have to find a way of at least straightening the door to a more acceptable level or bite the bullet and buy a new skin.

Wonder how it got to be such a state, there where some dings in yesterdays door as well, off roading perhaps?
 
Apologies for the lack of updates, mostly boring door stuff done and at last with some good weather able to move on to some body repairs.

I finished off the welding of the doors, some nasty corrosion on one of the rear doors but I was able to stitch in some panels from the opposite side spare door I have, just found shapes that matched -
upload_2023-4-20_19-26-4.jpeg

I was able to straighten out the skins reasonably well to use the minimum of filler then spent a lot of time filling and flatting to get the doors where I want them. After cleaning any exposed Birmabright with Deoxidine I sprayed on some 2K etch primer followed by 2K primer -
upload_2023-4-20_19-27-37.jpeg

As far as the frames and inner surfaces are concerned I first gave them a coat of Corroless S using a small touch up gun and even my air brush to get paint over every part spraying in through the door openings and down through the top window slot -
upload_2023-4-20_19-30-31.jpeg

Followed by a coat of 2K primer then 2K gloss black -
upload_2023-4-20_19-31-44.jpeg

My rational for the gloss black is hopefully any water will run off the surfaces rather than cling to the original matt finish, I am probably wrong but what the heck, I will all get treated with Dinitrol as well.
 

Attachments

  • upload_2023-4-20_19-24-43.jpeg
    upload_2023-4-20_19-24-43.jpeg
    225.6 KB · Views: 56
  • upload_2023-4-20_19-25-16.jpeg
    upload_2023-4-20_19-25-16.jpeg
    225.6 KB · Views: 65
  • upload_2023-4-20_19-25-42.jpeg
    upload_2023-4-20_19-25-42.jpeg
    225.6 KB · Views: 84
  • upload_2023-4-20_19-25-53.jpeg
    upload_2023-4-20_19-25-53.jpeg
    223.3 KB · Views: 53
Next horror story I discovered was the sunroof coming away from the roof panel -
upload_2023-4-20_19-36-28.jpeg

In an earlier thread I mentioned some horrible metal bars that had been bonded with goop and pop rivets, well when I took them off, which wasn't very difficult, I noticed the sunroof was actually falling away and only held on at the back. The bits of metal where a poor attempt at holding the sunroof in place. At least now I know for certain why the sunroof was leaking as no sealer or bonding agent had been used.

So my solution is a bit dramatic -
upload_2023-4-20_19-39-49.jpeg

EEK! I didnt want to rely just on bonding the roof in place as it was very difficult to thoroughly clean the surfaces so I used some stainless nuts and bolts. Dont worry I have a plan to hide these so all will be well.

Next up the front end. I spent a lot of time looking at the inner wing repairs that had been done and thought in the end stuff it they have to go -
upload_2023-4-20_19-42-36.jpeg

Easy to remove they where only held on with four pop rivets. In any case this makes getting the body off and footwell repairs much easier.
 
Back
Top